Using Time Machine with a Time Capsule
Q1. How do I set up Time Machine to back up to my Time Capsule?
Using Time Machine with a Time Capsule
Q1. How do I set up Time Machine to back up to my Time Capsule?
First, set up your Time Capsule via Airport Utility, using the instructions that came with it. If you can’t find them, try the Time Capsule Setup Guide.
Keep the name you assign to your Time Capsule, your Computer, and your network short (under 25 characters), and avoid embedded spaces, special characters, and punctuation (see item #P1 for details). Make sure your Mac can connect via an Ethernet cable, if at all possible, as well as wirelessly.
Setting up Time Machine to back up to your Time Capsule:
a.If the Time Machine icon isn't already in your Dock, drag it there from your Applications folder. See below for more about its use.
b.Control-click (right-click) it and select Open Time Machine Preferences, click the Show Time Machine status in the menu bar box, then click Select Disk (on Leopard, this button will be either Choose Backup Disk or Change Disk).
c.The window is a bit different on Lion and later vs. earlier versions of OSX (If you're not sure what version of OSX you're running, click here):
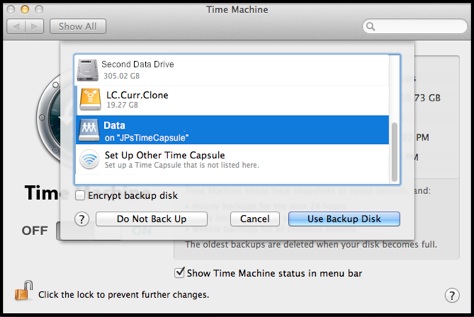
A list of possible destinations will appear. If you've already set up a Time Capsule, it should appear in the list (usually named Data). If not, select the last item to do that.
Select it and click Use Backup Disk.
Effective with Mountain Lion 10.8.x, you can specify two or more destinations, and have Time Machine back up to them alternately. See Time Machine FAQ #34 for details.
Effective with Mountain Lion, you can encrypt backups made over a network (on Lion you can only encrypt backups on an internal or directly-connected external HD). See Time Machine FAQ #31 for details and considerations.
SNOW LEOPARD and LEOPARD:
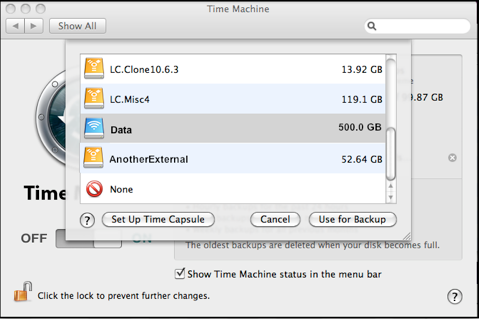
If you've already set up a Time Capsule, it should appear in the list (usually named Data). If not, click Set Up Time Capsule.
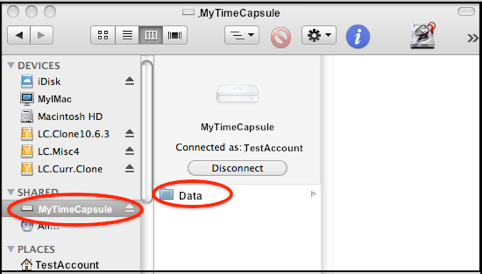
e.A prompt for your name and password will appear. In some cases there won't be a Name field, but if there is, enter your short user name. Also enter the password you set up for the Time Capsule via Airport Utility, then click the Connect button.
f.A 120-second countdown to the start of your first backup will appear in the Next Backup area of the TM Preferences panel.
Time Machine will put your backups in a case-sensitive sparse bundle disk image. (You can use the procedure in item #A8 to change that if desired, by cancelling the first backup as soon as the sparse bundle is created. See the discussion in the pink box of Time Machine FAQ #5).
Note that this first backup will copy the entire contents of your system, except for a few things that are skipped automatically, such as system work files, most caches, your logs, trash, etc., and anything else you may have excluded (see Time Machine FAQ #10 and #11). So it will be rather lengthy, depending on how much data is on your system, whether you're connected via Ethernet or WIFI, and if WIFI, how good the signal is.
You can continue to use your Mac while TM is backing-up, and you can even cancel a backup if necessary, but to make this first full backup as fast as possible, try not to overload your Mac or cancel the backup.
The Time Machine Icons in your Menubar and/or Dock
In the steps above, you dragged the Time Machine Application's icon into your Dock, and clicked the Show Time Machine status in the menu bar box.
For detailed info about them, see Time Machine FAQ #24.
By default, Time Machine will back up your internal HD. If you have multiple internal HDs, and/or multiple partitions, they'll all be backed-up. If you don't want some of those backed-up, you can exclude them, per question #10.
If you want to back up one or more external HDs/partitions, you'll have to remove them from the exclusion list, per question #10. Also see question #32 for info on backing-up multiple disks/partitions.
If you're backing-up more than one Mac, see question #33.
Security of the shared disk(s):
is not an issue for normal use of Time Machine. Users don't need any special permission on the Time Capsule or its disk(s) to browse or restore from their backups. That's all handled by Time Machine. Rarely, however, an administrator may need to access the drive(s) directly.
When setting-up the Time Capsule, you must select a method to Secure Shared Disks.
On the Disks window of Airport Utility (the File Sharing tab on Airport 5), you have three options for how to Secure Shared Disks. This controls how users gain direct access to the disk(s) -- both the internal HD and any attached USB drives. The first two are preferred for use with Time Machine;
•With device password: this is probably the simplest and easiest, but it allows anyone with the password set up on the Base Station window of Airport Utility 6, or the Time Capsule or Airport Extreme tab of the Airport window on version 5, to change settings on the Time Capsule via Airport Utility, and use the disk(s).
•With a disk password: a separate password you set up on the Disks window. Users with only this password can use the disk(s), but cannot change any settings on the Time Capsule.
•With Accounts: this allows setting up separate accounts, each with its own password and folder. You can set up accounts and passwords that correspond to the ones on your Mac (but passwords must be changed separately), and/or you can create different ones. Each account may have permission to Read, or Read and Write, or Not allowed. This is not recommended for use with Time Machine backups, as no single user can see everything on the disk(s). That's especially important if there's a space problem -- you'd have to connect with each account in turn to see the whole picture. The backups for each Mac are protected by the usual permissions anyway, so in most cases this option is overkill. There are also a few minor differences in the content of some of the windows when selecting the backup destination.
If you have one or more USB drives connected to the Time Capsule, this setting applies to them as well as the Time Capsule's internal HD -- you cannot have separate passwords for different physical disks or partitions on them.
If you're backing up more than one Mac to your Time Capsule, see Time Machine FAQ #33, especially the pink box.
Your first Time Machine backup (of your entire system) will be much faster if you connect via Ethernet. Subsequent backups can be done more conveniently via WIFI.
You can easily back up more than one Mac to a Time Capsule's internal HD (that's what it was designed for), but while it's possible to use it for both Time Machine backups and other data, that's not recommended. The best alternative is to connect a USB drive to the Time Capsule, and use it for the other data. There's a downside to that, too: Time Machine cannot back up your other data. See item #Q6 for details.
If the Time Capsule's internal HD isn't large enough to back up all your Macs, you can back one or more to a USB drive connected to it. See Item #Q2 for details.