Time Machine - Frequently Asked Questions
5. I just bought an external drive.
How do I get it to work with Time Machine?
Time Machine - Frequently Asked Questions
5. I just bought an external drive.
How do I get it to work with Time Machine?
You can just plug it in and let Time Machine set it up for you (see question #21), but we recommend doing it yourself so you know it’s the best way for your circumstances.
Most new disks come with various things on them that you don't need, and may even conflict with Time Machine. So even if the drive says "Mac Ready" or the like, it's best to erase and format it with the Disk Utility app (in your Applications/Utilities folder).
First, decide if you're going to put other data, or backups for multiple Macs, on the drive. If so, see question #3 or question #4 before proceeding. If you're making two or more partitions, it's usually a good idea to put your Time Machine partition first, so it’s more likely that you can can adjust it later.
(See Using Time Machine with a Time Capsule if you're backing-up to a Time Capsule.)
Case-sensitivity on Time Machine backups. A case-sensitive format means upper-case letters in file names are seen as different from lower-case letters. That's the default if Time Machine formats it for you, but non-case-sensitive (also known as case-ignorant) is the default for all other volumes. Do not use case-sensitive unless you're sure you need it.
Check the Format of all the disk/partitions to be backed-up, via Disk Utility, in your Applications/Utilities folder. Click each partition in the sidebar (indented under the main line of the drive), and you'll see the Format towards the lower left. Most are Mac OX Extended (Journaled); see if any are Mac OS Extended (Case-sensitive, Journaled). (Effective with Lion 10.7.x, they may also be encrypted.)
If ANY disk being backed-up is case-sensitive, then your backups must be case-sensitive also. There's no choice: that’s the only way Time Machine can back them up. So if you have, or think you might add, a case-sensitive disk, make your backup disk Mac OS Extended (Case-sensitive, Journaled) now.
But if NO disk/partition being backed-up is case-sensitive, the backup volume can be case-sensitive, but we recommend it be case-ignorant: Mac OX Extended (Journaled). Most of the time there's no difference, but if the backups are case-sensitive, there may be problems when restoring previous versions of files via the Time Machine browser (the "Star Wars" display). See Troubleshooting item #E7 for a detailed explanation.
Formatting a Disk for use with Time Machine:
a.When Disk Utility starts, select the new drive in the sidebar (the line with the size and make/ID). (If the drive doesn’t appear at all, see If a disk doesn't appear in the sidebar.)
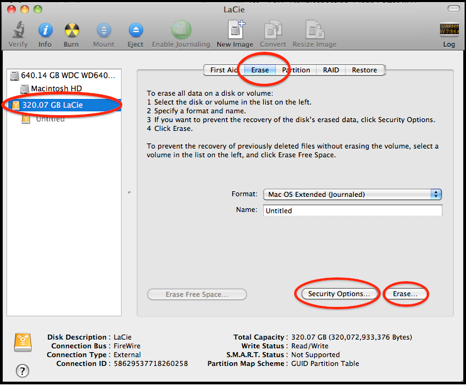
b.Select the Erase tab, then confirm. This will erase the entire disk.
If you want, you can select Security Options, then move the slider on that window to the first position from the left (or select Zero-Out Data on Snow Leopard and earlier) to physically erase the entire disk by writing over everything. This will take quite a while, and usually isn’t necessary, especially on a new disk.
This may not work if the drive is already set up with a non-Apple Partition Map Scheme, such as is used on Windows. If that happens, just continue with item c).

c.Select the Partition tab, then set the number of partitions from the pop-up menu below Volume Scheme (use 1 partition unless you need more).
Sometimes you can't change a MBR drive to GUID or APM and change the number of partitions at the same time; if that happens, make a single partition with GUID or APM first, then re-format with the desired number.
d.For each partition, click on it (it will then be outlined in blue), then supply a name (this is the name that will appear on your desktop and/or Finder sidebar) and size (either by typing in the box or dragging the dividers in the diagram).
e.Then set the Format. Usually, that will be the default: Mac OS Extended (Journaled). For your Time Machine partition, there are two considerations:
•If any disks/partitions being backed-up are case-sensitive, the backup volume must be, too, so select Mac OS Extended (Case-sensitive, journaled). If in doubt, see the pink box below.
•Effective with Lion 10.7.x, you can encrypt the backups, per Question #31.
Set any other partitions to the desired format. If in doubt about them, see Disk Formats.
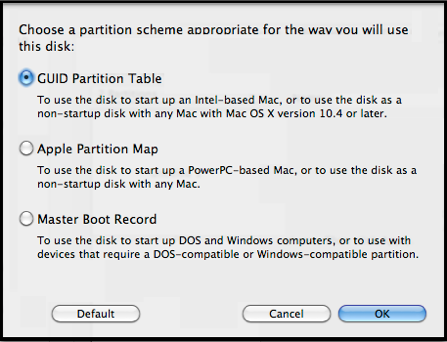
f.Click Options, then choose either GUID or Apple Partition Map. For Time Machine, either will work, but GUID is usually preferred for other purposes on an Intel Mac; Apple Partition Map for a PPC Mac.
g.When you've got everything the way you want it, click Apply and wait a few moments for the process to complete.
If you get a message saying "Could not unmount disk," some other process is using (or trying to use) the disk:
•If you're running any anti-virus software, exclude the disk from it or turn it off.
•Exclude it from Spotlight indexing, via System Preferences > Spotlight > Privacy.
•If you installed any software that came with the disk, uninstall it and Restart your Mac.
If all else fails, start your Mac up from a different source: the Recovery HD on Lion 10.7.x or later (see Using the Recovery HD), or your OSX Install disc (Software Reinstall drive on a MacBookAir), or a different disk that has OSX installed on it. Be sure you use a compatible version of OSX -- if you’re running Lion, use a Lion disc; if you’re running Snow Leopard, use a Snow Leopard disc, etc. (If you're not sure what version of OSX you're running, click here.)
To start up from your OSX Install disc, insert it in the SuperDrive (or insert the Software Reinstall drive on a MacBook Air). Then:
•Either wait for the Mac OS X Install DVD window and double-click the Install icon; or power down, then start up while holding down the "C" key. Either way, that takes a few minutes.
•Select your language when prompted.
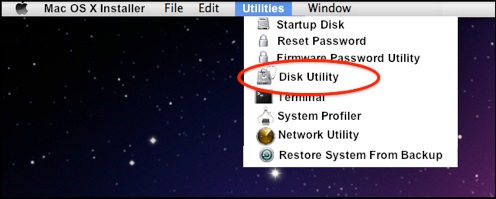
•On the next screen, select Utilities in the Menubar, then Disk Utility.
•Then format the disk as above.