Time Machine - Frequently Asked Questions
32. Backing-up Multiple Drives / Partitions (on the same Mac)
Time Machine - Frequently Asked Questions
32. Backing-up Multiple Drives / Partitions (on the same Mac)
Most of us have only a single partition on a single internal drive, and that's all we back up.
But for those who have more complex setups, Time Machine can easily back up multiple internal and/or directly-connected external drives and partitions simultaneously (but Time Machine cannot back up data that's on a network).
Note that the term "volume" refers to a single partition, whether there's one or more on any particular drive.
The only restriction is, they must be formatted for a Mac -- any variation of Mac OS Extended. See #1 and/or #2 in Using Disk Utility for formatting instructions.
This page assumes you're already generally familiar with Time Machine. If you aren't, please refer to the other FAQ pages for details.
Backing-up multiple volumes with Time Machine
•Internal drives: By default, Time Machine will back up all internal drives (SSDs or HDs) and partitions. If you have a volume that you don't want to be backed-up, you must specifically exclude it, per question #10.
•External drives: By default, it will exclude all externals. To have one backed-up, you must remove it from the exclusion list, per question #10.
Note that if you ever erase or restore a volume, it may be treated as a different one (even if you give it the same name and put all the same data back on it), so you'll have to exclude or remove it again. It may also get backed-up in full; you might be able to avoid that -- see Troubleshooting item #B6.
If a drive isn't available (such as an external that isn't always connected), Time Machine will just skip it, and continue backing-up all others normally. The next time it's available, Time Machine will back up whatever's new or changed since the last backup of that volume. If it's been disconnected for a long time, the next backup may be longer than usual.
The backups of each volume are kept separately within the backups for your Mac. That means you may need to do some things slightly differently to view or restore from the backups of the various volumes. See below for details.
Backing-up multiple OSX volumes presents some different issues.
If you have a "dual boot" setup with, for example, Lion installed on one volume and Snow Leopard on another, you have four options:
1.It's usually best, simplest, and safest to back them up separately, to different volumes.
The two volumes can be different drives, or different partitions on the same drive.
On the Lion volume, exclude the Snow Leopard volume from backups, and on the Snow Leopard volume, exclude the Lion volume. See question #10 for exclusion instructions. The downside is, if you make changes to the Lion volume from the Snow Leopard volume, those changes won't be backed-up until you boot into Lion and run a backup.
See question #5 for partitioning instructions of a new drive or one you don't mind erasing, or question #6 to add a partition to an existing drive.
If you're backing-up to a Time Capsule (which can't be partitioned), consider connecting a USB drive to it (or directly to your Mac), and backing-up one OSX volume to it. See #Q2 in Using Time Machine with a Time Capsule for details.
2.Back up both from one OSX volume only. Turn Time Machine OFF on the other volume. The downside is, if you make a lot of changes while running on the one where Time Machine is off, they aren't backed-up until you switch to the other volume and a backup runs. And, if that's a laptop running Lion or later, it won't make any Local Snapshots.
3.Back up both, from both OSX volumes, to the same volume. That can be a bit tricky, especially if you're excluding anything, as you must have the exclusions identical on both (not as easy as it may sound). If you don't, an item will be backed-up when Time Machine runs on one volume, excluded on the second one, then backed-up again, in full, when you switch back to the first.
Caution: there are reports that in some cases, the first backup after switching may be a full backup of one or both OSX volumes.
4.Back up both, from both OSX volumes, to different volumes. That can be done, but to get "dual backups" it's usually best to make one set with Time Machine, the other with a different app. See question #27 for an explanation and some suggestions.
Note that Spotlight on Lion and later does not share indexes made by Snow Leopard, or vice-versa. The indexes are stored and maintained separately, so a volume that mounts on both will be indexed twice. If you don't want a volume indexed (other than a Time Machine volume), you can exclude it via System Preferences > Spotlight > Privacy. You may want to do that on one or both OSX volumes.
Restoring selected items
Use the normal "Star Wars" display as above to locate the desired items. If you select any item(s) and click the Restore button, the items will be restored to their original location, if available.
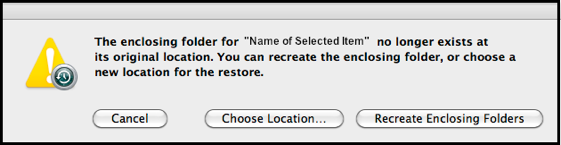
If you’re restoring from a disk or partition that’s no longer connected to your Mac, DO NOT choose Recreate Enclosing Folders, since Time Machine will restore it to the normally-hidden /Volumes folder at the top level of your internal hard drive.
To restore to a different volume, control-click (right-click) to get a menu where you can select the Restore <items> to option. See question #16.
Restoring entire volumes
•OSX volumes must be restored via the Restore from Time Machine Backup option, per question #14. Note that if there are multiple OSX volumes on a single set of backups, there will be a "pop-up" menu on the Select a Backup window, as explained in section (g) there.
•Data-only volumes cannot be restored that way. Use Time Machine's "Star Wars" display, per question #15, and select all the top-level folders. If you're restoring to a different volume than the one the backups were made from, do not click the Restore button, as that will put them in the hidden /Volumes folder on your internal HD. Instead, control-click (right-click) the selected items to get a menu where you can select the Restore <items> to option. See question #16.
Using Setup Assistant or Migration Assistant
Those facilities only transfer from OSX volumes. They won't even recognize volumes that don't have OSX installed. If you're setting-up a new Mac from backups of multiple volumes, transfer from the OSX volume(s) via Setup Assistant (preferred) or Migration Assistant, then restore the data-only volume separately, via the "Star Wars" display as in the tan box above.
See How do I set up a new Mac from an old one, its backups, or a PC? for details on using Setup Assistant and Migration Assistant.
If you log on to the new Mac, and want to restore a data-only volume from the old one, you'll need the Browse .. option to see the old backups, per question #17.
If you have home folders on a data-only drive, you may also want to review Transferring Home Folders not on a Startup volume.
Viewing Backups
When you Enter Time Machine from, say, a Finder window, it automatically shows the backups for the volume (disk or partition) shown in the Finder window. To see the backups of a different volume, do one of the following:
•Select that volume before entering Time Machine.
•Once in Time Machine, the Finder sidebar will show all volumes currently connected to your Mac on the Today (Now) page, in black. Select your Computer in the Finder sidebar (or press Shift+Cmd+C). On any backup, the sidebar will show all the disks/partitions that are currently connected, and a folder representing them in the center. If the one you want is there, just select it in the sidebar (or the center):
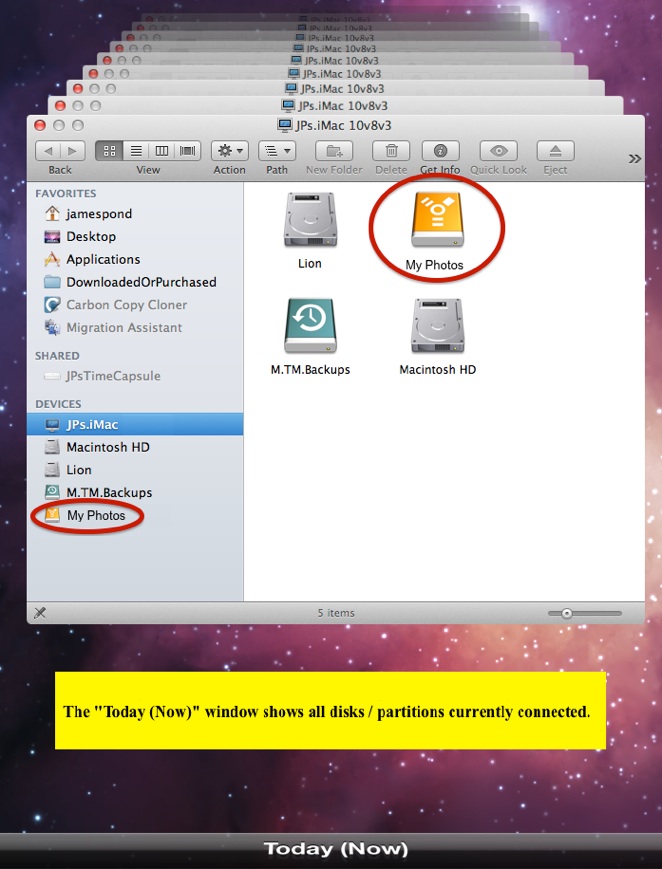
•If it isn't shown in the sidebar (ie, isn't currently connected), select the folder representing it in the center part of the window.
•If it's been erased or replaced since being backed-up, there are a couple of additional steps. See Troubleshooting item #E3 for details and samples.