Time Machine - Frequently Asked Questions
11. What should I exclude, and what should I not exclude?
Time Machine - Frequently Asked Questions
11. What should I exclude, and what should I not exclude?
Time Machine automatically excludes some things, mostly temporary files and things that are rebuilt at startup or after a full restore. This includes system work files, most caches and logs, trash, etc., so you don't need to worry about those (see the tan box below for the gory details).
You may want to exclude some special files/folders that cause extra-large backups (see question #9.)
Some folks exclude their Desktop and/or Downloads or other folders, as they use these for "working storage" and put the finished product in a permanent location that does get backed-up. See question #10 for instructions.
If you do a lot of step-by-step processing of large files, such as video processing, you might want to do it on a "scratch" disk, partition, or folder that’s excluded, so the intermediate steps won't all be backed-up. When done, be sure to put the finished product somewhere it will be backed-up.
What’s excluded from backups:
• Anything listed in the exclusion box in Time Machine Preferences > Options. That's mostly things specifically excluded by the user (per Question 10); but also your backup drive if it's an internal or directly-connected external HD; and any drives/partitions that aren't formatted for a Mac (since Time Machine can't back them up). Those are shown in gray and can't be removed.
•Changes to your iPhoto and/or Aperture libraries may not be backed-up if those apps are open.
•If you use Xcode, the "build" folders are excluded.
•If you use the original File Vault (not File Vault 2 on Lion and later), your encrypted home folder is only backed-up when you log out. See question #25 for details.
•Mounted disk images (they're backed up anytime they're not mounted).
•Most other things omitted are listed in a system file. Some are omitted entirely; for others, the actual folder is backed-up, but the contents are omitted, to preserve the folder structure. Mostly, these will be rebuilt after a restore. The main ones are:
•System work files, including the sleepimage file on a laptop (same size as the RAM).
•Spotlight index, trash, the Guest user account.
•The Volumes, Network, tmp, dev, home, and net top-level folders (on any drive).
•/Library/Caches, System/Library/Caches and /System/Library/Extensions/Caches.
•In the /private folder: /var/log (most logs), /var/vm (system work files), /var/tmp.
•In the Library folder of each user home folder: Caches, Logs, Mail/Envelope Index, Mail/AvailableFeeds, Safari/Icons.db, and Safari/WebpageIcons.db.
•On Lion and later, the hidden /.MobileBackups folder (Time Machine Local Snapshots)
•On Lion only, the /.DocumentRevisions-V100 folder (the Versions database).
•For full details, see this file (do not be tempted to alter it):
/System/Library/CoreServices/backupd.bundle/Contents/Resources/StdExclusions.plist
These exclusions do not appear on the Time Machine Preferences window.
•Some optional Apple and 3rd-party apps either exclude certain of their files automatically, such as caches that change often and shouldn't be backed-up every hour; or allow the user to do so.
Things excluded this way do not appear on the Time Machine Preferences window.
Some of these exclusions, called Sticky Exclusions, "follow the file" -- that is, if the file or folder is moved to a different location, it will still be excluded. Those can be seen via the procedure in the yellow box below.
Others, called Fixed Path Exclusions, don't follow the file, and cannot be seen without a special app called a Plist Editor. There's a rather technical explanation in the gray box of How Time Machine Works its Magic.
To see some items that are excluded this way, open the Terminal app (in your Applications/Utilities folder).
Be extremely careful when using Terminal. It is a direct command-line interface into UNIX, the underpinning of OSX. Unlike the Finder, there are few protections against making a mistake, which can cause untold damage.
In Terminal, the prompt looks like this: <Computer Name>:~ <your name>$
(where <your name> is your short user name). It's followed by a non-blinking block cursor.
Copy the following after the prompt exactly, then press Return.
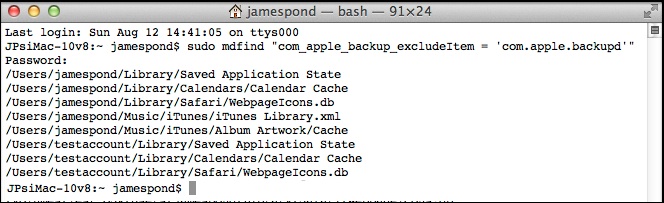
sudo mdfind "com_apple_backup_excludeItem = 'com.apple.backupd'"
You'll be prompted to enter your Admin password (it won't be displayed) and press Return. That will list the items excluded this way.
Here's a sample Terminal window after running this command:
System and/or Applications folders:
Some folks exclude their System and/or Applications folders, to save space on their Time Machine drive. Usually this is unwise, as it won't save very much disk space (OSX and Apple apps total about 5 GB; iLife apps roughly 2 GB; plus 3rd-party apps), but will make recovery from a disk failure very tedious, time-consuming, and error-prone, since you can't do a full system restore if you don't back up your system. Here’s what you’d be looking at, to save 10-20 GB for most users:
•Install OSX from your Recovery HD, Install disc, or USB stick.
•Set up your User Account(s).
•Go through the set-up procedure for your Internet connection(s), power settings, and other system-wide settings and preferences.
•Download and install the "combo" update, to get back to your current version of OSX, and run Repair Permissions via Disk Utility.
•If you've upgraded either OSX or iLife since purchasing your Mac, find the discs with iLife and restore those apps.
•Find all the discs for 3rd-party apps and install them. Re-enter any purchase keys.
•Find the websites for all downloaded 3rd-party apps, download and install them. Re-enter any purchase keys.
•Restore or copy whatever data you saved (hope the new accounts have permission to it).
•Re-enter all your Users' preferences and settings, including email accounts: account info, passwords, server names, etc. (if you didn’t save them).
•Wonder what you missed, and find out the hard way . . . for months . . . or longer.
Some common things that aren’t backed-up, and how to see their sizes:
• System work files (swapfiles and laptop sleepimage file).
In a Finder window’s menubar, select Go > Go to Folder and type /var in the prompt. Control-click (right-click) on the vm folder, select Get Info to see the size.
(If it's more than about twice the size of your installed RAM, there may be a problem. Check or post in the appropriate Apple Discussions forum for help.)
• Logs
In a Finder window’s menubar, select Go > Go to Folder and type /var in the prompt. Control-click (right-click) k on the log folder, select Get Info to see the size.
(If it's over about 2 GB, there may be a problem. See the green box in OSX Log Files.)
• Caches
Via the Finder, select your internal HD, then the top-level Library folder inside it, then control-click (right-click) on the Caches folder, select Get Info to see the size.
Repeat for each user home folder: select it's Library folder, then the Caches folder inside it.
• iPod Cache in iPhoto library
Via the Finder, control-click (right-click) each iPhoto Library folder and select Show Package Contents. Locate the iPod Photo Cache folder, control-click (right-click) it, and select Get Info to see the size.
(If you've processed all the photos, you can delete it safely.)