Time Machine - Troubleshooting
A8. Changing the size or case-sensitivity of a sparse bundle
Time Machine - Troubleshooting
A8. Changing the size or case-sensitivity of a sparse bundle
To REDUCE the maximum size of a sparse bundle:
Note: This may not work on some 3rd-party NAS (network) drives.
It may not "stick" on Snow Leopard 10.6.3 and 10.6.4, and on some occasions, Mountain Lion. But steps 7-10 should prevent that.
If there's much data in the sparse bundle, step 6 may take a long time (an hour or more is not unusual, even via Ethernet, if there's over 100 GB of data), so if it's on a Time Capsule's internal HD, connect via Ethernet; if it's an AirDisk connected to a Time Capsule, other Mac, or Airport Extreme, connect it directly to your Mac.
If you're just starting to back up, it will be faster to let the first backup get started, but cancel it when the sparse bundle has been created (with its permanent name -- it will include "tmp" for a few moments, then be renamed). Watch it in the Finder window in step 3. After changing the size, start the backup again.
1.Start the Disk Utility app, in your Applications/Utilities folder.
3.Drag the sparse bundle to Disk Utility's sidebar (if it isn't there already) and select it.
4.Double-click the sparse bundle to mount the Time Machine Backups or Backup of <computer name> partition (but don’t select it). That may take a moment.
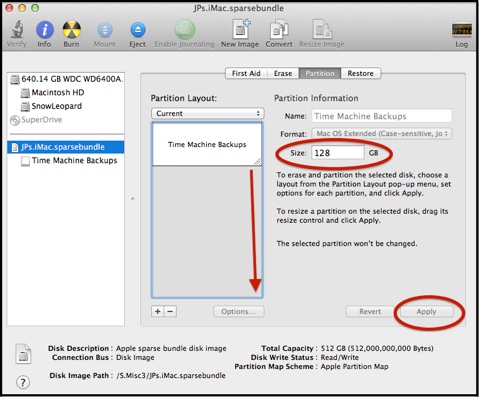
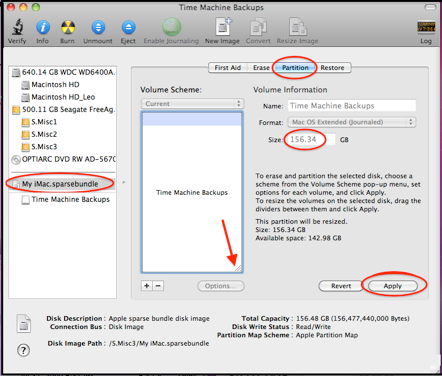
5.With the sparse bundle still selected, click the Partition tab towards the top of the window.
6.Type the desired size in the space provided, or, in the diagram that appears, drag the lower right corner of the partition upwards to shrink it, and click Apply. As part of the process, Disk Utility will do a verification of the data in the partition, so it may take quite a while.
Note that the Time Machine Preferences window may be misleading; it may show the amount of space available on the volume, not in the sparse bundle.
When done, Eject the sparse bundle before starting the next backup.
To change the CASE-SENSITIVITY of a sparse bundle
Note: this will ERASE the backups, and may not work on some 3rd-party NAS (network) drives.
Start the Disk Utility app, in your Applications/Utilities folder.
1.Open a Finder window to
the Time Capsule, NAS, or
AirDisk containing the
sparse bundle.
2.Drag the sparse bundle to
Disk Utility's sidebar and
select it (if it isn't there
already).
3.Double-click the sparse
bundle to mount the Time
Machine Backups or
Backup of <computer
name> partition. That
may take a moment.
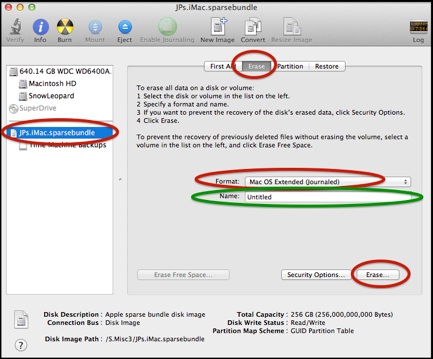
4.Select the sparse bundle in
the sidebar and click the
Erase tab at the top.
5.Select the desired new Format, and type "Time Machine Backups" in the Name box (green circle), then click the Erase button. You’ll get a confirmation prompt, then the erase and reformat will be done. That will take a few moments.
(If you missed retyping the name in the green circle, select and control-click (right-click) it in your Finder sidebar and rename it to "Time Machine Backups".)
If Time Machine still resets the size, repeat steps 1-6, then do these:
7.Select the sparse bundle via the Finder, right-click it, and select Show Package Contents.
8.Right-click the Info.bckup file and select Get Info.
9.Check the Locked box in the General section of the Info panel.
10.Do the same with the Info.plist file.
Time Machine will keep trying, but failing, to resize it, sending these messages to your system.log on each backup:
Resizing backup disk image from xxx GB to yyy GB
Could not resize backup disk image - DIHLResizeImage returned 35
To INCREASE the maximum size of a sparse bundle:
Note: This may not work on some 3rd-party NAS (network) drives.
If there's much data in the sparse bundle, step 9 may take a long time (an hour or more is not unusual, even via Ethernet, if there's over 100 GB of data), so if it's on a Time Capsule's internal HD, connect via Ethernet; if it's an AirDisk connected to a Time Capsule, other Mac, or Airport Extreme, connect it directly to your Mac.
1.Start the Disk Utility
app, in your
Applications/
Utilities folder.
2.Open a Finder
window to the Time
Capsule or AirDisk
containing the
sparse bundle.
3.Drag the sparse
bundle to Disk
Utility's sidebar (if
it isn't there already)
and select it.
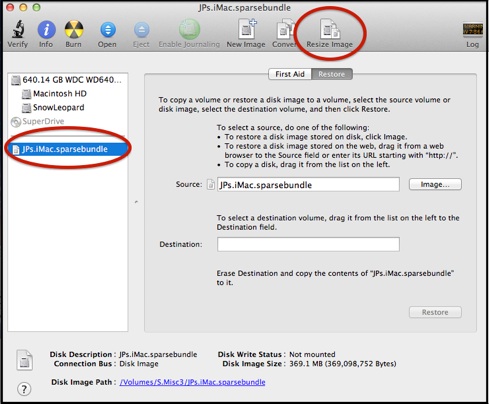
4.Click the Resize
Image button in the
toolbar:
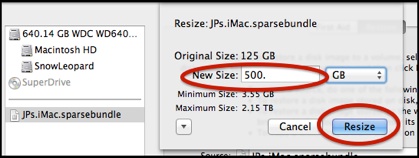
5.Enter the desired New Size
and click the Resize button:
(Depending on the amount
of data in the sparse bundle,
that may take from a few
moments to several minutes.)
6.Double-click the sparse bundle to mount the Time Machine Backups or Backup of <computer name> partition (but don’t select it). That may take a moment.
7.Select the sparse
bundle again, and
click the Partition tab
towards the top of the
window.
8.Type the desired size
in the space provided,
or, in the diagram
that appears, drag the
lower right corner of
the partition all the
way to the bottom to
fill the volume, or
drag it upwards to
shrink it, click Apply
and confirm.
9.As part of the
process, Disk Utility
will do a verification of the data in the partition, so it may take quite a while. You can see the log of what it's doing by selecting Window > Show Log in the menubar.
10. When done, and you quit Disk Utility, you may get an Operations still in progress message. As long as the log says "Partition Complete," it's done, so click Close.
11. Eject the sparse bundle before starting the next backup.