Time Machine - Frequently Asked Questions
33. Backing - up multiple Macs
Time Machine - Frequently Asked Questions
33. Backing - up multiple Macs
There are various ways to back up more than one Mac with Time Machine.
This page assumes a general knowledge of the workings of Time Machine. If you're not familiar with it, you might want to review the Time Machine Tutorial, and perhaps browse some of the earlier Time Machine FAQs. And, there are links to related pages below.
See question #17 for how to view/restore from another Mac's backups.
Three important points to consider:
•Time Machine runs on each Mac, independently of any other Macs, whether they're backing-up to the same destination or a different one. When Time Machine runs out of room for new backups, it deletes the oldest backup(s) to make room, if it can, but only for the Mac it's running on, not any others.
•Any Mac can be backed up to a number of places, as detailed in question #2. The best way to back them up depends mostly on whether they're desktops or portables, but also your particular circumstances and budget.
•Time Machine needs considerably more space than the data it's backing-up, usually 2-3 times as much. See question #1 for details.
Desktop Macs
Backing-up to a directly-connected external HD is fastest and most reliable, by far. Leave it connected and powered on at all times; Time Machine will do hourly backups of the changes; you'll hardly notice it, and be very well protected.
If you have more than one desktop Mac, it's best to use one external HD for each.
You can back up multiple Macs to the same external HD, but it's not optimum:
•You have to connect the HD to each Mac in turn, which means no Mac will get the regular, hourly backups.
•It's easy to forget, leaving one with no backups for an extended period.
•Frequently swapping the drive risks dropping it, or damaging the ports or cables.
If you do want to back up that way, it's best to have a separate partition for each Mac. See question #4 for details and instructions.
You can, of course, back a desktop Mac up over a network, as below, but that's much slower and less reliable. If you do that, connect via Ethernet cable if at all possible -- it's still slower than a direct USB, FireWire, or Thunderbolt connection, but 2-3 times faster than WIFI, and more reliable.
Portable Macs
If your portable Mac is mostly stationary, it might be a good idea to back it up to a directly-connected external HD, as in the green box above. It is the fastest and most reliable method.
But it is more convenient to back up portable Macs wirelessly over your local network. It's much slower and less reliable than a direct connection, but the convenience is often worth it.
The destination options are:
•A Time Capsule. These were designed by Apple specifically as the destination for multiple Macs. See Using Time Machine with a Time Capsule for details and instructions. If your Time Capsule isn't large enough for all the Macs you want to back up (usually at least twice the size of the data it's backing-up), consider connecting a USB drive, as in the next item. If you back up more than one Mac to a TC's internal HD, see the pink box below.
•A USB drive connected to a Time Capsule. If your Time Capsule isn't large enough for all your Macs' backups, you can connect a USB drive to it, and back some of the Macs up to it. Unlike the Time Capsule's internal HD, you can make multiple partitions on the USB drive, so each Mac backing-up to it has it's own, exclusive space; and/or for other data besides your backups. See #Q2 in Using Time Machine with a Time Capsule for details and instructions.
•A USB drive connected to an Airport Extreme. Depends on whether it's a new "ac" model or an older, flat one. See Using Time Machine with an Airport Extreme Air Disk.
•A "shared" drive on another Mac on the same local network. If you have a mix of desktop and laptop Macs, this is a good option. Back the desktop up to a drive connected directly to it, as in the green box above, and the laptop(s) to a different external HD, or a separate partition on the same drive (you don't have to use a separate partition for each laptop, but doing so will avoid the problem in the pink box below). See question #22 for instructions. An advantage to this is, if there's a problem, you can connect the drive directly to a Mac for troubleshooting, repair, and restore purposes.
•A 3rd-party NAS (Network) drive. Functionally, that's similar to using a Time Capsule as above, but more complex, as you're using a 3rd-party's software (and they're all different) as well as Apple's. Not all NAS drives even work with Time Machine, and some that do, don't work very well. Sometimes you can't set up separate "accounts" or "shares" for different Macs, so you may have the problem in the pink box below. In addition, the makers typically don't upgrade their software/firmware when new versions of OSX are released, so it may not work at all for a while. See the pink box in question #2 for details and cautions.
For an initial wireless backup (and any large backups or restores), connect via Ethernet cable if at all possible. That's 2-3 times faster, and much more reliable, than WIFI
Multiple Backups on a Time Capsule or other single network volume
When backing-up to a local disk, Time Machine puts a Backups.backupdb folder at the top level, and stores the backups for one or more Macs in it.
But when backing-up over a network, Time Machine makes a separate sparse bundle disk image for each Mac's backups, and puts the Backups.backupdb folder inside it. Normally, multiple sparse bundles coexist well on a single volume, even once the volume gets near full, but sometimes there are exceptions.
Recall how Time Machine works: it's designed to fill all the available space, then begin deleting old backups to make room for new ones. The problem is, when the drive gets full, Time Machine on one Mac only deletes the oldest backups for that Mac, not any others that are sharing the same destination. The result is, once the drive is fairly full, the sizes of the sparse bundles won't change much.
You may be able to prevent that, by limiting the maximum size of each Mac's sparse bundle. See Troubleshooting item #A8 for details.
That means one Mac's backups can "hog" a large portion of the available space, reducing the amount of space available for others. That can happen in a few ways:
•Before the volume gets near full, if one Mac has some sort of problem and makes extra-large backups, they can take up a large portion of the space, but you may not notice that until something else happens.
•If you add a Mac to a volume that already has one or more other Macs' backups.
•If you want or have to delete one Mac's backups, and let it start fresh, the others will tend to grow into the space vacated by the deleted backups, reducing the space available to that Mac.
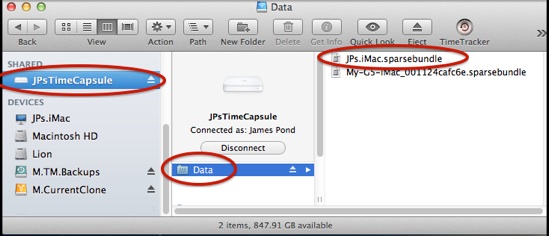
(Note that the .sparsebundle suffix may not be displayed.) One at a time, select and control-click (right-click) the sparse bundles and select Get Info. That display will show the size of each one.
Note: if your Time Capsule is set up with Accounts as the method to Secure Shared Disks (see the blue box in #Q1 of Using Time Machine with a Time Capsule), one user will only see that user's stuff. You'll have to connect to the Time Capsule with each Account to get the full picture of what's there (one reason why that's not recommended.)
There are ways to deal with the situation, but none are very attractive:
•Erase the entire volume. That's quick, but erases all the backups. See #Q5 in Using Time Machine with a Time Capsule for instructions. Then let Time Machine start fresh on each Mac (preferably one at a time, via Ethernet).
•Delete the sparse bundle that's taking up too much space. See #Q5 in Using Time Machine with a Time Capsule for instructions. Then let Time Machine start fresh on that Mac (preferably via Ethernet).
•Delete a number of old backups from one or more of the sparse bundles, then "compact" them to regain the space. This is rather tedious and time-consuming. See FAQ #12, and don't miss the pink box there. Do this via Ethernet if at all possible -- it will still be slow, but 2-3 times faster than via WIFI.