Time Machine - Frequently Asked Questions
22. How do I set up Time Machine to a shared drive on another Mac?
Time Machine - Frequently Asked Questions
22. How do I set up Time Machine to a shared drive on another Mac?
Since we're talking about 2 (or more) Macs here, we need some terms to identify them:
•The source Mac is the one you want to back up.
•The destination Mac will have the drive connected to it directly, and receive the backups (you cannot back up to an internal drive or partition on another Mac).
First, be sure the shared drive is formatted properly. If you're also backing-up the destination Mac to this drive, those backups should be in a separate partition. If there will be other data on the drive, in addition to Time Machine backups, that other data should be in a separate partition, too. If you're backing-up more than one source Mac via your network, they can each have a separate partition, or they can share one. If they share one, however, you can have the problem in the pink box in FAQ #33.
The partition(s) for the network backups may be Formatted with either the Mac OS Extended (Journaled) or Mac OS Extended (Case-sensitive, journaled) format: it doesn't matter which, since Time Machine will put the backups in a separate case-sensitive sparse bundle for each Mac (you can change that if desired, per #A8 in Troubleshooting). The Format for any other partitions is, of course, important.
For step-by-step formatting instructions, see question #5 for a new drive, or a drive with data on it that you no longer need. See question #6 for an existing drive with other data on it that you want to keep.
Note: If you were backing-up to a directly-connected external HD, you cannot continue backing-up to those backups via your network, as Time Machine stores them differently. You must either start fresh, or copy them per section #3 in question #18.
On the Destination Mac:
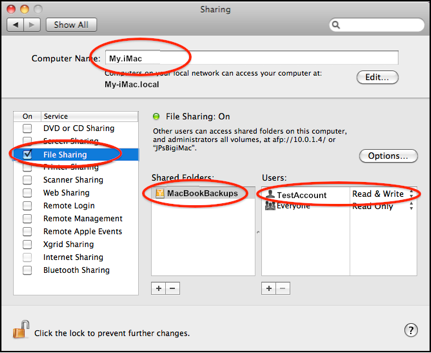
•b. Go to System Preferences > Sharing and click the box for File Sharing. Under Shared Folders, click the plus sign at the bottom.
On the next screen, find and select the disk/partition to be used for the backups, then click the Add button.
•c. Under Users, add or remove users as necessary to allow or deny them access to the drive.
Be sure the one(s) you want have Read & Write privileges.
This is how the source Mac will sign-on in step (e) below.
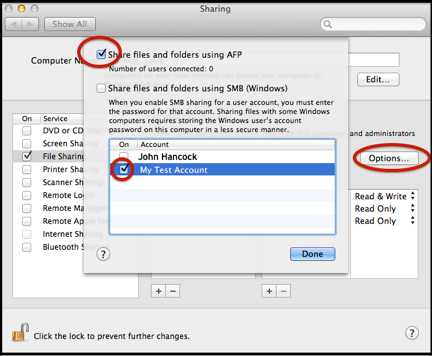
•d. Click the Options button and be sure only the Share files and folders using AFP box is checked, and the box for the user account is also checked.
Note: the first backup will copy the entire contents of your system, except for a few things that are skipped automatically, such as system work files, most caches, your logs, trash, etc., and anything else you may have excluded (see question #10 and #11), so it will be rather lengthy, depending on how much data is on your system, how your Time Machine disk is connected, and how busy your Mac is.
You can continue to use your Mac while Time Machine is backing-up, and you can even cancel a backup if necessary, but to make the first full backup as fast as possible, try not to overload your Mac or cancel the backup.
See question #24 for information on the two Time Machine icons you just added.
Note: Effective with Mountain Lion 10.8.x, you can specify two or more destinations, and have Time Machine back up to them alternately. See Time Machine FAQ #34 for details.
Speeding up the first full backup:
Once this is all set up, and the first backup has begun, there is a way to speed it up:
•As soon as the sparse bundle has been created, cancel the backup (click the small circle with an "X" at the right of the progress bar).
•Eject and disconnect the drive, then connect it to the source Mac.
•Re-select the (now local) disk via Time Machine Preferences.
•Select Back Up Now from the Time Machine icon in your menubar.
•When the backup is done, you won't see it normally via the Star Wars display while the drive is connected directly. Double-click the sparse bundle via the Finder to mount the disk image, then double-click that to mount it, then Enter Time Machine.
•Eject and disconnect the drive and reconnect it to the destination Mac. Re-select it via Time Machine Preferences. Time Machine should display it normally.
•Regular, hourly, incremental backups will continue wirelessly.
If you need to do a full system restore:
Eject and disconnect the drive, connect it to the Mac to be restored, and see Frequently Asked Question #14.
By default, Time Machine will back up your internal HD. If you have multiple internal HDs, and/or multiple partitions, they'll all be backed-up. If you don't want some of those backed-up, you can exclude them, per question #10.
If you want to back up one or more external HDs/partitions, you'll have to remove them from the exclusion list, per question #10. Also see question #32 for info on backing-up multiple disks/partitions.
If you're backing-up more than one Mac, see question #33.
If there may be a problem with the Destination Mac sleeping, preventing the Source Mac from backing-up to the shared drive, check the Wake for network access box in System Preferences > Energy Saver. See Sharing your computer’s resources when it’s in sleep for details.
On the Source Mac:
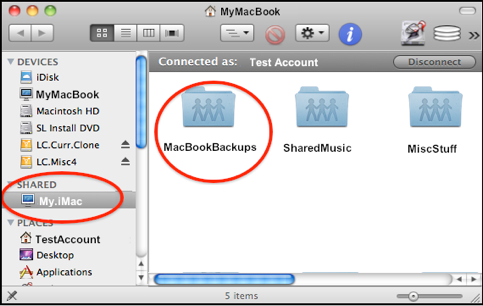
•g. Enter the user name and password (from step c above) and click Connect. On the next Finder window, double-click the partition.
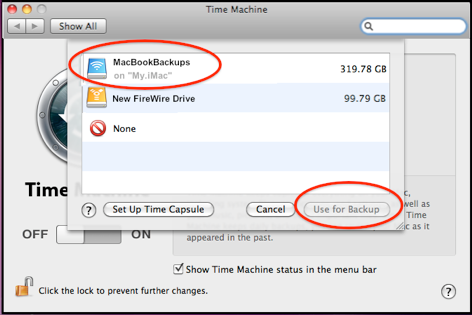
•h. If the Time Machine application isn't already in your Dock, drag it there from your Applications folder. Control-click (right-click) it and select (Open) Time Machine Preferences. Check the box to Show Time Machine status in the menu bar and click the Select Disk button (on Leopard, this will be either Choose Backup Disk or Change Disk.)
Enter the user name and password (from step c) when prompted.
In the Next Backup area of the Time Machine Preference panel there should be a 120-second countdown until the backup starts.

That will automatically mount the partition on the shared drive when the source Mac user logs on (if it's in range and the destination is awake or can wake for network access, per item d. above).