Time Machine - Frequently Asked Questions
12. Should I delete old backups? If so, How?
Time Machine - Frequently Asked Questions
12. Should I delete old backups? If so, How?
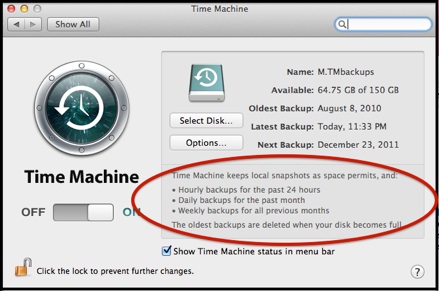
•"Hourly" backups after 24 hours (except the first of the day, which is a "Daily" backup).
•"Daily" backups after a month (except the first of each week, which is a "Weekly" backup.)
•"Weekly" backups are kept until Time Machine needs the space for new backups; then one or more of the oldest weeklies will be deleted.
To delete ALL backups. Sounds easy, but like so many things, it depends on the circumstances:
If the backups were made locally (to an internal or directly-connected external disk/partition -- USB, FireWire, Thunderbolt, or eSATA):
•If two or more Macs were backed-up to the same place, and you want to delete all the backups for only one, you’ve got a problem. The backups are mixed in the same Backups.backupdb folder. To delete all the backups for one Mac, without disturbing the others, you must delete each individual backup for the Mac in question, as above. (This is one reason it's a good idea to use separate partitions in such cases).
•If there’s nothing else on the volume (drive or partition) you want to keep, erase it with Disk Utility. See #2 in Using Disk Utility.
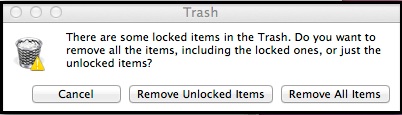
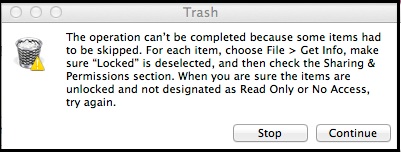
•If there is other data on the volume (drive or partition), you can delete the Backups.backupdb folder, but it will take a very long time to empty the trash afterwards (as there may be from several hundred thousand to a few million files), and you may have trouble with locked files and/or permissions. If possible, it’s much better to delete the backups individually as above, or copy the other data elsewhere temporarily, erase the volume with Disk Utility, and copy the data back. (Again, a separate partition for Time Machine backups is advised.)
If the backups are on a Time Capsule’s internal disk:
If the backups are on an AirDisk connected to a Time Capsule, other Mac, or Airport Extreme, connect the drive directly to your Mac.
•If there’s nothing else on the volume (drive or partition) you want to keep, erase it with Disk Utility. See #2 in Using Disk Utility.
•If there is other data, use the Finder to delete the sparse bundle containing the backups. If you have a very large sparse bundle, and deleting it is going to take many hours, you may be able to use the procedure in the blue box below.
If the backups are on a NAS (Network Attached Storage) disk:
You may be able to delete the sparse bundle as you would for a Time Capsule above. But some NAS drives don't allow that. If not, you'll need to follow the maker's instructions to clear or delete the "share" or "account" or whatever the NAS maker calls it.
If that sparse bundle is very large, and OSX says it will take many hours to delete it, there is a faster, but more tedious, way:
•Cancel the deletion.
•Control-click (right-click) the sparse bundle in the Finder and select Show Package Contents.
•Open the bands folder (it may take a while to show the contents).
•Select a large number of bands (up to about 8000 at a time), and delete them.
•When they’re all deleted, delete the sparse bundle.
However, Time Machine will never delete the backup copy of anything that was on the disk being backed-up at the time of any remaining backup. So all that's actually deleted are copies of items whose originals were changed or deleted before the next remaining backup. If that seems odd, it is! See How Time Machine works its Magic for details.
To delete via the Time Machine browser (the "Star Wars" display):

Use the Time Machine browser (the "Star Wars" display): Enter Time Machine by clicking the Time Machine icon in your Dock or select the TM icon in your Menubar. (To delete backups for a different Mac, see question #17).
1.Locate the backup or item you want to delete via the Timeline or "cascade" of Finder windows.
2.If you want to delete all backups of a particular item or items, select it/them in the window.
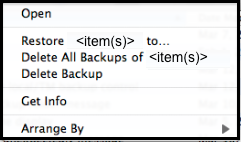
"gear" icon in the toolbar) and select either Delete Backup
(the entire backup) or Delete all Backups of <item selected>
in the small menu that appears.
(Note: You won't see either Delete option if you select a Local
Snapshot. Nothing can be deleted from them manually. If you delete all backups of a selected item via an external backup, those will remain in any Local Snapshots. Snapshots are deleted automatically after a week or if your disk gets over 80% full. If you really need to delete them, turn Time Machine OFF on the preferences window, then back ON. See FAQ #30 for more on Local Snapshots.)
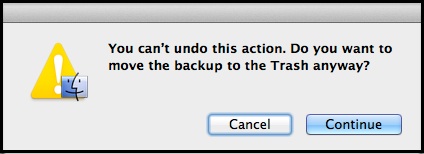
You'll see a confirmation prompt, then one for your Administrator's password. This may take a while, especially over a network. so if you’re deleting a lot of things from a network backup, connect via Ethernet if possible; if you’re deleting a lot from an AirDisk on an Airport Extreme (not supported) or another Mac, connect the disk directly to your Mac.
If you delete an entire backup, it will disappear from the Timeline and the "cascade" of Finder windows, but it will not actually delete the backup copy of any item that was present at the time of any remaining backup. Thus you may not gain much space. This is usually fairly quick, but sometimes quite lengthy, especially if your backups are on a network (if you exit Time Machine, you may see a progress bar for it). Unfortunately, you cannot predict which will be fast and which won't.
If you delete all backups of an item, Time Machine will not back it up again unless/until it's changed, or Time Machine does a "deep scan" (see Troubleshooting item #A6).
Deleting backups via the Finder on Lion 10.7.x or later:
This is supported, but seems to take longer and often has problems of its own.
And, you can only delete entire backups via the Finder; if you only want to delete all backups of selected item(s), you must use the Time Machine browser, as detailed in the green box above.
If you're not sure how to locate the backup(s) you want to delete, see the green box in How Time Machine Works its Magic.
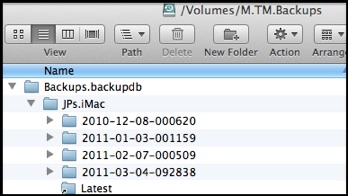
There's a folder for your Mac, and one folder with a date stamp for each backup, plus a "Latest" alias.
Then a prompt for your Admin password.
If you're backing-up over a network, there's an additional complication: those backups are in a rather odd container called a sparse bundle disk image, not a normal folder. A sparse bundle doesn't shrink automatically when things are removed from it, so you won't see how much space you've gained. Time Machine will automatically "compact" a sparse bundle when it needs room for new backups, but if necessary, you can do it manually via a command in the Terminal app (in your Applications/Utilities folder.
Connect to your Time Capsule or network drive via Ethernet, or connect an AirDisk directly to your Mac, if possible. That will be much faster than via WIFI.
Be extremely careful when using Terminal. It is a direct command-line interface into UNIX, the underpinning of OSX. Unlike the Finder, there are few protections against making a mistake, which can cause untold damage.
In Terminal, the prompt looks like this: <ComputerName>:~ <user name>$
(where <your name> is your short user name). It's followed by a non-blinking block cursor.
At the prompt, copy or type: hdiutil compact followed by a space:

Then drag the sparse bundle from a Finder window to the Terminal window:

That will put the formatted "path" to the sparse bundle in the command:

Press Return. You’ll get a message when the process starts:

then (sometimes) a line of dots while it works, but no progress bar. Then (eventually, as it may take quite a while) a completion message showing how much space was "reclaimed."
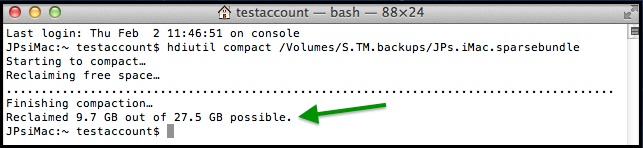
If you get a message "compact failed - Resource temporarily unavailable," eject the sparse bundle via the Finder, copy the command in Terminal via Cmd+C, paste it to the current prompt via Cmd+V and try again.
If necessary, you can delete the following:
•All backups of a particular file or folder -- use Time Machine, per the green box below.
•One or more individual backups -- it's best to use Time Machine, per the green box below, but on Lion or later, you can use the Finder, per the gray box at the bottom of this page.
•An entire set of backups -- all the backups for one Mac. See the yellow box below.
(Note: if your backups are on a network, connect via Ethernet cable if at all possible -- deletions will still be fairly slow, but 2-3 times faster than via WIFI.)