Time Machine - Frequently Asked Questions
21. How do I set up Time Machine to an internal
or directly-connected external HD?
Time Machine - Frequently Asked Questions
21. How do I set up Time Machine to an internal
or directly-connected external HD?

If you select Decide Later, you'll see the prompt again every time you connect that disk.
If you select Don't Use, you won't see it again for that disk (unless you reformat or erase it).
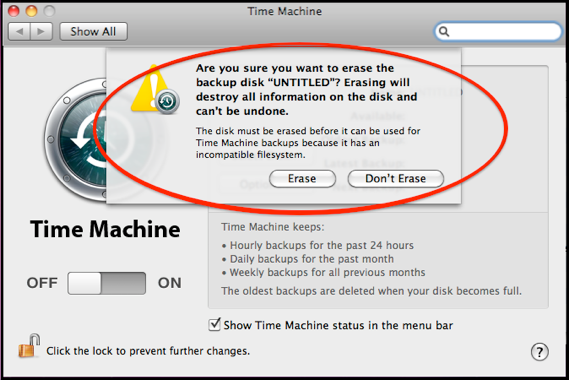
Be very sure you really want to erase the disk before clicking Erase -- if there are files on the disk that you want, they will be erased. They’ll be difficult or impossible to recover, and the process will be lengthy and expensive.
If you confirm, OSX will set Time Machine to back up to the location selected, and begin the first backup. But see the pink box below before you do this.
If the Time Machine application isn't already in your Dock, drag it there from your Applications folder.
If the Time Machine preferences window isn't already shown, control-click (right-click) the TM icon in your Dock and select Open Time Machine Preferences. Check the box to Show Time Machine status in the menu bar.
In the Next Backup area of the Time Machine Preference window, there should be a 120-second countdown until the backup starts. If you close the window, the backup will start immediately.
Note that the first backup will copy the entire contents of your system, except for a few things that are skipped automatically, such as system work files, most caches, your logs, trash, etc., and anything else you may have excluded (see question #10 and #11) so it will be rather lengthy, depending on how much data is on your system, how your Time Machine disk is connected, and how busy your Mac is.
You can continue to use your Mac while TM is backing-up, and you can even cancel a backup if necessary, but to make the first full backup as fast as possible, try not to overload your Mac or cancel the backup.
See question #24 for information on the two Time Machine icons you just added.
There may be some problems if Time Machine sets a drive up, so we recommend this way:
•First, set up the drive yourself. See question #5 for instructions on setting up a new drive, or one without any data you want to keep. See question #6 to add a partition for Time Machine to an existing drive that already has data that you want to keep. Then you'll get this prompt again. If it shows the desired partition, click Use as Backup Disk, then see the blue box below. If not, select the correct one per the green box.
•Next, if the Time Machine application isn't already in your Dock, drag it there from your Applications folder.
•Control-click (right-click) it and select Open Time Machine Preferences. Check the box to Show Time Machine status in the menu bar and click the Select Disk button (Choose Backup Disk or Change Disk on Leopard). Select the desired drive/partition from the list and click the Use for Backup button, then see the blue box below.

You'll see this window:
Click Select Backup Disk to tell Time Machine where to put your backups.
Then you'll get a list of all possible destinations, showing all volumes that could be used for backups (except your startup drive). Select the one you want (even if there’s only one).
The window is a bit different on different versions of OSX.
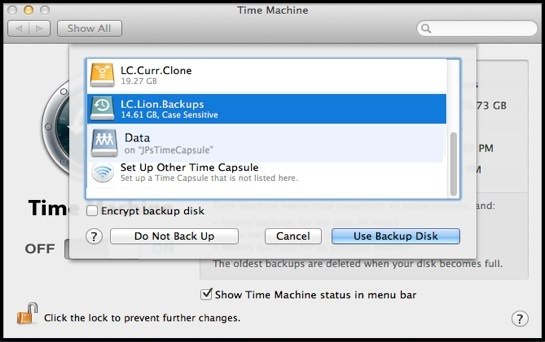
Select the destination you want and click Use Backup Disk.
If you do not want to back up at all, click Do Not Back Up.
If you've already set up a Time Capsule, it should appear in the list (like the 3rd sample). If not, select the last item to do that.
If you want to encrypt your backups, see question #31 for details and limitations.
Effective with Mountain Lion 10.8.x, you can specify two or more destinations, and have Time Machine back up to them alternately. See FAQ #34 for details.
SNOW LEOPARD 10.6.x, LEOPARD 10.5.x:

Select the destination you want and click Use Backup Disk.
If you do not want to back up at all, select the "None" item.
If you've already set up a Time Capsule, it should appear in the list (like the 3rd sample). If not, click Set Up Time Capsule.
If any partition being backed-up is case-sensitive but the backup volume is not, you'll get the warning screen above, as the volume must be completely erased and reformatted.
By default, Time Machine will back up all internal disks and partitions. If you have multiple internal HDs, and/or multiple partitions, they'll all be backed-up. If you don't want some of those backed-up, you can exclude them, per question #10.
If you want to back up one or more external HDs/partitions, you'll have to remove them from the exclusion list, per question #10. Also see question #32 for info on backing-up multiple disks/partitions.
If you're backing-up more than one Mac, see question #33.