Time Machine - Frequently Asked Questions
6. Can I use a drive with other data already on it?
Time Machine - Frequently Asked Questions
6. Can I use a drive with other data already on it?
Maybe. First, verify that it has the correct Partition Map Scheme using Disk Utility (in your Applications/Utilities folder). Select the top line of your drive (with the size and make). Down towards the bottom of the panel will be the Partition Map Scheme. It should be either GUID or Apple Partition Map. If it isn't, the only way to use the disk for Time Machine backups is to copy the data off somewhere else temporarily, reformat it into at least 2 partitions with the correct Partition Map Scheme per question #5, then copy the data back.
Before doing this, back-up the data you want to keep, just in case.
You can buy some 3rd-party apps that will move data around so you can do the partition even when Disk Utility can't, such as iPartition. But they all strongly recommend that you back-up the data first, "just in case" something goes wrong. Well, if you're going to do that, you might as well simply do the copy, then erase and reformat the disk, then copy the data back.
Here's how to partition without erasing, via Disk Utility:
a.When Disk Utility starts, select the drive in the sidebar (the line with the size and make/ID). (If the drive doesn’t appear at all, see If a disk doesn't appear in the sidebar.)

c.Click the partition you want to split. DU will outline it in blue.
d.Click the plus sign at the bottom. DU will split the partition into two parts, and name the new one the same as the old, but with "_2" appended.
e.Click the new partition; DU will outline it in blue.
f.Give it a name (to show on your desktop/Finder sidebar).
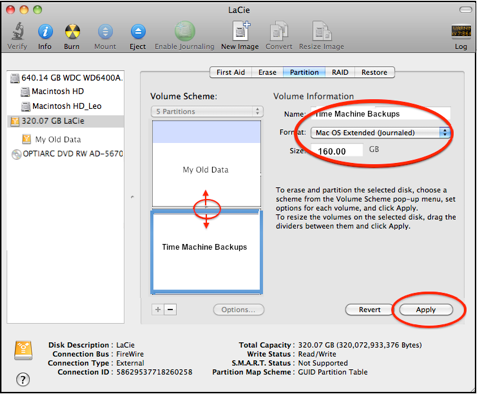
h. Set the Format to the default of Mac OS Extended (Journaled) unless you're backing-up a case-sensitive drive or partition. See the pink box in question #5 for details.
Effective with Lion 10.7.x, you can encrypt your backups, per question #31.
i.When you have it the way you want it, click Apply.
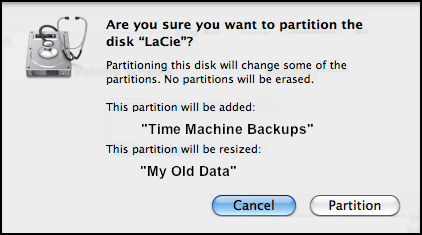
j.Read the confirmation prompt carefully, then click Partition.
k.The drive will be re-partitioned, and Disk Utility will Verify all the partitions. This may take several minutes or more.
Partitions must occupy contiguous physical space on a disk.
If the existing partition has ever had more data than it does now, and then some things were deleted, the remaining data may be scattered over it, so there may not be enough contiguous space left for the new partition.
When you Get Info on a partition, or select the partition in Disk Utility’s sidebar, you’ll see the amounts Used and Available. This is, of course, the total amount of data, and the total empty space. If that data is all at the beginning of the partition, you can reduce the partition to that size; if it’s scattered, you can’t.
But when you select the top line of the drive in Disk Utility’s sidebar and click the Partition tab, then select a partition as shown below, the amount shown as Available may be smaller -- it’s the amount of contiguous empty space at the "end" of the partition -- the maximum available for a new partition.
It seems odd to see different values for the amount Available on the same volume in different places, but it's for different purposes.