Time Machine - Frequently Asked Questions
14. How do I restore my entire system?
Time Machine - Frequently Asked Questions
14. How do I restore my entire system?
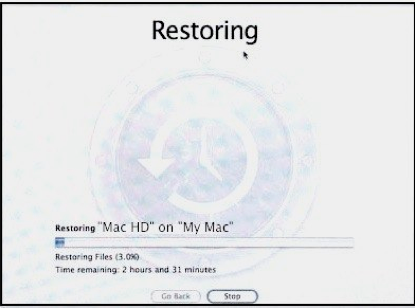
This is, naturally, a lengthy process, but your Mac will be restored exactly as it was at the time of the backup you selected (except, of course, for things that were excluded). Then your Mac will start up normally.
But do not try this full system restore from a different Mac's backups. If it boots at all, many things may go wrong. See these Apple articles for details:
Don't install a version of Mac OS X earlier than that which came with your Mac and
Issues after restoring a Mac from a Time Machine backup made with a different Mac.
Instead, use Setup Assistant (see How do I set up a new Mac from an old one, its backups, or a PC? ).
You may want to immediately turn Time Machine OFF, as the next backup may be a full one, of everything you just restored, taking lots of time and disk space. On Leopard, it will be; on Snow Leopard or later, it should be slower than usual, but only backup what's new or changed since the backup you restored. If Time Machine starts doing a full backup, cancel it immediately. You may be able to manually tell it to "associate" the restored drive with the old backups via the procedure in Troubleshooting item #B6.
Don't be alarmed by the length of this page -- it covers many unusual situations, in detail.
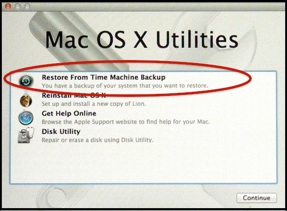
The usual procedure is quite simple:
•Start your Mac from your Recovery HD (Install disc on Snow Leopard or earlier).
•Select Restore From Time Machine Backup.
•Select the backup you want to restore, and where you want to put it.
•Wait while your Mac does all the work (copying all your stuff).
•Start up normally, and you're back in business!
On occasion, your Mac may not start up normally. If it doesn't, see Troubleshooting item #E8.
If you backed-up multiple drives/partitions, note that this procedure will restore one OSX drive/partition at a time.
•If your user home folders are on a different volume, and need to be restored, do that via the Restore tab of Disk Utility, in step (d) below.
•For other "data only" drives/partitions, after restoring your OSX volume, use Time Machine’s normal "Star Wars" display (see questions #15 and #32).
If your backups are on a Time Capsule, connect to it via an Ethernet cable if possible; it will be much faster and more reliable than WIFI.
If your backups are on a disk connected to a Time Capsule or Airport Extreme, or a shared drive on another Mac on the same local network, connect it directly to your Mac if possible; that will be much faster than Ethernet or WIFI.
If they're on an internal HD on another Mac, start it in Target Disk mode and connect via FireWire.
You can restore your entire system to the exact condition it was in at the time of any Time Machine backup, even if it's a different version of OSX (unless you excluded System folders: see question #11).
If you want to monitor the installation, select Window, then Show Log and Show All logs from the menubar. These selections may require several seconds to take effect.
A log window will appear at the bottom of the screen.
a.To use a Recovery HD, start up from it per Using the Recovery HD.
b.To use an Install disc (or Software Reinstall drive on a MacBook Air).
c.If you're restoring to a new disk, or one that may not be formatted properly, select Disk Utility and format the drive: Select the top line (with the make and size), click the Partition tab and select 1 Partition from the the pop-up menu under Volume Scheme, unless you need more than one. (If any of your user home folders were on a separate internal HD or partition, be sure the new disk(s) are set up the same way.)
Give it a name (probably Macintosh HD) under Volume Information, and select Mac OS Extended (Journaled) for the Format unless you're certain you need Mac OS Extended (Case-sensitive, journaled). On Lion, you can select an encrypted version of either of those. Click the Options button below the box, and select GUID for an Intel Mac, or Apple Partition Map for a PPC Mac, and click the OK button, then Apply. That should only take a few moments. Quit Disk Utility and you’ll see the Utilities menu again.
d.If you'e restoring both an OSX volume and copying a second one containing user home folders, select Disk Utility and restore the one with the home folders via the Restore tab. See Copying a volume via the Restore Tab for details. (If you're going to restore a data-only volume, see question #15.) Then quit Disk Utility and continue.
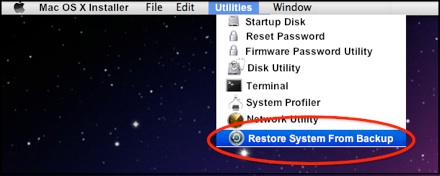
e.Select Restore From Time Machine Backup (Lion) or Restore System from Backups (Leopard or Snow Leopard). You’ll see a Restore Your System screen with some information and warnings. Click Continue and follow the on-screen instructions:
f.You'll be prompted to select the disk where your backups are. Even if there’s only one, you must click it to select it.
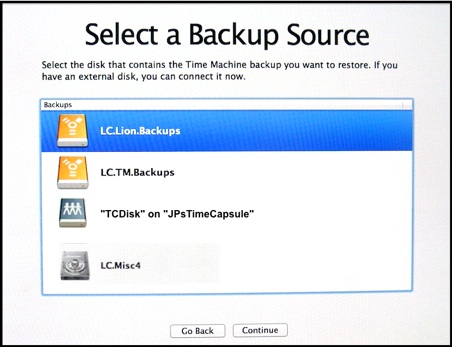
An encrypted disk has a special gray icon (4th on the sample). When you select it, you must enter the password. Then it will be displayed normally, but may change position in the window, and you may need to re-select it.
If you're restoring from a network drive via WIFI (not recommended -- use Ethernet if at all possible), click the Airport icon in the Menubar and join the network.
If your backups aren’t recognized, return to the Utilities menu and use Disk Utility to repair them.
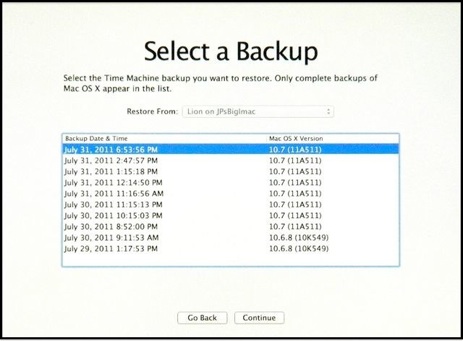
There will be a list showing the date and time of each completed backup of the disk selected, and the version of OSX on that backup. Note: the times may not match your current time zone: they may be shown in U.S. Pacific Time.
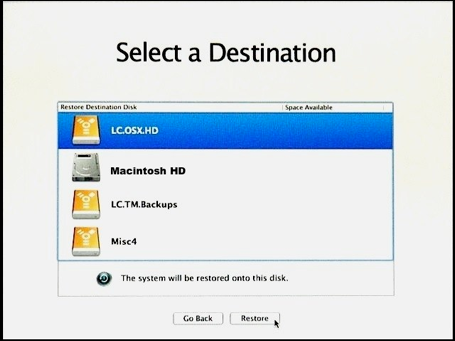
Click Restore, then the confirmation prompt.
Note: If you select a volume with a different name than the original, the restore process will rename it to the name on the backup. Once your Mac restarts, you can select the renamed volume in a Finder sidebar and control-click (right-click) it to change the name back.
g.You'll next be prompted to

Even if the names are the same, there are still separate sets of backups. Select the one you want and you'll see a different list of dates.
To restore your entire system, you need a Recovery HD (Lion 10.7.x or later) or Install Disc:
•For best results, use the Recovery HD or Install Disk for the same major version (Lion, Snow Leopard, Leopard) of OSX on the backup you're going to restore. So if you're on Lion, wanting to revert to Snow Leopard, use a Snow Leopard Install disc if possible.
•In some cases, you can use a different "major" version: a Snow Leopard Install disc will install a Leopard backup; a Lion Recovery HD will install a Snow Leopard backup. But a Leopard Install disk will not install a Snow Leopard backup successfully.
•If you don't have the proper disc, you can probably use a borrowed Retail disk (not a gray disc that came with a different Mac), if the version of OSX on it isn't earlier than the one the Mac came with.
(If you're not sure what version of OSX you're running, click here).
Or, if you copied the Recovery HD to a different drive via the Lion Recovery Disk Assistant, you can use that, via Startup Manager per Using the Recovery HD.
When it starts, select your language from the list shown.
Then you'll see the Mac OS X Utilities menu.
Select your language, then on the next screen, select Utilities from the top menubar.