Time Machine - Frequently Asked Questions
18. How can I copy my TM backups to a different location?
Time Machine - Frequently Asked Questions
18. How can I copy my TM backups to a different location?
If you find you need more space for Time Machine backups, or want to change locations (local to network, or vice-versa), your best bet is to simply start a new set of backups in the new location. Keep the old ones "on the shelf" until you're sure you don't need them. (If you're backing-up to a locally-connected disk, it's best to give it a different name.)
That's especially true for a large set of backups and/or more than a few month's worth; the larger the backups, the longer it takes to populate the "Star Wars" display, especially over a network; the monthly Verify Backups will take longer; and of course the possibility of corruption increases.
You can always browse and restore from the old backups, via the Browse Other Time Machine Disks option (hold down the Alt/Option key while selecting the Time Machine icon in your menubar, or control-click (right-click) the Time Machine icon in your Dock). See Question #17 for details.
But if you want, in many cases you can copy your Time Machine backups to a new location. It will take a very long time (even a small set of backups will contain at least several hundred thousand files), and sometimes it's not easy. And there are some restrictions:
There are some Limitations:
•If your backups were made to an internal or directly-connected USB or FireWire disk or partition, you must copy all the backups for all the Macs that were backed-up to the same disk/partition that way.
•You can only copy a complete set of backups, not just some individual backups.
•You cannot merge two or more sets of backups, even for the same Mac.
•On Leopard, you cannot change from local to network, or vice-versa.
•You cannot convert case-sensitive backups to case-ignorant, or vice-versa.
•You cannot copy anything from damaged/corrupted backups.
Because of the last two items, be sure your backups are ok by Repairing them, per Troubleshooting item #A5.
While you're using Disk Utility, determine whether the backups are case-sensitive; you'll need to know that below.
When you select a volume in Disk Utility's sidebar, the Format is shown towards the lower left. If your backups are in a sparse bundle, double-click the sparse bundle to mount it, then select the Time Machine Backups (or Backup of <computer name>) partition that will appear, indented, below the sparse bundle.
The Format is either Mac OS Extended (Journaled), meaning case-ignorant, or Mac OS Extended (Case-sensitive, journaled).
The method of copying is different depending on how the backups were made; whether you're changing from local to network, or vice-versa; and, in some cases, for different versions of OSX. (If you're not sure which version of OSX you're running, click here).
Part of the complexity here is because Time Machine stores its backups differently depending on how they were made:
Local backups (made to an internal disk or a USB, Thunderbolt, or FireWire disk connected directly to a Mac) are stored in a folder named Backups.backupdb, at the top level of the drive/partition.
Network backups (made over a network, whether via WIFI or Ethernet) are also stored in a folder named Backups.backupdb, but it's on a partition inside a special container called a sparse bundle at the top level of the drive/partition.
You cannot just switch from one method to the other.
Note that below, a "volume" is either an entire disk drive or a partition on a disk drive.
Before starting to copy, turn Time Machine off, via Time Machine Preferences. When done, select the new destination.
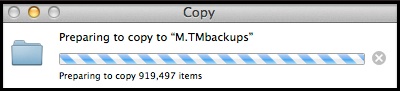
Copying backups will take a long time under the best of circumstances; even a small set of backups will contain several hundred thousand files; a large one may number in the millions.
Note that the first backup to the copied set may take much longer than usual, as the backups may need to be indexed (especially on Lion).
How to:
1. Copy LOCAL backups from one volume to another LOCAL VOLUME
•Using SNOW LEOPARD 10.6.x or later:
a.Format the new drive/partition, with either the GUID or APM Partition Map Scheme, and the exact same Format as the old backups. See question #5 if you need detailed instructions.
b.Connect both drives to your Mac, via separate ports if possible.
c.Control-click (right-click) the new volume on your desktop or Finder sidebar and select Get Info. If the Ignore ownership on this volume box is checked, click the padlock at the lower right and enter your Admin password at the prompt. Then remove the check mark from the box and close the window.
d.Drag the Backups.backupdb folder from the old volume to the top level of the new one. Enter your Admin password when prompted.
You cannot copy local backups properly from one volume to another via the Leopard Finder. But you can duplicate the backups to a different volume via the Disk Utility app (in your Applications/Utilities folder).
Note that you must duplicate an entire volume to another entire volume -- if you have other items on the old volume, they will be copied, too (this is a bad idea: see question #3). Also, any data already on the new volume will be erased.
a.Format the new drive/partition, with either the GUID or APM Partition Map Scheme, and the exact same Format as the old backups. See question #5 if you need detailed instructions.
b.Connect both drives to your Mac, via separate ports if possible, then open a Finder window. Make sure both volumes are shown in the sidebar (if not, from the Menubar select Preferences > Sidebar, and check the box to show External disks in the sidebar). Leave the Finder window open.
c.Start Disk Utility, select anything in the sidebar, and click the Restore tab.
d.Drag the old volume to the Source box, and the new volume to the Destination box.
e.Check the Erase destination box, then the Restore button. This will take a long time.
f.When the duplication is complete, note that Disk Utility has changed the name of the destination volume to be the same as the source. You do not want to leave it that way, so immediately rename one of them. In the sidebar of the Finder window opened above, control-click (right-click) the one you want to rename. When done, look back at the Disk Utility display to be sure you renamed the right one, then quit Disk Utility.
•Using LEOPARD 10.5.x (also works on Snow Leopard and later, if desired):
2.Copy NETWORK backups to another NETWORK location
•ALL VERSIONS OF OSX
If you're copying to a Time Capsule, configure your Time Capsule for your network. (See the documentation that came with your Time Capsule for information about setting it up on your network.)
If you're copying from one Time Capsule to another Time Capsule, give the new one a different name. Then use one Ethernet cable to connect your Mac to the Ethernet port on the existing Time Capsule, and use another Ethernet cable to connect from the existing Time Capsule to the new one if at all possible. If not, leave your Mac in the same room as the Time Capsules.
If you're copying to a USB drive to be connected to a Time Capsule, Airport Extreme, or another Mac on your network, connect it directly to your Mac and format it with either the GUID or APM Partition Map Scheme, and either Mac OS Extended (Journaled) or Mac OS Extended Case-sensitive, journaled) Format. See question #5 if you need detailed instructions.
a.Be sure the new network location appears when you click Select Disk in Time Machine Preferences, but don’t actually select it (or start a backup) yet.
b.If possible, connect the old and/or new drive(s) directly to your Mac (or a Time Capsule via Ethernet).
c.Drag the sparse bundle from the old network location to the new one.
Note that the copied sparse bundle will have the same maximum size as the old one. (Just to be contrary, though, Time Machine Preferences will show the new volume’s size.)
SNOW LEOPARD: 10.6.3 and 10.6.4 (and on some installations, later versions):
That's not a problem; Time Machine will increase it automatically to the size of the volume it’s on, during the next backup. You're done!
All other versions of OSX:
If the new Time Capsule or other network location is larger than the old one, you probably want to increase the maximum size of the sparse bundle, per the blue box in Section #A8.
3.Copy Local backups to be used on a NETWORK
ALL VERSIONS EXCEPT LEOPARD 10.5.x (you cannot convert Local Backups to Network on Leopard):
If you're copying to a Time Capsule, configure your Time Capsule for your network. (See the documentation that came with your Time Capsule for information about setting it up on your network.)
If you're copying to a USB drive to be connected to a Time Capsule, Airport Extreme, or other Mac, connect it directly to your Mac and format it with either the GUID or APM Partition Map Scheme, and either Mac OS Extended (Journaled) or Mac OS Extended Case-sensitive, journaled) Format. See question #5 if you need detailed instructions.
a.Configure Time Machine to back up to the network location, and start a backup.
b.After the sparse bundle is created, and copying starts (xxx GB of yyy GB appears on the Preferences window, cancel the backup (that may take a few moments).
c.If possible, connect the new drive directly to your Mac (or a Time Capsule via Ethernet).
d.Use the Finder to mount the new sparse bundle.
e.Double-click it to mount the Time Machine Backups partition inside it.
f.Click the Time Machine Backups partition to open it, and delete the Backups.backupdb folder inside it.
g.If the old backups are case-ignorant (per the yellow box above), you must change the new sparse bundle to be case-ignorant, too:
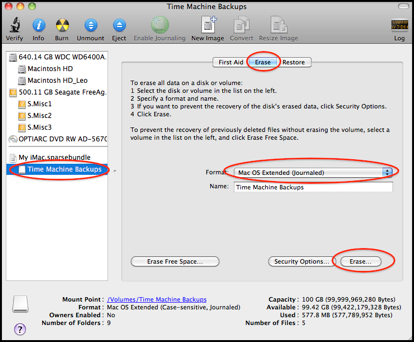
2. Select the same Format as the backups being copied (per the yellow box above) and click the Erase button.
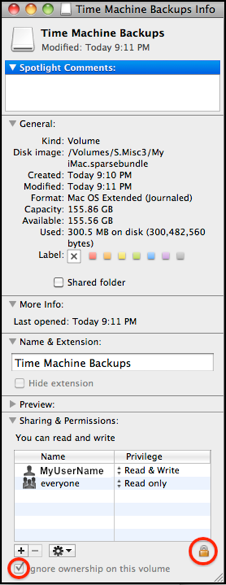
3.Via the Finder, do a Get Info on the Time Machine Backups partition.
4. Click the padlock at the lower right and enter your Admin password at the prompt.
5. Remove the check from the Ignore ownership on this volume box and close the window.
h.Via the Finder, drag the Backups.backupdb folder from the old volume to the new Time Machine Backups partition. Enter your Admin password when prompted. After a few moments, you may also get a prompt saying that you'll need to enter it again later: click Continue.
4.Copy NETWORK backups to be used LOCALLY
ALL VERSIONS EXCEPT LEOPARD 10.5.x (you cannot convert Local Backups to Network on Leopard):
a.Format the new drive/partition, with either the GUID or APM Partition Map Scheme, and the exact same Format as the old backups. See question #5 if you need detailed instructions.
b.Control-click (right-click) the new volume on your desktop or Finder sidebar and select Get Info. If the Ignore ownership on this volume box is checked, click the padlock at the lower right and enter your Admin password at the prompt. Then remove the check mark from the box and close the window.
c.Connect the old drive directly to your Mac if possible.
d.Use the Finder to mount the old sparse bundle.
e.Double-click it to mount the Time Machine Backups or Backup of <computer name> partition inside it.
f.Click the partition to open it, and drag the Backups.backupdb folder from the disk image to the top level of the new volume. Enter your Admin password when prompted. After a few moments, you may also get a prompt saying that you'll need to enter it again later: click Continue.
If you copy via the Finder (by dragging) per the How to instructions below, you'll see several small windows during the (usually lengthy) process:
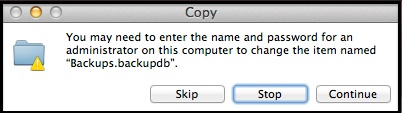
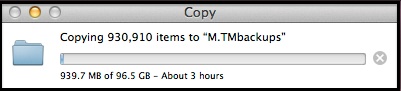
•A prompt for your Admin password.