Time Machine - Troubleshooting
B6. "Reconnecting" to your backups
Time Machine - Troubleshooting
B6. "Reconnecting" to your backups
Some situations can cause Time Machine to start a new, full backup when you don't want it to. (If you're not sure what you're running, click here.) On Snow Leopard 10.6.x and later:
•You get a new Mac and transfer at least Settings from the old Mac or its backups via Setup Assistant (preferred) or Migration Assistant, or,
•Your Mac's logic board (motherboard) is replaced, or,
•You get a new internal HD, or erase your internal HD and transfer everything to it via a full system restore (preferred), or if you transfer at least Settings to it from a backup via Setup Assistant (preferred) or Migration Assistant.
If you do any of those things, then start a backup to the existing backups, you should be asked whether to start a new set of backups (that does not happen until the backup actually gets started.) See item #B5 for details and instructions. If you weren't asked, and a full backup starts, effective with Lion 10.7.x, you may be able to prevent a full backup by cancelling it and using the appropriate procedure below (on Snow Leopard, you cannot prevent it).
•You get a new Mac or internal HD or erased and restored your internal HD, but moved your data to it by other methods (such as restoring from a "clone" or drag & drop), Time Machine will probably do a full backup.
•You get a new data-only drive or partition, or erase and restore one, Time Machine will do a full backup of that volume (not any others).
If you did one of those things, when the next backup starts and Time Machine starts a full backup, effective with Lion 10.7.x you may be able to prevent that, by cancelling it and using the appropriate procedure below (on Snow Leopard, you cannot prevent it)
If you get a new Mac and don't transfer your stuff as above (or don't get the prompt in item #B5), you can make your new Mac "inherit" the backups of your old one (but if your backups were made over a network, it may not work). You'll need to use the procedures in both the blue and pink boxes below.
If your Logic Board is replaced, you can make your new Mac "inherit" the backups of your old one, per the blue box below.
If you replace or erase your internal HD and don't transfer your stuff as above, you can tell Time Machine to "associate" the backups to the new HD per the pink box below.
If you replace or erase a data-only volume (or a second OSX volume) and restore the data, you can tell Time Machine to "associate" the backups to the new HD per the tan box below.
These procedures require using the Terminal app, in your Applications/Utilities folder.
Be extremely careful when using Terminal. It is a direct command-line interface into UNIX, the underpinning of OSX. Unlike the Finder, there are few protections against making a mistake, which can cause untold damage.
In Terminal, the prompt looks like this: <ComputerName>:~ <your name>$
(where <your name> is your short user name). It's followed by a non-blinking block cursor. When you first start it, you'll see something like this:

The commands below are prefaced by the term "sudo" which means to execute the command with "root" or "super user" privileges. The first time you use it in a session, you'll see some warnings and a prompt for your Admin password (nothing will be displayed as you type your password). Press Return again.
Normally, there are few error or confirmation messages in Terminal. When a command completes, you usually just see another prompt.
"Inherit" a backup
Copy the following after the prompt, and leave a space, but do not press Return yet:
sudo tmutil inheritbackup
If your backups are on an external HD, locate and open the drive in the Finder window. At the top level of the drive is a Backups.backupdb folder containing a folder named for your old Mac, per the sample. This is what you want the new Mac to "inherit." Drag that folder to the Terminal window.
(If your backups are on a Time Capsule or other network location, find the sparse bundle containing the backups for your old Mac via the Finder, per the green box below, and drag it to the Terminal window):
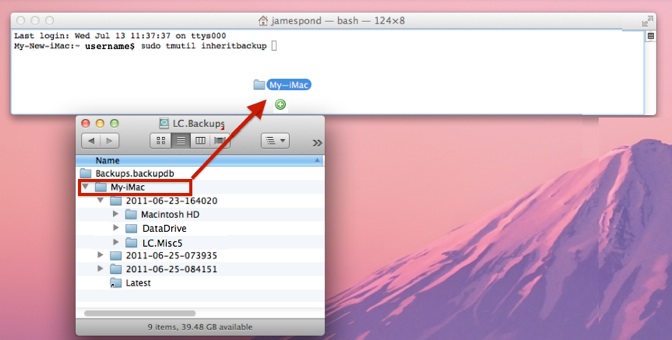
Terminal will supply the "path" to the dragged folder or sparse bundle (underlined in red):

Note that it will insert a back slash (\) before any spaces in the names. That's normal.
Press Return, enter your Admin password if prompted (it won't be shown) and press Return again.
"Associate" an OSX volume
To "associate" the OSX volume you're running from, copy the following after the prompt, leave a space after the slash, but do not press Return yet:
sudo tmutil associatedisk -a /
Be sure there's a space after the slash. Open the backup drive in the Finder window (if your backups are on a network, see the green box below). At the top level of the drive is a Backups.backupdb folder containing a folder named for your old Mac. Inside that are a series of time-stamped folders. Inside each of those is one folder for each volume (disk or partition) that was backed-up. Locate any folder for the "old" volume, but it's usually best to use the latest backup that you're sure was made from the "old" drive). Drag it to the Terminal window:

Terminal will supply the "path" to the dragged folder (underlined in blue):

Note that it will insert a back slash (\) before any spaces in the names. That's normal.
Press Return, enter your Admin password, if prompted (it won't be shown) and press Return again.
Note that Time Machine will change the name of the disk on the existing backups to the name of the new one. In the sample, if the new OSX disk is named Lion, the disk name on all the old backups would be changed from Macintosh HD to Lion. (That may take a few moments.)
As noted above, if you make a mistake with one of these commands, there may not be an error message. If there is one, it may be in "geek speak," unfortunately.
If done correctly, the next backup should not be a full one, but it will take longer than normal, especially after using the associatedisk verb. But if you've moved or renamed anything, those items will be backed-up in full, including all the contents of a moved or renamed folder. That applies, of course, to any new or renamed user home folders.
However, in some cases, especially on 10.7.0, Time Machine may say it's going to do a full backup; delete a lot of old backups if necessary; copy data very, very slowly; but only actually do an incremental backup. This seems to happen less frequently on later versions.
"Associate" a data-only volume (or a second OSX volume)
This is similar to the procedure in the pink box above. There, the first slash represents the current OSX volume, but in this case, you want the new data-only or second OSX volume.
Copy the following after the prompt, leave a space after the -a, but do not press Return yet:
sudo tmutil associatedisk -a
From a Finder window, drag the new disk/partition to the Terminal window. It will supply the path as above. If it's not followed by a space, add one, but do not press Return yet.
Now follow the instructions in the pink box to drag the old volume from the Finder window containing the backups to the Terminal window, and press Return. The final command should look something like this (the new data-only drive is "NewDataDrive", underlined in orange; and the backups of the old one were on "M.Misc", underlined in blue):

As in the pink box, if the disk names are different, Time Machine will change the old name on the backups to the new one. (That may take a few moments.)
Before starting: Log on as an Admin user, and make sure the backups in question are connected to your Mac.
Open a Finder window to the backups, preferably in List or Column view, and leave it on the screen, as you'll be dragging things from it into the Terminal window as detailed below.
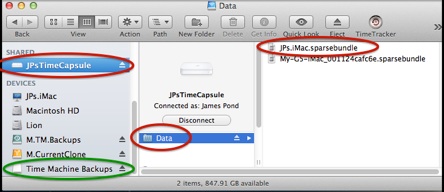
If your backups are on a network
Follow the instructions in the blue and/or pink box above as desired, to the instructions to use this box to get the network backups in a Finder window:
1.In a Finder sidebar (samples in
Column View), click the network
server (Time Capsule or NAS)
name.
If the server isn't shown, from a
Finder menubar, select Preferences
> Sidebar and make sure the
Connected Servers box is checked.
2.Find the disk/volume, connect to
it if necessary, and double-click it.
That should show the sparse bundle
named for your Mac. (The name
may not include ".sparsebundle.")
3.To "inherit" the backup, return to
the blue box above and drag the
sparse bundle into the tmutil
command. Do not mount or open
the sparse bundle -- if it's already
mounted, eject it.
4.To "associate" the backups to a new or erased drive, double-click the sparse bundle to mount it. After a moment, the Time Machine Backups (or Backups of <computer>) disk image should appear in the sidebar (green circle).
If it doesn't, from a Finder menubar, select Preferences > Sidebar and
make sure the External Disks box is checked.
5.Double-click that to open it. That will show another Finder window, showing the Backups.backupdb folder as in the sample in the blue box above.
6.Scroll down. If there's an ".inProgress" package, and you've had several failed backups, you may want to delete it. Connect via Ethernet cable if at all possible -- it may take a long time, but be 2-3 times faster than WIFI. You'll have to enter your Admin Password. Hold the Alt/Option key while emptying the trash -- that may take a long time.
7.Follow the rest of the instructions in the pink box.
8.Eject the Time Machine Backups disk image.
9.Open the Activity Monitor app, in your Applications/Utilities folder. Select All processes in the toolbar, then sort by Process Name (click in the header). If there's a backupd process listed, select it and click the Quit Process icon in the toolbar. Select Quit in the prompt.
10.Whew! Now try running a backup. It will take a while (so connect via an Ethernet cable if at all possible).

Note: Leopard backups cannot be inherited without a very "techie" workaround. If there's room on your Time Machine drive, your best bet is to let Time Machine start a new set. You can always see and restore from the old set via the Browse Other Backup Disks, per section #E2. Note that Time Machine will not delete old backups from that set; when you no longer need them, you'll have to do it manually, per Time Machine FAQ #12. If there isn't enough room on the drive, either erase it (delete the sparse bundle if they're on a network), or let Time Machine start fresh on a different one, and use Browse Other Backup Disks to see them.
If you didn't do one of the things listed above, this page does not apply to your situation and will not prevent large or full backups.
See section #D3, or section #D4 for other causes and possible remedies.