Time Machine - Troubleshooting
E3. I can't see backups for a disk/partition that's no longer connected
Time Machine - Troubleshooting
E3. I can't see backups for a disk/partition that's no longer connected
For the examples below, let's assume you have too many photos and videos to fit on your internal HD, so you've put them on an external HD, and named it MyMedia.
Normally, while that drive is connected, it will appear on your Desktop and/or Finder Sidebar (if the External Disks box is checked in Finder > Preferences > General and/or Finder > Preferences > Sidebar, respectively). You can display its backups by selecting it in either place, then using either Enter Time Machine or Browse Other Backup Disks.
But if the disk isn't connected, it may not be obvious how to see the backups.
There are three similar, but slightly-different, situations:
•If a previously backed-up disk is no longer connected (or has failed), and you're having trouble finding its earlier backups, see the green box below.
•If a disk or partition has been erased or replaced, and you see only the current backups but need the older ones, see the blue box below.
•If you've excluded a previously backed-up disk or partition from backups (via Time Machine Preferences > Options), and done subsequent backups of the rest of your system, so the backups of that disk or partition no longer appear, but you need them, see the tan box below.
To restore selected items, or the entire contents of a volume in any of these situations, see the pink box below.
To Restore selected items, or the entire contents of a volume (disk or partition):
To restore an entire OSX volume, use the procedure in Frequently Asked Question #14.
To restore selected item(s) from a data-only volume, select them, control-click, and select Restore <item> to... You'll then get a prompt to select the desired location.
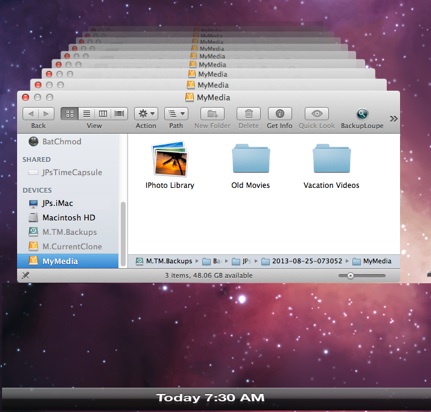
Instead, click the MyMedia folder in the center to show the contents:
Then select and control-click all the top-level folders and select the Restore <items> to... option. You'll then get a prompt to select the desired location.
Note: in some circumstances,
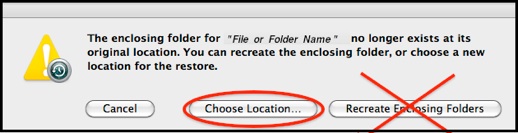
You'll then get a prompt to select the desired location, as if you'd selected the Restore <items> to... option.
DO NOT SELECT Recreate Enclosing Folders if the drive has been replaced, or is no longer available -- that will restore to the hidden Volumes folder on your internal HD!
If you restore selected items, those items will be treated as new on the next backup, and backed-up in full.
If you restore the entire contents to a new or erased drive, the next backup will be a full one (everything on the drive), and you'll continue to have to use the procedure above to see the old backups. Effective with Lion, you may be able to tell Time Machine to "associate" the new or erased drive with the old backups, per Item #B6.
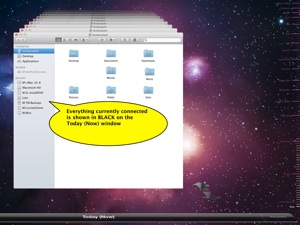
To see the backups of a volume that’s no longer connected:
Open a Finder window and select your computer name in the Finder Sidebar (or press Shift+Cmd+C).
Then either Enter Time Machine or Browse Other Time Machine Disks (see section #E2).
If you're already in the Time Machine browser, looking at something else, you can select your computer name in the Finder Sidebar (or press Shift+Cmd+C).
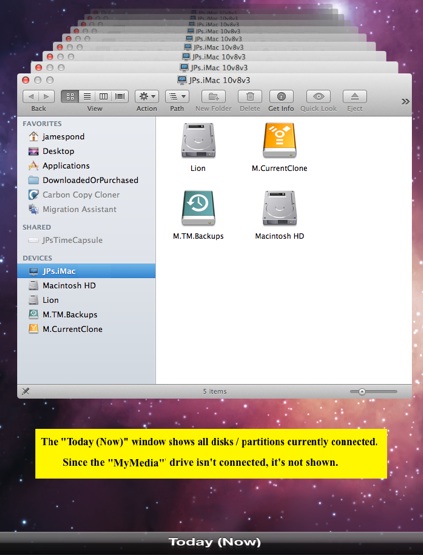
On the first Finder window in the "cascade," labelled Today (Now), you'll see all the volumes currently connected to your Mac.
Disk MyMedia, which was backed-up previously, but has failed or been disconnected, does not appear.
Do not select anything in the Today (Now) Finder window.
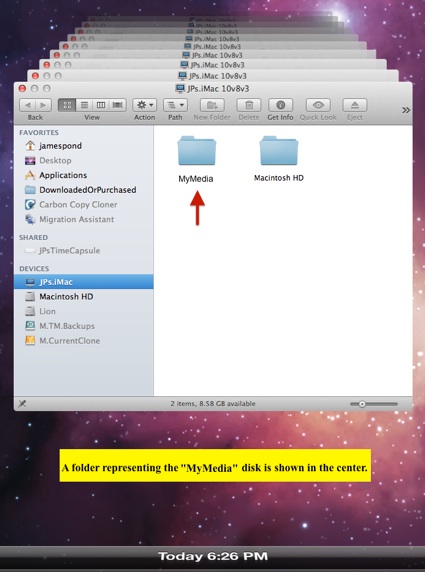
The folder for MyMedia does appear in the center only, but not in the sidebar.
Double-click the folder for MyMedia; then you can navigate to whatever you're looking for.
Note that other things in the Finder sidebar that are now connected, but were not included in the backup being displayed are shown in gray, not black, and of course you can’t select them.
To see the prior backups of a volume that’s been excluded:
Open a Finder window and select your computer name in the Finder Sidebar (or press Shift+Cmd+C).
Then either Enter Time Machine or Browse Other Time Machine Disks (see section #E2).
If you're already in the Time Machine browser, looking at something else, you can select your computer name in the Finder Sidebar (or press Shift+Cmd+C).
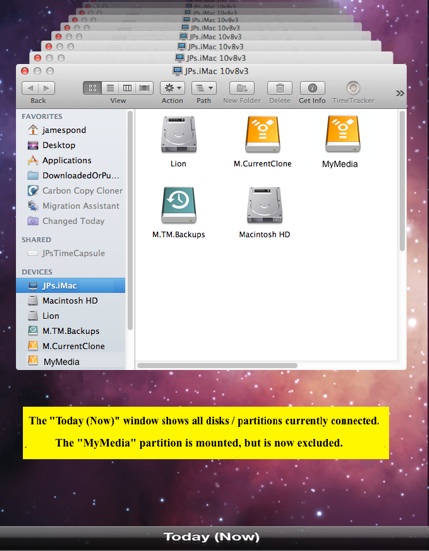
On the first Finder window in the "cascade," labelled Today (Now), you'll see all the volumes currently connected to your Mac.
Partition MyMedia, which was backed-up previously, but has since been excluded, appears normally on the Today (Now) page.
Do not select anything in the Today (Now) Finder window.
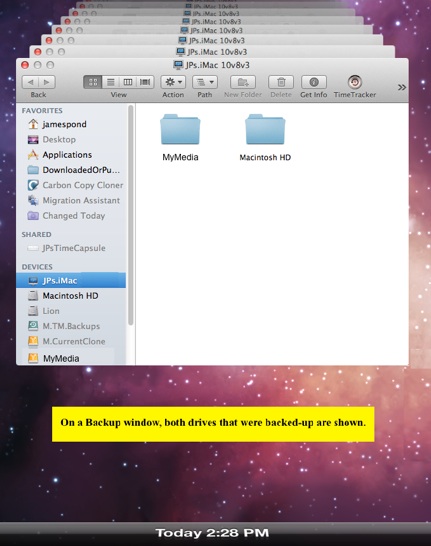
The folder for MyMedia does appear, since it was included on the selected backup.
Double-click the folder for the MyMedia, then you can navigate to whatever you're looking for.
Note that things in the Finder sidebar that were not included in the backup being displayed are shown in gray, not black, and of course you can’t select them.
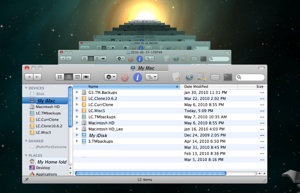
To see the backups of a volume that’s been erased or replaced:
•If the replacement has a different name (even slightly different) it will appear just as expected, like any drive; the old one will appear as in the green box above.
•If the replacement has been given the identical name as the original, Time Machine will add a "1" to the name, as in the second sample below.
Open a Finder window and select your computer name in the Finder Sidebar (or press Shift+Cmd+C).
Then either Enter Time Machine or Browse Other Time Machine Disks (see section #E2).
If you're already in the Time Machine browser, looking at something else, you can select your computer name in the Finder Sidebar (or press Shift+Cmd+C).

On the first Finder window in the "cascade," labelled Today (Now), you'll see all the volumes currently connected to your Mac.
Disk MyMedia, which was backed-up until it failed, has been replaced with a new drive, also named MyMedia, which has also been backed-up.
The new MyMedia drive is shown on the Today (Now) window and a folder for it is in the center.
On any backup prior to the failure, the MyMedia folder will appear normally in the center part of the window. But it represents the OLD disk.

On any backup after the replacement, Time Machine will show
•The current drive as MyMedia
•The old drive as MyMedia 1
Double-click the folder for the desired volume or its icon in the sidebar; then you can navigate to whatever you're looking for.
Note that other things in the Finder sidebar that were not included in the backup being displayed are shown in gray, not black, and of course you can’t select them.