Time Machine - Frequently Asked Questions
15A. How do I use the (not so intuitive) Time Machine display?
Time Machine - Frequently Asked Questions
15A. How do I use the (not so intuitive) Time Machine display?
You can Enter Time Machine by clicking the Time Machine icon in your Dock, or select Enter Time Machine from the TM icon in your menubar. Usually, a Finder window will appear, as in the samples below. But if you start from Address Book or Mail, or in some cases iPhoto, you'll see those windows. The basic workings are the same for all. See FAQ #15 for details on the other windows.
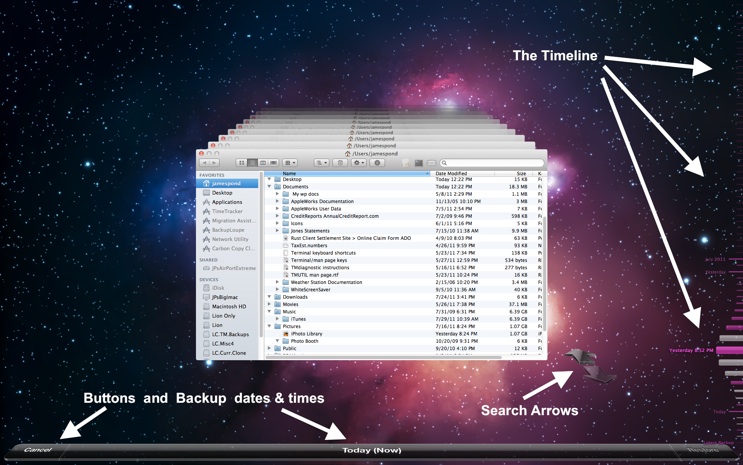
The first display is titled Today (Now) at the bottom, and shows the current contents of the folder, drive, or whole system that was selected in the Finder window when you started.
If you don't find the "Star Wars" display intuitive, PLEASE tell Apple at: Time Machine feedback. If you think there should be a menubar or other way to access Time Machine Help from it, please mention that, too.
There are some variations depending on what version of OSX you're on. (If you're not sure which you're running, click here). Here's a guide to the elements on Lion 10.7.x and later (Snow Leopard and Leopard are a bit different):
There's a "cascade" of windows similar to the one you started from. When you first arrive, the one in front is "Today (Now)" and shows the current contents of your system (not a backup). Behind it are versions of how that window looked at the time of each backup, receding back into history.
The Timeline on the right shows a "tick" mark for "Now" and one for each backup.
You can view the backup windows either by clicking the windows or by navigating in the Timeline and clicking the date/time you want to see.
If you highlight an item in one window, that same one will be highlighted on the others.
You can use the search box in the window's toolbar and the search arrows to search for the next or previous backup where the contents match the search string. If you leave the search box blank, the arrows will take you to the next or previous one where the contents of the window are different from the one you're looking at, not necessarily the next or previous backup.
Note that what you see once you're in Time Machine depends on how your Finder window appeared before you clicked the Time Machine icon. If you were on your Desktop, you'll see a Finder window showing only your Desktop; if on your home folder, when you get into Time Machine, that's what you'll see. Once there, you cannot add a sidebar to select other places, or the toolbar (you may need the "gear" or "action" icon if you’re on Leopard) by clicking the lozenge in the upper right. If you need these, select them before entering Time Machine.
To see the backups of something different, select the current contents of what you want in a Finder window before Entering Time Machine, or, if you're already there, select something (like your home folder or internal HD) in the Finder sidebar. Also see the pink box below.
See below for details:
•The Lion and later Timeline: tan box
•The ~/Library folder on Lion and Later: yellow and gray boxes
•The Snow Leopard and Leopard Timeline: blue box
•The Buttons and Backup Date and time bar: green box
•If a "tick mark" is faded-out and can't be selected: pink box
•Keyboard shortcuts and options: gray box
The Snow Leopard 10.6.x and Leopard 10.5.x Timeline:
The display may take a while to "populate;" it may seem hung, especially if your backups are on a network. It may take a few moments to settle down, and if you change the contents of what you're looking at (such as by selecting something different in the sidebar), it may need to be re-calculated and refreshed, with more moments when it's unresponsive.
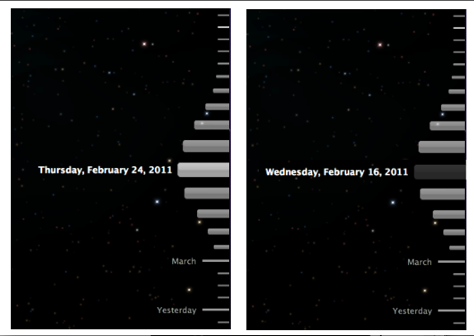
Note how the button is faded-out in the sample on the right. That means that whatever's shown in the window on the display was not included in that particular backup (the window for that backup will be faded-out, too, and you can't select it).
See the pink box below for possible reasons.
The Buttons and Backup date & time bar
Since there is no menubar, this bar does double-duty. The date and time of the currently selected backup (or current contents of your Mac) are shown in the center.
Press Cancel (or click the close button in the window) to quit the Time Machine display.
At the right is the Restore button. It will be enabled when you select something in the window.
Note that Restore will restore the item(s) to their original locations if possible, and you'll get a prompt if that isn't possible or there's a conflict. See the green boxes in question #15.
To restore to a different location, see question #16.
To delete a backup, or all backups of a selected item, see question #12.
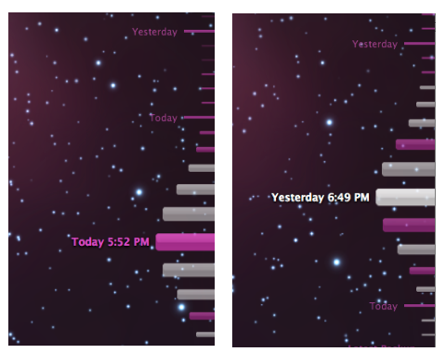
The Lion 10.7.x & later Timeline:
The display may take a while to "populate;" it may seem hung, especially if your backups are on a network. It may take a few moments to settle down and become responsive, and if you change the contents of what you're looking at (such as by selecting something different in the sidebar), it may need to be re-calculated and refreshed, with more moments when it's unresponsive. There is no progress bar, wheel, or other indication why it seems stuck or sluggish.
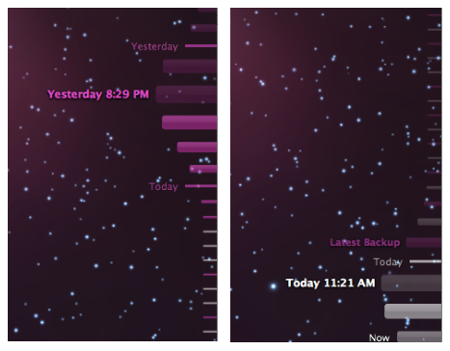
If you have a portable Mac, the white "tick marks" indicate Local Snapshots on your startup disk.
Like normal Time Machine backups, Local snapshots are usually made hourly. If your Time Machine volume is available, both are normally done at the same time, so you'll see only purple tick marks for those backups.
If the Time Machine volume wasn't available, at the time of the backup, Local snapshots continue on the same schedule, so for that period you'll only see white ones.
The Today(Now) item, representing the current contents of your system, is shown in White.
As you move your mouse over the timeline, it will expand the "tick" marks into buttons as in these samples, showing the date and time for the one where your mouse is.
That means that whatever's shown in the window on the display was not included in that particular backup (the window for that backup will be faded-out, too, and you can't select it). See the pink box below for possible reasons.
Note: if your Time Machine volume is not available, all the purple tick marks may still be shown, but faded-out.
For more detail on Local snapshots, see Question # 30.
If a "tick mark" is faded out and can't be selected
It means that whatever's shown in the window on the display was not included in that particular backup (the window for that backup will be faded-out, too, and you can't select it).
Several things can cause that:
•The folder currently shown in the window didn't exist then, such as a folder that was created later, or has been moved or renamed even slightly. If so, select something else in the sidebar that did exist, such as your home folder, internal HD, or Computer name (if your Computer isn't shown in the sidebar, press Shift+Cmd+C), and navigate to the item in question.
•You're looking for something on a different drive/partition. Select that drive/partition in the sidebar, and/or see the gray box in question #32 for details and a sample.
•The item was excluded from backups. See question #10 for details.
•Effective with Lion 10.7.x, if the backup destination isn't available at the moment, all the purple tick marks may be shown, but faded-out.
The ~Library folder effective with Lion 10.7.x
Apple hides the ~/Library folder (meaning the Library folder inside your home folder), from users, apparently to protect us mere mortals from messing with it. That's kind of a problem when we need to.
To see it on a Finder window before entering Time Machine, hold the Alt/Option key while selecting the Go item in the menubar. That will produce a list of common places, including Library (about halfway down). Or, press Shift+Cmd+G and type ~/Library in the prompt. That will show it in the Finder window, and also in the Finder windows once you're in the "Star Wars" display.
If you forget to to do that first, once you're in the "Star Wars" display, press Shift+Cmd+G and type ~/Library in the prompt.
(To make it visible permanently, on a "normal" Finder window, drag it into the sidebar.)
Keyboard shortcuts and options
Since there's no menubar, you might think none of the standard Finder keyboard shortcuts work in the Time Machine browser. You'd be partly right. Here's a summary of the things you can do once in the browser. Of course, which options you see and can use will vary some depending on what's on the screen, whether one or more items are selected, even whether you're looking at an external backup or a Local Snapshot:
Keyboard shortcuts:
Shift+Cmd+A Applications
Shift+Cmd+C Computer
Shift+Cmd+D Desktop
Shift+Cmd+G Go to Folder prompt (type ~/Library for your home folder's Library)
Shift+Cmd+H Home
Shift+Cmd+O Documents
Shift+Cmd+U Utilities
Option+Cmd+L Downloads
Cmd+1 Icon View
Cmd+2 List View
Cmd+3 Column View
Cmd+4 Cover Flow View
Contextual Menu:
click the "gear" icon in the toolbar or select one or more items and control-click (right-click)
Open
Restore <item(s)> to .. (an alternate location)
Delete all backups of <item(s)> (selected item(s))
Delete backup (entire backup)
Get Info
Quick Look
Arrange by
Print Screen:
Shift+Cmd+3 Print entire screen
Shift+Cmd+4 to print a selected portion does not work