OSX Tips: Using Disk Utility
7. Copying a Volume via the Restore tab
OSX Tips: Using Disk Utility
7. Copying a Volume via the Restore tab
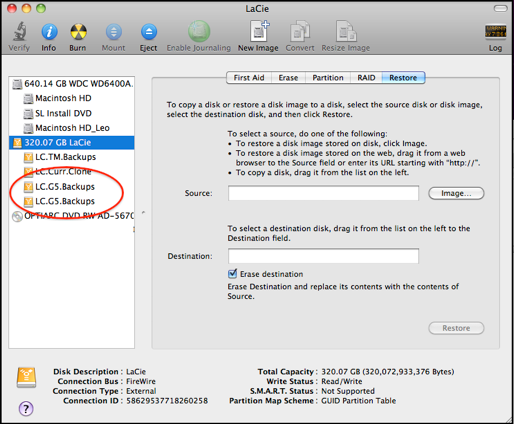
You can copy one volume to another with the Restore tab of Disk Utility.
This is handy for several tasks:
•Copying your OSX Install disc (Snow Leopard or earlier) to a partition on an internal or external HD. Then you can start up and run from it, instead of the Install disc, so you don’t have to find it or risk scratching it. An additional benefit is, besides the time saved by not having to look for the disc, your Mac will start and run much faster from such a partition than from the Install disc (there’s one on the internal HD in the samples below).
•Restoring a disk image’s contents to a disk. The image being copied can be on a disk connected to your Mac, a CD or DVD mounted in your SuperDrive, or available on the internet.
•Copying Time Machine backups to a new and/or larger volume on the same or a different disk. But if the backups are damaged or corrupted, the restore will fail. Try to repair them, per item #6. This only works on backups made on an internal disk or a directly-connected USB or FireWire disk, to be used locally (not over a network). For other situations, see Time Machine FAQ #18.
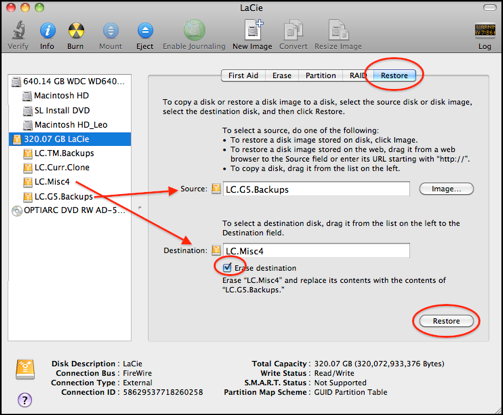
Select any disk or volume in the sidebar, then click the Restore tab. Instructions are shown in the center portion.
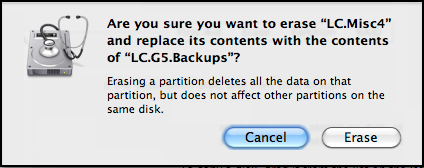
Effective with Lion, there is no Erase Destination box; that's done automatically. On Snow Leopard or earlier, if you’re copying your Install disc, or a disk image that you’ll want to use to start up your Mac, or Time Machine backups, the Erase destination box must be checked.
Then you’ll be asked for your Admin password.
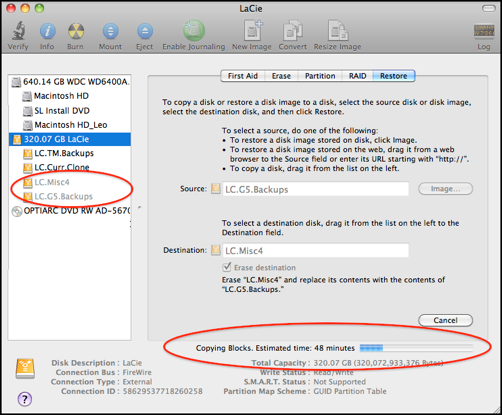
You can Cancel the copy if necessary without damage, but the process will have to be restarted from the beginning.
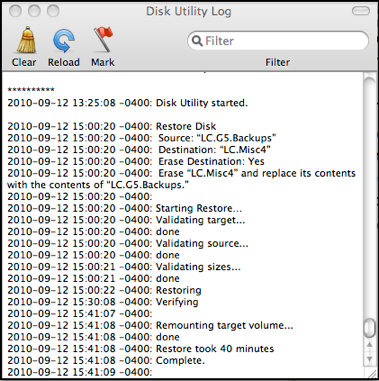
Click Window > Show Log in the menubar to display them in a separate window:
Don’t quit Disk Utility yet; control-click (right-click) one of them in a Finder Sidebar, change it’s name, then look back at the Disk Utility window to be sure you changed the right one.
In some unusual cases, you may want to add everything from one volume (disk/partition) to your Startup volume (prior to Lion). But you cannot do that while OSX is running from it. Instead, you must start your Mac up from a different source: your OSX Install disc or a different disk that has OSX installed on it. Be sure you use a compatible version of OSX -- if you’re running Leopard, use a Leopard disc; if you’re running Snow Leopard, use a Snow Leopard disc. (If you're not sure what version of OSX you're running, see OSX Versions).
To start up from your OSX Install disc, insert it in the SuperDrive. Then:
•Either wait for the Mac OS X Install DVD window and double-click the Install icon; or power down, then start up while holding down the "C" key. Either way, that takes a few minutes.
•Select your language when prompted.
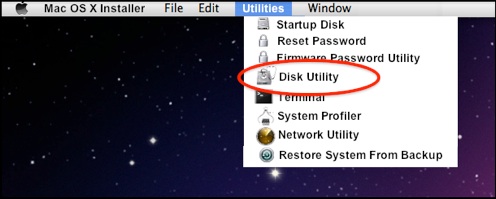
•On the next screen, select Utilities in the Menubar, then Disk Utility.
•When you set up the restore, be certain to remove the check from the Erase destination box !!