OSX Tips
Using the Recovery HD
•Start your Mac while holding down the Alt/Option key.
That will bring up the Startup Manager, showing all possible startup volumes:
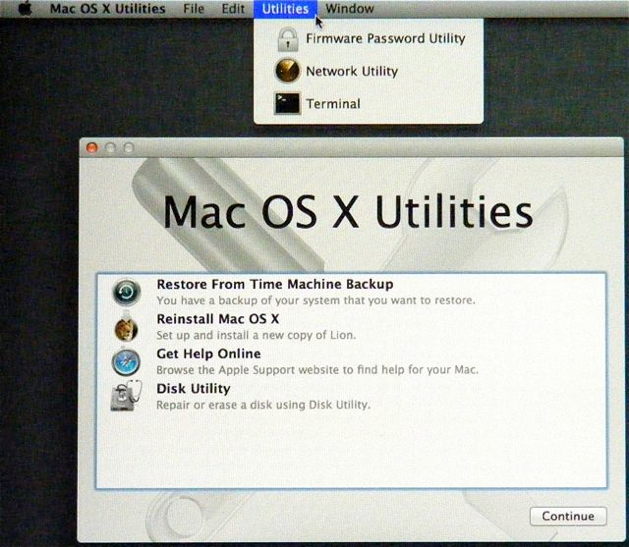
The Utilities Menu items in the menubar
Firmware Password Utility
allows you to set a low-level password protection. See Setting up firmware password protection in Mac OS for instructions and details.
Network Utility
provides network information and troubleshooting tools. Also available when OSX is running, in your Applications/Utilities folder.
Terminal
is a direct command-line interface into UNIX, the underpinnings of OSX, but without the checks and protections of the Finder and other apps. Unless you're familiar with it, be extremely cautious with this app, as a tiny mistake can destroy your data. Also available when OSX is running, in your Applications/Utilities folder.
Either way, then you'll see the Utilities menu:
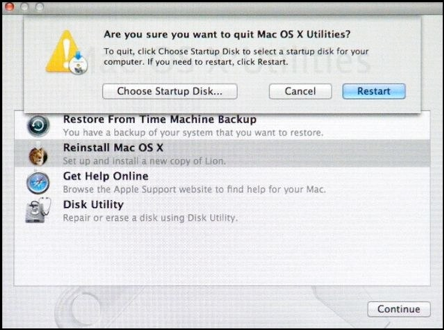
Click the Mac OS X Utilities item in the menubar and select Quit (or press Cmd-Q). You'll see this:
Click the Choose Startup Disk button, and select the volume you want to start up from.
Mac OS X Utilities
Restore From Time Machine Backup
allows you to restore your entire system (OSX volume) to the exact condition it was in at the time of any backup. See How do I restore my entire system? for details.
Reinstall Mac OS X
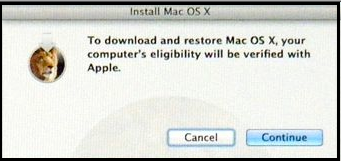
Click the Continue button. "Loading installation information ..." will appear on the prompt briefly, then the usual License agreement will appear.
To Exit from any option
Just close the window or press Cmd+Q to return to the Utilities menu.
To Exit from the Recovery HD
Get Help Online
You'll see some instructions for the Recovery HD options, plus how to Restore your computer to factory settings.

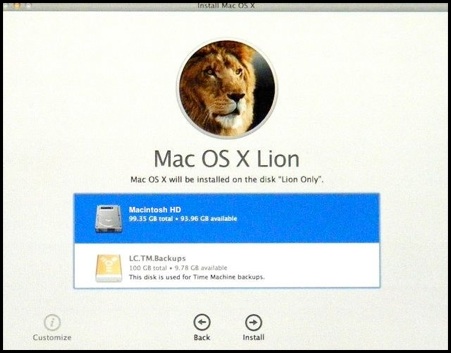
All volumes will be listed; any that can't be used will be shown in gray, with a reason, such as the Time Machine backups in the sample.
Select the one you want and click Install.
Then you'll see a Downloading window with a progress bar, and estimated time.
When done, your Mac will restart, to the Installing OSX window, with progress bar.
Then your Mac will restart into Lion.
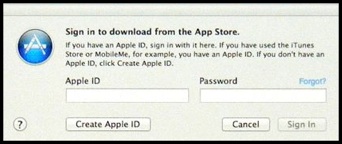
Next, you must log on to the App Store:
•Start your Mac while holding down the Command and R keys. That will start from the Recovery HD associated with the last OSX volume you were running from. If it doesn't, shut down and use the Alt/Option key:
You can also copy the Recovery HD to a partition on an external HD. See OS X Lion: About Lion Recovery Disk Assistant. It, too, can only be accessed via Startup Manger, by starting up with the Option key.
Effective with Lion, Macs normally have a hidden partition on their internal HDs containing a "Recovery HD." In some cases, such as if the OSX volume is on a RAID set, it won't.
This is the rough equivalent of having a copy of an OSX Install Disc on your system, but is much more convenient (except for the Reinstall OSX option, which is much slower). See OS X Lion: About Lion Recovery.
You may be able to create an Install disc or partition after purchasing Lion or Mountain Lion from the AppStore (but not after Reinstalling via the Recovery HD). See Making a Lion Install disc or partition for instructions.
You can start from the Recovery HD in either of two ways:
Effective with Lion 10.7.2, if you have Time Machine backups on a directly connected USB or FireWire drive with the GUID partition map scheme, it should have a copy of the Recovery HD (after your first backup on 10.7.2 or later). So if your internal HD is damaged, you can start from the copy on your Time Machine drive (green arrow; the icon may be green or yellow) and either restore your backups or reinstall OSX. Note that Command+R will not find or start from this copy; you must start with the Alt/Option key.
Note: a few multi-interface drives don't show any bootable volumes when connected via FireWire (but do if connected via USB).
Or, if you have a USB 3.0 card, it seems the drivers aren't loaded by the Startup Manager, so connect via USB 2.0 if possible.
Disk Utility
is the same as the version of Disk Utility that's in your Applications folder. You can use this one to erase, repair, or reformat your internal or external HD(s) as necessary. See Using Disk Utility for details.
Using Safari on the Recovery HD
This is a separate version of Safari -- you won't see your preferences, saved bookmarks, browser history, etc., and saved website passwords won't be available for autofill.
You can use this version normally, but if you need to download something, you’ll have to set the download location (otherwise, it will try to download to the Recovery HD itself).
Select Safari > Preferences > General. On the Save downloaded files to pop-up, select Other and select the location (probably on your internal HD, usually named Macintosh HD) you want. You won’t see your home folder directly; you’ll have to navigate to it by selecting the internal HD, then the Users folder, then your home folder, then your Desktop or Downloads or other folder.
You won’t be able to use any such files from the Recovery HD, but will have to restart either from your normal Startup Drive or other source.
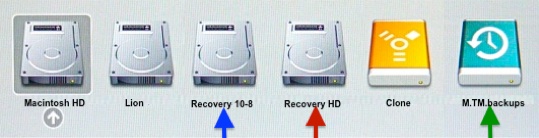
In the sample, the Macintosh HD drive/partition is running Mountain Lion 10.8.x. The Recovery HD associated with it is automatically named Recovery 10-8 (blue arrow), or it may be named Recovery 10.8.1, 10.8.2, etc.
The Lion drive/partition is running Lion. The Recovery HD associated with it is automatically named Recovery HD (red arrow).
Click the one you want to select it, then press Return or click your mouse on the circled arrow.