Time Machine - Frequently Asked Questions
30. What are Local Snapshots?
Time Machine - Frequently Asked Questions
30. What are Local Snapshots?
Disk Space considerations:
Local snapshots require space on your internal HD (and any other disk/partition that Time Machine is backing-up), but only if there's at least 20% free space: Time Machine will delete some or all as necessary, and make no new ones, if the drive gets over 80% full. See Automatic deletions below.
The Finder (including Get Info and the space "available" shown at the bottom of Finder windows if View > Show Status Bar is selected) does not count local backups when calculating space used, since they'll be deleted if necessary.

See The Storage Display for details.
Some 3rd-party utilities report them, some don't. (The $13 WhatSize app does show them, in "As Admin" mode (but not the version from the App Store). See the green box in Where did my disk space go for details).
Automatic deletions: If the disk gets to 80% full, Time Machine will start deleting the oldest Snapshots, at a low priority (so might take a while). If it gets to 90% full, the priority will be increased so they'll be deleted faster, and you might see a small performance hit. This is done independently for each disk/partition. Time Machine does not send specific messages when it deletes snapshots, as it does with regular backups.
In addition, regardless of space, Local Snapshots are periodically reduced to one per day after 24 hours, then deleted after a week.
This may cause some unexpected behavior of the free space available, but only as shown by Disk Utility, the Storage display, and a few 3rd-party apps:
•If you delete a large file/folder, you may gain little or no free space, since the items are included in one or more snapshots.
•Later on, free space may grow suddenly and unexpectedly, when Time Machine deletes the last snapshot containing those items.
•If you add large items, the free space may not be reduced as much as you expect -- if the free space drops below the threshold, Time Machine will delete some or all of your snapshots. Thus, if you copy a 100 GB item to your system, and Time Machine deletes 20 GB of old snapshots, your free space will only be reduced by 80 GB.
•If an external disk that has Snapshots is excluded from backups while Time Machine is ON, those Snapshots will not be deleted immediately. Whether and when they'll be deleted is not clear.
Unlike normal Time Machine backups, snapshots don't contain extra copies of everything currently on your system; so items that haven't been changed don't take up extra space.
Snapshots also don't make extra copies of files made by apps that support Versions; but only the current Version of such files are saved (on backups and snapshots), so if you restore a backed-up copy of a file that had multiple versions, you'll get only the version that was current at the time of the backup or snapshot. Different snapshots or backups, of course, may contain different versions.
Turning Snapshots ON or OFF manually:
This requires using the Terminal app, in your Applications/Utilities folder.
Be extremely careful when using Terminal. It is a direct command-line interface into UNIX, the underpinning of OSX. Unlike the Finder, there are few protections against making a mistake, which can cause untold damage.
In Terminal, the prompt looks like this: <ComputerName>:~ <your name>$
(where <your name> is your short user name). It's followed by a non-blinking block cursor.
Copy the appropriate command after the prompt, then press Return:
•To turn Snapshots ON: sudo tmutil enablelocal
•To turn Snapshots OFF: sudo tmutil disablelocal
•To make a Snapshot: tmutil snapshot
For the first two, you'll see a warning message, and asked for your Admin password (which won't be shown as you type it). Press Return again.
There will be no confirmation message; just another prompt. Then quit Terminal.
Notes:
If you turn Time Machine OFF and back ON, Local snapshots will be turned ON for portable computers, OFF for desktops. You must execute the command again.
If you turn snapshots or Time Machine off, all existing Snapshots will be deleted (although that may take a while).
Sometimes OSX will reset this behavior to the default (ON for laptops, OFF for desktops). Often starting from the Recovery HD and running Repair Disk will do it, sometimes starting from a different Startup volume will do it.
You cannot enable or disable snapshots on one volume but not another. It's all or none (but they'll be made or deleted independently, according to the space on each volume).
Snapshots in the Timeline:

Like normal Time Machine backups, Local Snapshots are usually made hourly. If your Time Machine volume is available, both are usually done at the same time, so you'll see adjacent purple and white tick marks with the same time. If the Time Machine volume isn't available, Local snapshots will continue on the same schedule, so for that period you'll only see white ones.
Also, the "contextual menu" you get on Local Snapshots doesn't allow deleting a Snapshot, or all Snapshots of selected items, as on normal backups.
See: Question #15A for more about the Timeline and "Star Wars" display.
It is possible to turn Snapshots on for a desktop Mac; or off for a portable, while still making external backups; or force a new snapshot, via a special Terminal command. See the blue box below.
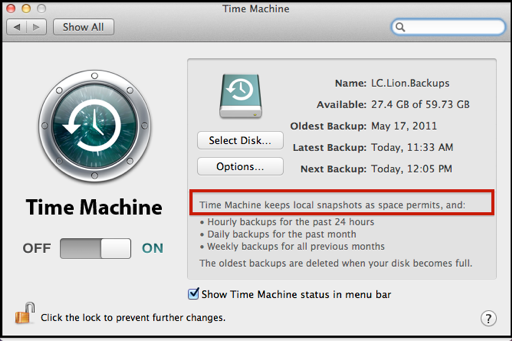
If enabled, you'll see the text outlined in red:
If not, that line will just say "Time Machine keeps:"
If your disk is too full, though, they may not be made.
Effective with Lion 10.7.x, to make recent backups available to Time Machine users while travelling or otherwise away from their backups, Time Machine makes "Local Snapshots" hourly. See Apple's About Time Machine's "local snapshots" on portable Macs article for an overview, below for the gory details.
These snapshots are normally made only on portable Macs, and are kept on the Mac's internal HD (and on any other disks/partitions being backed-up) for a week, space permitting.
Think of them as (temporary) Versions for files that don't have regular Versions.
Ordinarily, the best way to view your Local snapshots is via the normal Time Machine display, per question #15. If for some reason that's not working, you can see them via the Finder.
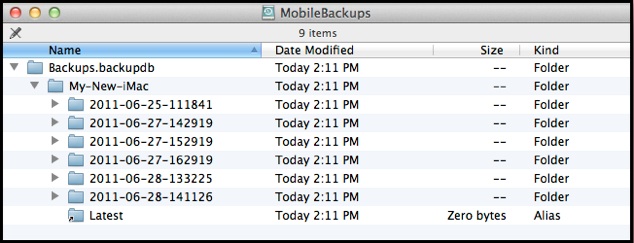
From a Finder menubar, select Go > Go to Folder and type /Volumes in the prompt, and select the MobileBackups folder. You'll see the same structure as for Time Machine backups on a separate volume: a Backups.backupdb folder containing a folder for your Mac, which contains a time-stamped folder for each snapshot. Inside each of those is a folder for each disk/partition that was backed-up, containing the same folder structure as on the original, with the contents as of the time of the backup.
Note that nothing in the size column is meaningful (if you Get Info on the MobileBackups folder, for example, it will show the total amount of space on the drive it's on! It will show dashes for the Backups.backupdb folder, or any of the dated snapshot folders).
Snapshots on external drives won't show up that way. They're in a hidden .MobileBackups folder at the top level of the volume. You'll need to show hidden volumes, such as via the app in Troubleshooting item #A3. Then you'll have to grant yourself read rights to it. As above, nothing in the size column is meaningful.
Local Snapshots and Versions are related
Unlike "normal" Time Machine backups to an external volume, Local Snapshots are not extra copies of a file. Instead, when a file is changed or deleted, it isn't really deleted immediately -- it just disappears from what the user sees.
The advantage of that is, of course, that Local Snapshots can be made very quickly and efficiently -- there's no copying from place to place, using lots of CPU and disk access; just a few changes to indexes, etc.
The disadvantage is, if the "original" was damaged, the "copies" in the Local Snapshots are also damaged.
Some of this is combined -- a file made and edited with an app that supports Versions doesn't have separate copies in the Local Snapshots. In those cases, they share space.
Snapshots are a convenience, NOT "real" backups. Do NOT depend on them.
First, they're on the same disk/partition as your data, so if there's a major problem, your data and the snapshots may be gone. The essence of a good backup strategy is to have (at least) two copies of everything important, in (at least) two different places.
Second, they're temporary and expendable. If the disk gets too full, some or all will be deleted without warning, and no new ones made. In addition, they're consolidated periodically into daily versions, then deleted after a week. So it's usually not worth worrying about the space they use. See the pink box below.
If you turn Time Machine OFF, Time Machine will immediately stop creating new ones, and start deleting all existing snapshots (that may take a while).
Sometimes they're deleted without warning after using the Recovery HD.