Time Machine - Troubleshooting
E2. I can't see some backups
Time Machine - Troubleshooting
E2. I can't see some backups
If you can't see some backups in the Time Machine browser (the "Star Wars" display):
•To see the backups for a different Mac (ie, not the one you're using), or a different set for the same Mac (such as, if it has multiple destinations), use the Browse Other Backup Disks option, per the green box below.
•If you can't see the backups for a disk/partition that's no longer connected to your Mac, or if you've erased or replaced a disk/partition, but can't see its backups, see Troubleshooting item #E3.
•If some of your backups are listed, but faded-out in the TimeLine on the right and you can't select them, see the tan box below.
•If you've moved your Time Machine disk, from a direct connection to a network location (such as an external drive connected to a Time Capsule, other Mac, or Airport Extreme), or vice-versa, see the blue box below.
If you still can't find your backups, see Troubleshooting item #E4.
The Browse Other Backup Disks Option
Time Machine keeps the backups for each Mac separate, and normally only shows the ones for the Mac it's running on (selected in the Time Machine Preferences window), even if there are other backups of the same or a different Mac on the same or different disk/partition.
Also, if you have more than one set of backups for the same Mac, Enter Time Machine will only show the backups in the set currently selected via the Time Machine Preferences window.
To see these "other" backups, you need the Browse Other Backup Disks or (Browse Other Time Machine Disks on Snow Leopard or Leopard) option. It's available by Alt/Option-clicking the Time Machine icon in your Menubar, or by control-clicking (right-clicking) the Time Machine icon in your Dock.
Note: This option DOES NOT WORK on the first versions of Mountain Lion. If you're on 10.8 or 10.8.1, use Software Update from the Apple menu, or see Installing the Combo Update.
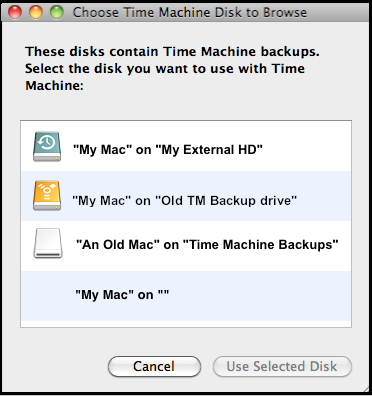
If the backups you want were made over a network, you may have to manually mount the sparse bundle they're in, by double-clicking it via the Finder, for them to show up here (3rd sample). See the pink box below.
You may not be able to restore such items normally (to their original location); if not, you'll need to restore them to an alternate location per Frequently Asked Question #16.
Note: the 4th item shown is a bug that occurs on some versions of Mountain Lion. It's a leftover from a network backup. Ignore it.
If you've moved your Time Machine drive
Time Machine stores its backups differently when they're done locally vs. over a network.
Local backups (to a USB, Thunderbolt, or FireWire disk connected directly to a Mac) are stored in a folder named Backups.backupdb, at the top level of the drive/partition.
Network backups (via Ethernet or wireless) are also stored in a Backups.backupdb folder, but it's inside a special container called a sparse bundle disk image at the top level of the drive/partition.
Unfortunately, you cannot just switch from one method to the other. (In many cases, you can copy them so they can be used in the new location. See Frequently Asked Question #18).
•If you've moved from a network location to local, Time Machine will usually continue backing up to the sparse bundle. But when you Enter Time Machine, it will be looking for local backups. You'll have to manually mount the sparse bundle by double-clicking it in the Finder before entering Time Machine, and may need the Browse ... option.
•If you've moved from local to network, you cannot continue backing-up to the same set of backups.
•If you've moved from one network location to another, you should be able to continue using the same set of backups. Re-select the drive in its new location via Time Machine Preferences > Select Disk.
Some backups are faded-out and not selectable
What you see in Time Machine depends partly on how you got there. If you start from, say, a Finder window showing a folder that was created recently, the backups before that date will be faded-out and you can't select them.
Click something else in the Finder's sidebar, such as your home folder or computer name; then you should be able to display the other backups.
If the Finder window doesn't have a sidebar, or what you need isn't listed there, quit Time Machine and show the sidebar (click the small lozenge at the upper right or select View > Show Sidebar from the menubar). If you want to change the contents of the sidebar, select Finder > Preferences > Sidebar from the menubar. Then re-enter Time Machine.
Or select your computer name in the sidebar, or press Shift+Cmd+C, then Enter Time Machine.
If you're having trouble understanding or navigating the display, see question #15A.
If your backups were made over a network, and don't show up in the selection window above, you'll need to manually mount the sparse bundle they're in first.
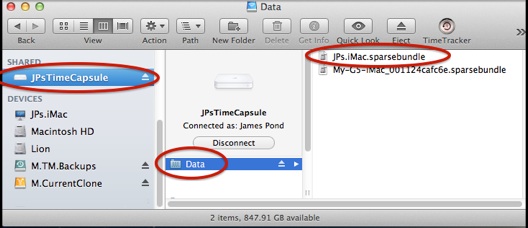
(Note: the .sparsebundle suffix isn't always displayed)
If the server isn't shown, from a Finder menubar, select Preferences > Sidebar and make sure the Connected Servers box is checked.
Double-click the Data folder (it may have a different name) to show the sparse bundle(s).
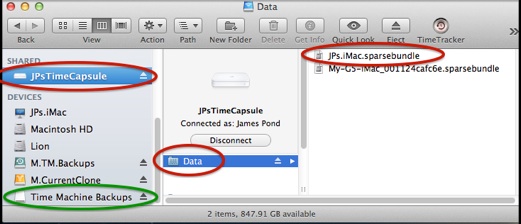
If it doesn't, from a Finder menubar, select Preferences > Sidebar and make sure the External Disks box is checked.
Then try the Browse... option again. The backups, usually named "Time Machine Backups," should appear in the window with a Disk Image icon (the third sample in the green box).
If it doesn't mount after a few moments, or you get a message about "no mountable file systems," the backups may be damaged. Try to repair them, per Troubleshooting item #A5.