Time Machine - Troubleshooting
A5. How to Repair or Verify Disk
Time Machine - Troubleshooting
A5. How to Repair or Verify Disk
This will Repair or Verify the File System on a disk, partition, or sparse bundle disk image (not the physical hardware -- see Checking the S.M.A.R.T. status for that).
Use the Disk Utility app, in your Applications/Utilities folder (or type Disk Utility into the Spotlight search box in your menubar).
To VERIFY your internal (Startup) drive/partition:
You can't Repair the drive/partition your Mac is running from (kind of like a brain surgeon operating on himself), so Verify it instead. If that fails, see the yellow box below to Repair it.

You should see the "appears to be OK" message. If not, click the Repair Disk button. That also should just take a moment.
(If you're not sure what version of OSX you're using, see What Version of OSX do I have?)

You'll see a message about how your Mac may respond slowly while the verification is in progress.
When it's done, you should see the "appears to be OK" message.
If it shows errors (in red), you'll need to repair them via the procedure in the yellow box below.
If REPAIR DISK fails:
If Disk Utility says it can't repair your disk, look closely at the messages. If it repaired some things, but not everything, run it again (and again) until it either repairs everything or can't repair any more.
If Disk Utility can't repair your internal HD, it's possible a heavy-duty 3rd-party disk repair app, such as DiskWarrior, can. These are expensive (DiskWarrior is about $100), and probably a good investment for the future, but there's no guarantee it will work.
If you decide to do this, be sure to use only a version that's compatible with the version of OSX on your system. (If you're not sure, see What Version of OSX do I have?)
You might be able to recover some of the data, but it’s "iffy" and expensive. See Data Recovery for details.
Of course, you'll also need to have an Apple Store or Authorized Repair Location replace your disk.
To REPAIR your internal (Startup) drive/partition:
OSX can't Repair the OSX volume while running from it. You must start your Mac up from a different source: either the Recovery HD on Lion, or your OSX Install disc or a different disk that has OSX installed on it. Be sure you use the same major version of OSX -- if you’re running Leopard, use a Leopard disc; if you’re running Snow Leopard, use a Snow Leopard disc.
(If you don't have either, you can repair it this way: Mac OS X: Starting up in Safe Mode.)
•To start up from the Recovery HD, see Using the Recovery HD.
•To start up from an OSX Install disc, insert it in the SuperDrive. Then:
•Either wait for the Mac OS X Install DVD window and double-click the Install icon; or power down, then start up while holding down the "C" key. Either way, that takes a few moments.
•Select your language when prompted.
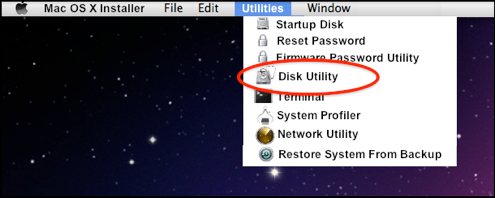
•On the next screen, select Utilities in the Menubar, then Disk Utility.
Once in Disk Utility, follow the instructions in the blue box above, but click the Repair Disk button, not the Verify Disk button. It should proceed just as in the blue box above.
If Disk Utility can't repair your disk, or the Repair Disk button is grayed-out and you can't select it, see the pink box below.
Reboot normally.
To REPAIR Time Machine backups:
Do this when Time Machine is OFF (via Time Machine Preferences), or at least not running.
The exact procedure varies depending on where your backups are; click the appropriate link:
An internal or directly-connected external disk
Backups on a network:
A USB drive connected to a Time Capsule or Airport Extreme
To REPAIR another drive/partition that's being backed-up:
Follow the instructions in the blue box above, selecting the drive/partition that's being backed-up, but select the Repair Disk button (it won't be grayed-out).
Note: there's no point in running Verify Disk first -- just run Repair Disk. (If you run both, it will take twice as long.)