Time Machine - Troubleshooting
A5a. How to Repair Time Machine backups
on an internal or directly-connected external HD
Time Machine - Troubleshooting
A5a. How to Repair Time Machine backups
on an internal or directly-connected external HD
If an external HD isn't in the sidebar:
See If a disk doesn't appear in the sidebar.
If the Repair Disk option is grayed-out:
OSX has already determined it can't repair it. See One Last Option below.
If Repair Disk fails:
If Disk Utility says it can't repair your disk, look closely at the messages. If it repaired some things, but not everything, run it again (and again) until it either repairs everything or can't repair any more.
One Last Option:
If Disk Utility can't repair the drive, it's possible a heavy-duty 3rd-party disk repair app, such as DiskWarrior, can. These are expensive (DiskWarrior is about $100), and probably a good investment for the future, but there's no guarantee it will work.
If you decide to do this, be sure to use only a version that's compatible with the version of OSX on your system. (If you're not sure what version of OSX you're using, see What Version of OSX do I have?)
If you're out of options:
You might be able to recover some of the data, but it’s "iffy" and expensive. See Data Recovery for details.
Otherwise, all you can do is to erase the disk. If there's other stuff there, (not a good idea - see Time Machine FAQ #3), copy it off temporarily. Click the Erase tab, then the Security Options button, then Fastest (Lion) or Zero Out Disk (earlier). That will take a long time, but if it fails, you know the disk itself has failed. If it succeeds, the disk may be ok.
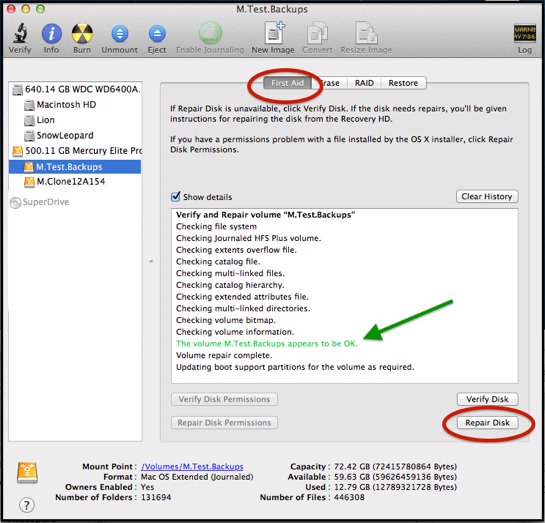
Note that the last two messages in the sample may appear whether or not they apply. What’s important is: "appears to be OK".
If you don't see that, but error messages in red instead, see the pink box below.

Effective with Lion (10.7) select the main (top) line for the drive and click the Repair Disk button. That will repair the Partition Map, very quickly.
(If you're not sure what version of OSX you're running, see What Version of OSX do I have?)
If the repair fails, see the pink box below.
This will Repair or Verify the File System on a disk/partition (not the physical hardware -- see Checking the S.M.A.R.T. status for that).
Use the Disk Utility app, in your Applications/Utilities folder (or type Disk Utility into the Spotlight search box in your menubar).