OSX Tips: Using Disk Utility
6. Verify or Repair Disk
OSX Tips: Using Disk Utility
6. Verify or Repair Disk

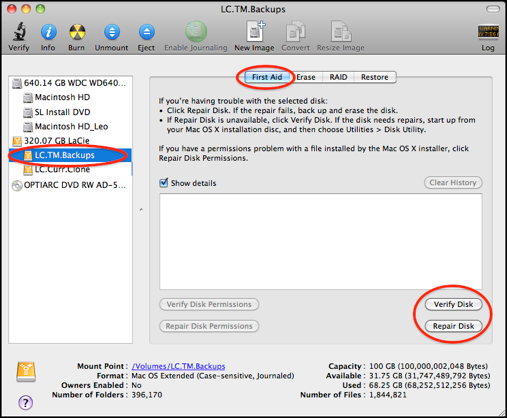
First click the top line for the drive, then Verify Disk or Repair Disk to verify or repair the Partition Map.
This will only take a few moments.
Progress messages will appear in the center part of the screen, and a progress bar and estimated time will appear.
The estimated time may vary greatly during the process.

If you do a Verify Disk on your Startup disk, while running from it, your Mac may respond very slowly while it's running.
When finished, the center part of the window will contain the messages, as in this sample.
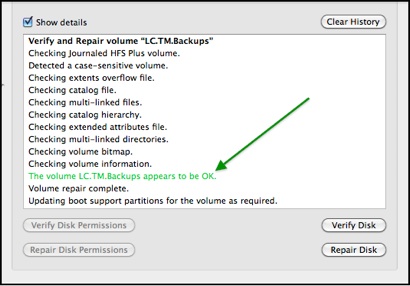
As long as you see "appears to be OK," it’s ok.
If there’s a problem while Repairing, Disk Utility will try three times before giving up.
If errors are found while Verifying your internal HD, see the yellow box above to Repair it.
If Disk Utility can’t Repair the disk or volume, see the pink box below
This title is a bit misleading -- Disk Utility can be used to Verify or Repair the File System on a volume (not the physical hardware -- see Checking the S.M.A.R.T. status for that). It checks and/or repairs problems with the various directories and catalogs that keep track of your files.
You can Verify or Repair an internal disk or partition, or a directly-connected disk or partition.
You can also Verify or Repair a sparse bundle disk image on a network drive, such as a Time Capsule (connect via Ethernet cable if possible -- it will be much faster than WIFI). See item #A5 in Time Machine - Troubleshooting for instructions.
To Verify or Repair a network drive, however, you must be able to connect it directly to your Mac via USB, FireWire, Thunderbolt, or eSATA (not anEthernet cable - that's still on a network).
If the Repair Disk button is disabled for a drive or partition that your Mac is not running from, it means that OSX has already determined it can't be repaired. See the pink box below.
Note: for any disk or partition that your Mac is NOT running from, there's little point to running Verify Disk. If there's a problem, you'll just have to run Repair Disk, duplicating all the verification steps. So just run Repair Disk.
Your Startup Volume:
You can Verify your startup volume normally (see the blue or green box below). Unless you know there's a problem, it's usually best and easiest to do that first. Then if a problem is found, use this procedure to repair it.
To Repair your Startup volume (the OSX volume on your internal HD), however, you must start your Mac up from a different source:
•Effective with Lion, the Recovery HD or OSX USB thumb drive.
•On Snow Leopard and earlier, your OSX Install disc (or OSX USB thumb drive on a MacBookAir).
•Or, a different disk that has OSX installed on it. Be sure you use a compatible version of OSX -- if you’re running Lion, use only a Lion source; if you’re running Snow Leopard, use a Snow Leopard disc.
(If you're not sure what version of OSX you're running, click here).
To start up from your OSX Install disc, insert it in the SuperDrive (or insert the Software Reinstall drive on a MacBook Air). Then:
•Either wait for the Mac OS X Install DVD window and double-click the Install icon; or power down, then start up while holding down the "C" key. Either way, that takes a few minutes.
•Select your language when prompted.
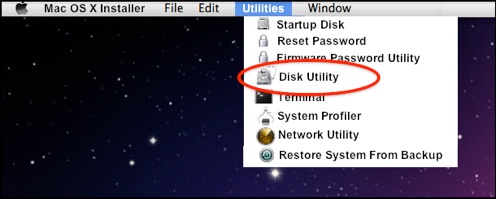
•On the next screen, select Utilities in the Menubar, then Disk Utility.
Then follow the procedure in the blue or green box below:

Select the desired partition (indented) and click Repair Disk or Verify Disk.
If you have multiple partitions, and want to verify or repair them all at once, click the top line for the drive.
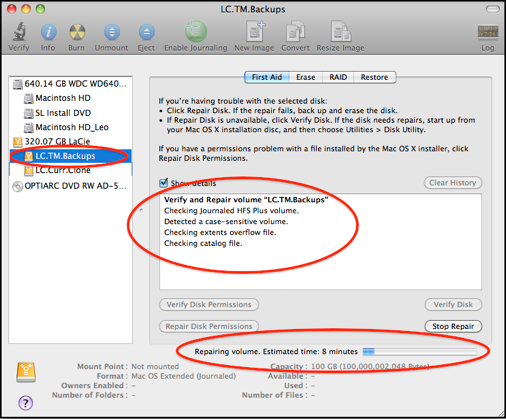
The estimated time may vary greatly during the process.
You can click Stop Repair if necessary without causing any damage (but Disk Utility will have to start over from the beginning next time).
If you do a Verify Disk on your Startup disk, while running from it, your Mac may respond very slowly while it's running.
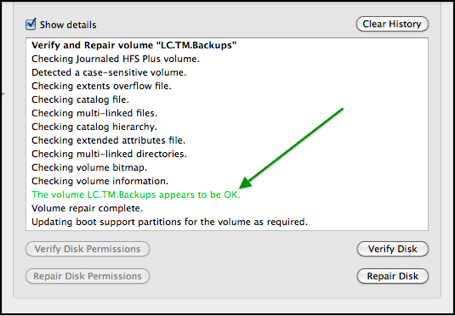
Note that on Snow Leopard, the last two lines will always appear, whether they apply or not.
As long as you see "appears to be OK," it’s ok.
If there’s a problem while Repairing, Disk Utility will try three times before giving up.
If errors are found while Verifying your internal HD, see the yellow box above to Repair it.
If Disk Utility can’t Repair the disk or volume, see the pink box below.
Effective with Lion, Verify/Repair Disk works a bit differently than on earlier versions of OSX. (If you're not sure what version of OSX you're running, click here).
If your disk doesn't appear, see If a disk doesn't appear in the sidebar.
If Disk Utility can't repair your disk, or the Repair Disk option is grayed-out and you can't select it (meaning OSX has already determined it can't repair it), it's possible a heavy-duty 3rd-party disk repair app, such as DiskWarrior, can.
These are expensive (DiskWarrior is about $100), and probably a good investment, but there's no guarantee it will work.
If you decide to do this, be sure to use only a version that's compatible with the version of OSX on your system.
If DiskWarrior can't fix it, or you don't want to spend the money, about your only choice is to back up or copy off what you can, then try to reformat the drive (section #1) or partition (section #2). If you do that, take the time to click Security Options, then Fastest (Lion) or Zero Out Data (Snow Leopard or earlier). That will take quite a while, but if it fails, you know for sure the drive has failed. If it succeeds, the drive may be ok.
If all else fails, you might be able to recover some of the data, but it’s "iffy" and expensive. See Data Recovery.