OSX Tips: Using Disk Utility
2. Erase a Partition
OSX Tips: Using Disk Utility
2. Erase a Partition
Most disk drives have a single partition. Your Mac came with an internal hard drive containing one partition, named Macintosh HD. But internal or external HDs can contain multiple partitions (also called volumes) if desired.
Each partition occupies contiguous physical space on the disk, and for most purposes is treated as a separate drive. Each one has a different name, and by default will appear on your desktop and Finder sidebars as if they were separate drives.
This procedure will erase and, optionally, reformat one partition on a hard drive, erasing all the contents of the selected partition, leaving all others untouched. Use the Disk Utility app, in your Applications/Utilities folder.
If your disk doesn't appear in the sidebar, see If a disk doesn't appear in the sidebar.
Erase Free Space is a security feature only. It overwrites all the free space on the disk with zeros, similar to the Security Options above.
The windows below are different, but the function is the same.
It does not delete any active files or free up any additional space.
It does take quite a while, of course, and it can cause problems if interrupted, especially if performed on your startup volume while running from it.
This is because it "gathers" all the free space into a folder before starting to overwrite it. So you’ll see the free space on your disk disappearing at an alarming rate, all the way to zero. If your Mac is trying to do much of anything else, it will slow down, apps may crash, data may be lost, etc.
Worse, if the process is interrupted or fails, or your Mac is shut down or crashes, the space will not be returned when you start up again (if you can start up again).
Thus it is not recommended to do this on your startup volume while running normally.
If you really need to do it, start up from another source: either your OSX Install disc (see the yellow box in section #1) or a different disk that has OSX installed on it. Be sure you use a compatible version of OSX -- if you’re running Leopard, use a Leopard disc; if you’re running Snow Leopard, use a Snow Leopard disc.
Lion 10.7.x and later Snow Leopard 10.6.x and earlier

partition in the sidebar, and click the Erase tab.
The current Format will be shown in the pop-up; select a different one if desired. (See Disk Formats for details.)
You can also change the Name if you want.
For most purposes, that’s all you need.
But in some cases, you may want to take the time to do a Secure Erase writing zeros to the entire disk or partition selected (unless it’s an SSD).
Click Security Options and you’ll see a prompt like the one in the green box below.
See the pink box below for the Erase Free Space button.
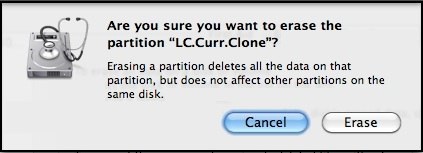
When ready, click the Erase button on the main window. You’ll then see a confirmation prompt:
To format, erase, or reformat your Startup volume (the OSX volume on your internal HD), you must start your Mac up from a different source:
•On Lion or later, the Recovery HD or OSX USB thumb drive.
•On Snow Leopard or earlier, your OSX Install disc (or OSX USB thumb drive on a MacBookAir).
•Or, a different disk that has OSX installed on it. Be sure you use a compatible version of OSX -- if you’re running Leopard, use a Leopard disc; if you’re running Snow Leopard, use a Snow Leopard disc.
(If you're not sure what version of OSX you're running, see OSX Versions).
To start up from your OSX Install disc, insert it in the SuperDrive (or insert the Software Reinstall drive on a MacBook Air). Then:
•Either wait for the Mac OS X Install DVD window and double-click the Install icon; or power down, then start up while holding down the "C" key. Either way, that takes a few minutes.
•Select your language when prompted.
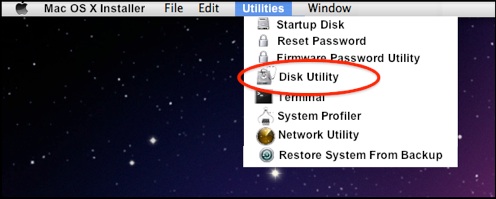
•On the next screen, select Utilities in the Menubar, then Disk Utility.


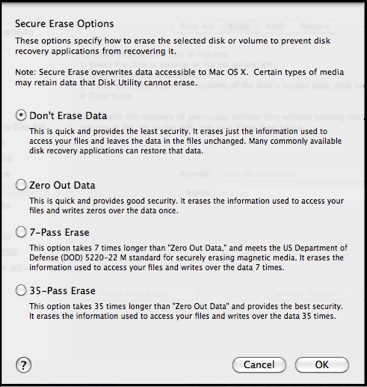
Security Options can overwrite the disk with zeros, to prevent recovery of erased files.
The windows below are different, but the function is the same.
In most cases, a single pass is plenty.
Lion 10.7.x and later Snow Leopard 10.6.x and earlier