OSX Tips: Setting-up a new Mac from an old one or its Backups
Using Setup Assistant on Snow Leopard or Leopard
OSX Tips: Setting-up a new Mac from an old one or its Backups
Using Setup Assistant on Snow Leopard or Leopard
Transferring User Accounts
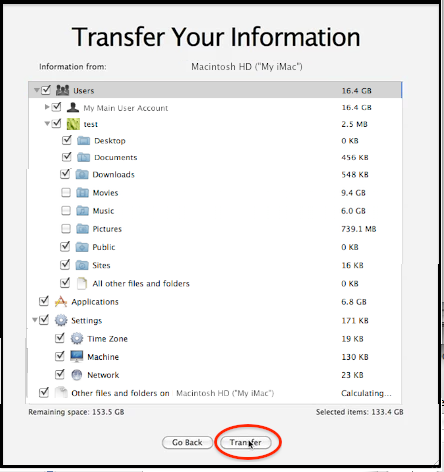
To select from multiple user accounts, or to select/omit data within one or more, click the "disclosure triangle" in front of the checkbox to see a list of them. (It may take a few moments for the triangles to appear).
For each user you select, you can click the disclosure triangle and select or omit the contents of that user’s top-level folders (Desktop, Documents, Downloads, etc.)..
Otherwise, you can’t "pick and choose" within any of those folders.
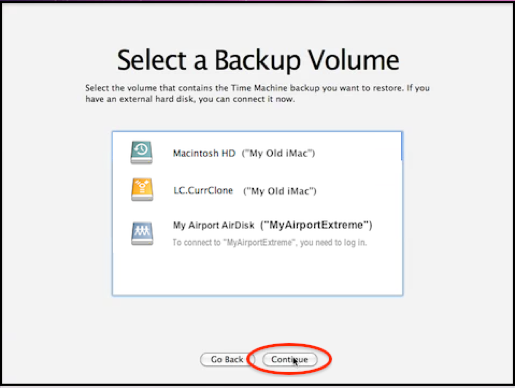
If you selected Time Machine backups, select your backup volume from the list on the next screen.
(If they're not shown, connect the drive, or click Join if they're on your network).
Select the one you want (even if there's only one) then click the Continue button
Time Machine backups on an internal volume have a gray icon; directly-connected disks a green or yellow icon, and list the name of the volume and computer that was backed-up, not the volume they’re on. Time Machine backups on a network drive have a blue icon, and show the name of the partition and network device they’re on.
Other Macs and "clones" are shown with a gray icon if on an internal HD, a yellow icon if on a directly-connected disk, a blue icon for a network disk, with the name of the volume and computer they’re on.
Next is the selection for what you want to transfer. You'll see four checkboxes; some will have "disclosure triangles" (they may not all appear until the "Calculating..." is done) you can click to expand that section (see the pink boxes below for details):
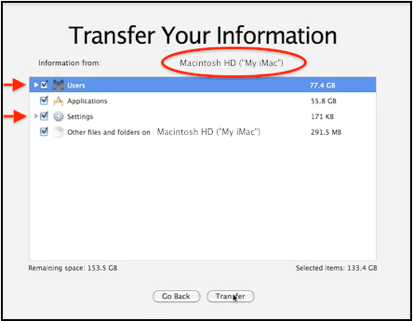
•Applications
•Settings
•Other Files and Folders
(The Transfer button won’t be enabled until it finishes "Calculating" the sizes.)
These are mostly "all or nothing" selections.
In most cases, just leave everything selected and click the Transfer button (as soon as it completes calculating all the sizes). Setup Assistant will then transfer everything selected.
(If you backed-up multiple OSX partitions, or have done a full system restore, the area circled in red in the sample will be a "pop-up" menu where you can select the one you want.)
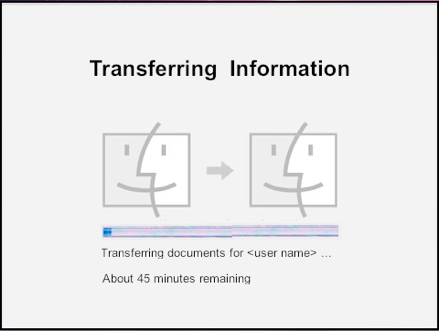
That will take a while, of course, depending on how much data is being transferred, and how. (Network transfers will be slower than FireWire, etc.)
When it finishes, if you didn't transfer settings, you'll see windows to set up your network, select a Time Zone, etc.
Then a Registration Information window, with your identifying data pre-loaded.
Then A Few More Questions window will ask about how you'll use your Mac, etc., followed by Now you're ready to connect to send it to Apple, then a Thank You window. Click the Go button and your Mac will restart.
For each account selected, the default folders created by OSX (Desktop, Documents, etc.) are all transferred automatically, whether you select them or not. Only the folders that are checked will have their contents transferred.
The exception is the user’s Library folder, which isn’t listed. It, and all of its contents, will be transferred along with the user account automatically.
Transferring Applications
This option will transfer applications only from the top-level Applications folder; not an Applications folder(s) in user home folder(s), or elsewhere. It will also transfer various support files in the top-level Library folder.
You must transfer either all apps or none; you can't select or omit them individually (see Transferring Applications for an explanation).
But Setup Assistant will only transfer apps that don't already exist in the top-level Applications folder on the destination Mac; thus the new Apple apps that came with your new Mac will not be replaced by old ones (and the size shown may be very small). But if the names are different, or they're in different places on the destination (such as sub-folders within Applications or elsewhere), you'll end up with both.
In some cases, there may be a few exceptions:
•If you’re on Snow Leopard, see Mac OS X v10.6, OS X Lion: About incompatible software.
•Some 3rd-party apps may not work properly, or at all, if transferred from an older version of OSX. Check with the maker about compatibility.
•If transferring from a PPC Mac to an Intel Mac, some PPC applications may not work properly, or at all. See this Apple article: Intel-based Mac: Some migrated applications may need to be updated.
•You may have to re-enter serial numbers/purchase codes for some 3rd-party applications.
•Some complex 3rd-party apps that were installed with special installers may need to be reinstalled from the original disc(s) to work properly. Adobe apps are often subject to this.
Transferring "Other files and folders on <disk name> <Computer Name>"
This will transfer the following:
•Non-system files/folders at the top level of the disk, such as the (empty) Unix Desktop folder, the User Guides and Information alias, the Developer folder (if installed), etc.
•The Shared user folder
There is special handling for duplicates in this category: if the item already exists, the new one will have "(from old Mac)" appended to its name.
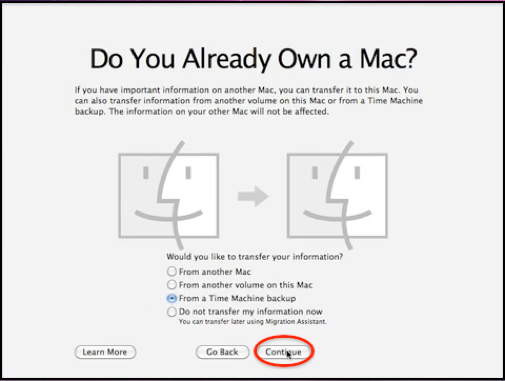
Then you’re asked if you already own a Mac and would like to transfer your information from it, followed by four options:
•From another Mac
•From another volume on this Mac
•From a Time Machine Backup
•Do not transfer my information now
If you have Time Machine or "clone" backups on an external HD, it's usually simpler and faster to transfer from them, rather than directly from the old Mac (and, to transfer directly, you may have to install/upgrade software on the old Mac).
If you transfer directly, Ethernet is 2-3 times faster and much more reliable than WIFI.
•From another Mac. Via System Preferences > Energy Saver, set the old Mac to never sleep. You'll next see a Connect window (not shown here), where you can choose FireWire or Network.
•If you choose FireWire, set the old Mac to never sleep. You'll be led through starting the other Mac up in Target Disk mode. If you're not sure how to do either, see Using Target Disk mode.
•If you choose Network, you'll be led through connecting via Ethernet cable or Airport (ugh!) and using Migration Assistant on the old Mac (you may have to upgrade it and/or install the DVD/CD Sharing Update from the new Mac's Install disc on the old Mac). See Migration Assistant tips and tricks for instructions.
Once the connection is established, you'll see the Transfer Your Information window.
•From another volume on this Mac includes "clones" on USB or FireWire drives. You'll next see the Transfer Your Information window.
•From a Time Machine backup includes those on an internal or external drive, or a network destination such as a Time Capsule. If they're on a Time Capsule, connect to it via Ethernet cable if possible. If they were made on a USB drive connected to a Time Capsule, Airport Extreme, or another Mac, connect the drive directly to your new Mac. If the backups are on an internal HD on another Mac, connect that Mac in Target Disk mode. You'll next see the Select a Backup Volume window.
There's a brief video demonstration of using Setup Assistant to transfer from Time Machine backups about 3/4 of the way through the Time Machine Tutorial.
Before you get started, if you anticipate an issue with iTunes authorizations, see About iTunes Store authorization and deauthorization.
Don't be alarmed by the length of this page: It includes many details that only a few users will need, in a few situations. The usual procedure is actually simple:
•Start your new Mac, see the Welcome video, select your country and language.
•Specify whether you want to transfer directly from your old Mac or its backups, and connect to it.
•Confirm what you want to transfer (Apps, User Accounts, Settings, etc.).
•Wait while your Mac does all the work (copying your stuff).
•When it's done, you're in business!
See below for step by step instructions, including some unusual circumstances.
The following samples are from Snow Leopard; if you're migrating to Leopard, the windows look a bit different, and those for what data you want to transfer are on separate windows, in a slightly different order.
Setup Assistant is designed to transfer all or selected data, apps, etc. from one Mac, or its Time Machine or "clone" backups, to set up a new Mac just like the old one.
Migration Assistant, however, is used primarily to transfer user account(s) and perhaps other things, from one Mac or its backups, adding them to a Mac that's already set up.
If there's any doubt about which you need, see: Setting up a new Mac from an old one or its backups.
Avoid transferring wirelessly if at all possible -- it's excruciatingly slow and less reliable.
If the old Mac has any user home folders on a separate disk or partition, and/or you want to set the new one up that way, see: Transferring Home Folders not on a Startup volume.
If the Mac you’re setting up is running 10.7 or 10.8 see Using Setup Assistant on Mountain Lio or Lion. It's a bit different from the Snow Leopard and Leopard version covered here. (If you're not sure what version of OSX you're running, click here).
"Second chance" to use Setup Assistant
Normally, you only get one chance to use Setup Assistant -- when your new Mac first starts up. If you missed the opportunity, you should erase your internal HD, install OSX, and use Setup Assistant when your Mac restarts. See the tan box in Problems after using Migration Assistant for detailed instructions.
If you're setting up a shiny new Mac, Setup Assistant is preferable, and will work well.
But if you're transferring directly from a PPC Mac to one running Leopard or the first versions of Snow Leopard (10.6.0 or 10.6.1), there's a small chance of problems, so an extra precaution is recommended: either make a separate full backup of the PPC Mac "just in case," or see A Basic Guide for Migrating to Intel-Macs.
If you use Time Machine, as soon as your Mac starts up again, turn Time Machine OFF. If it’s already started a backup, cancel it. Unless you back up to the old Mac's backups, the first backup will be of everything. And if anything didn’t transfer properly, it may be more difficult to recover if a new backup is completed.
If you back the new Mac up to the old Mac's backups, when the first one starts, you should (on Snow Leopard) get a prompt about using a different Mac's backups. See: Would you like to reuse the backup . . .? The first backup may be a full one, or TM may say it's going to be a full one and run very, very slowly, but only do an incremental backup.
Transferring Settings
If you're already connected to a network, you won't have the Network option.
If the Machine settings are transferred, that includes system-wide settings, such as Time Zone, System Keychain, EnergySaver, Time Machine, and Sharing. Sharing includes the Computer Name. That's easily changed after your new Mac restarts, via System Preferences > Sharing.
Note that Leopard doesn't have the three options; just the single Settings option.