OSX Tips: Setting-up a new Mac from an old one, its backups, or a PC
Problems after using Migration Assistant
OSX Tips: Setting-up a new Mac from an old one, its backups, or a PC
Problems after using Migration Assistant
Where's my stuff?

If you selected the last option, and created a user account, then later on used Migration Assistant, even if it seemed to work you may not find your data.
The reason is, you now have an extra user account; the one you created plus the one(s) you migrated. Look in System Preferences > Users & Groups (System Preferences > Accounts on Snow Leopard or Leopard). There will be (at least) two accounts. Log on to the one you transferred -- it should have your data.
Note that the transferred account has probably lost permission to see and change its files on other disks/partitions, especially backups. If that's going to be a problem, see the pink box below.
If the account you created doesn't have anything you need, you can just delete it via the System Preferences > Users & Groups (or Accounts) window.
But if the account you created does have data you want to keep, you're in a bit of a pickle -- there's no easy way to "merge" the two accounts. You can copy many things from one account to another, but that can be tedious and difficult. See Transferring files to another account for details and suggested procedures.
Lost permission to files on other disks/partitions
Normally, one user, even an Admin user, doesn't have permission to access files belonging to other users. This is clear when you have multiple users on the same Mac, such as for different family members -- each has its own preferences, settings, and data (such as pictures, email, and documents); and everything is kept separate and private from the other users. These same permissions may also apply to files that user may have on other disks or partitions, especially backups.
When a user account is transferred via Setup Assistant when the new Mac first starts up, it's transferred "intact" -- any permissions to files on other disks or partitions (especially backups) are preserved.
However, with Migration Assistant, permissions to files on other disks/partitions usually cannot be preserved. This is because of the way accounts and permissions work:
Every user account has a (mostly hidden) User ID, also known as a UID, associated with it. OSX assigns these automatically as user accounts are created. The first one is #501, then 502, 503, etc. These must be unique on each Mac, and are the basis for permissions throughout your system and other disks (not the user Account name).
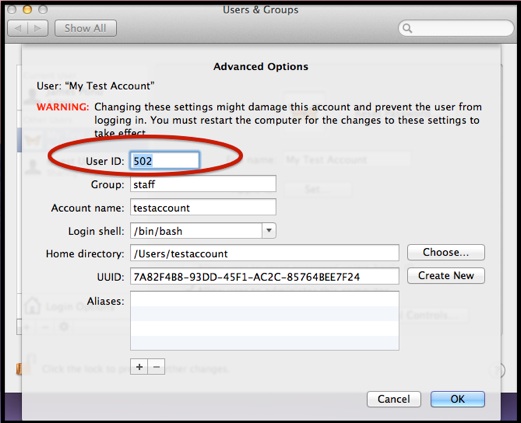
Unlock the padlock at the bottom of the window, then control-click (right-click) the account in the sidebar and select Advanced Options, and you'll see this window:
As noted, do not change anything on that window.
When you don't transfer your stuff via Setup Assistant, but instead create a user account, it's assigned #501. If you then use Migration Assistant to transfer the 501 account from another Mac, it cannot keep the 501 on the new Mac, so it's assigned the next available number, usually 502. The user account name, password, data, etc., will all be identical to the old Mac, but the UID will be different. All the permissions on the files in that account are changed to correspond to the new UID.
That means that the transferred user account is treated as a different account when trying to access files in other places, such as backups: it's #502, but the files belong to #501, so you'll see the "no entry" icon and/or messages about not having permission to the files/folders.
This won't happen if the files are on a disk or partition where ownership is not enabled. Even if it is, sometimes an Admin user can disable permissions, or change the permissions on the disk or partition, but that can't be done on Time Machine backups, and may be difficult to do, or cause other problems, on other disks.
If you've recently used Migration Assistant instead of Setup Assistant, and still have access to the old Mac or backups you transferred from, you may be able to fix it. Just how depends on the circumstances:
•If you're now on Lion (10.7.x) or later, see the green box below.
•If you're now on Leopard or Snow Leopard, see the tan box at the bottom of this page.
Fixing a UID mismatch after using Migration Assistant
If there were only one or two user accounts on the old Mac or backups, you can probably fix this without having to start over. The procedure is a bit tedious, and you must be careful to follow it exactly. See the white Fixing a UID mismatch without starting over box below.
But if you had three or more accounts, or some of the user accounts on the old Mac or backups had been deleted and recreated, that won't work. You'll need to start over as detailed below.
Starting over on Mountain Lion or Lion
The simplest, most reliable way is to erase your internal HD, reinstall OSX, and use Setup Assistant to transfer your apps, users, data, etc., per one of the first three options below. If none of those is practical, there's a fourth option:
1.If you're on Lion and have a Lion Install USB thumb drive:
a.Start from the USB thumb drive, select Disk Utility, and erase your internal HD.
b.Quit Disk Utility, select Install Mac OS X, and follow the on-screen instructions.
c.When your Mac restarts, use Setup Assistant to transfer your apps, data, etc., per Using Setup Assistant on Mountain Lion or Lion. If you're using Time Machine for backups, and want old backups to be treated as if they were made from the new or erased Mac, be sure to transfer Settings as well.
d.When your Mac restarts, you may need to install the "combo" OSX update to get back to the version of OSX you were running. See Installing the ''combo'' update and/or Reinstalling OSX.
2.If you made a copy of the Installer app and have another OSX volume:
a.Start from the other OSX volume, select Disk Utility, and erase your internal HD.
b.Install OSX from the copied installer.
c.When your Mac restarts, use Setup Assistant to transfer your apps, data, etc., per Using Setup Assistant on Mountain Lion or Lion. If you're using Time Machine for backups, and want old backups to be treated as if they were made from the new or erased Mac, be sure to transfer Settings as well.
d.When your Mac restarts, you may need to install the "combo" OSX update to get back to the version of OSX you were running. See Installing the ''combo'' update and/or Reinstalling OSX.
3.If you don't mind downloading a fresh copy of OSX via the internet:
a.Start from your Recovery HD, select Disk Utility, and erase your internal HD.
b.Quit Disk Utility, select Reinstall Mac OS X, and follow the on-screen instructions.
c.When your Mac restarts, use Setup Assistant to transfer your apps, data, etc., per Using Setup Assistant on Mountain Lion or Lion. If you're using Time Machine for backups, and want old backups to be treated as if they were made from the new or erased Mac, be sure to transfer Computer Settings as well (they're transferred by default).
d.When your Mac restarts, you may need to install the "combo" OSX update to get back to the version of OSX you were running. See Installing the ''combo'' update and/or Reinstalling OSX.
4.To transfer (or re-transfer) via Migration Assistant:
The trick is to delete and re-transfer the user accounts, in a way that Migration Assistant doesn't have to change account names or UIDs (per the pink box above).
a.Try to remember the number of user accounts on the old Mac. If in doubt, add 2.
b.Via System Preferences > Users & Groups, see how many are on the new one.
c.Unlock the padlock at the bottom of that window (enter your Admin password).
d.Add enough (temporary) user accounts, with any names, so you have at least one more than the old Mac, via the plus sign at the bottom of System Preferences > Users & Groups. Make the last one you add an Admin account (check the Allow user to administer this computer box), but do not use any of the names you want to transfer. Be sure to remember that name and password.
e.Log off all accounts; log on to that last, temporary, Admin account.
f.Via System Preferences > Users & Groups, delete all the other user accounts (the ones you migrated plus the temporaries, except the one you're using). Restart your Mac.
g.Use Migration Assistant to transfer (or re-transfer) the user accounts, per Using Migration Assistant on Mountain Lion or Lion. If you already transferred apps and/or Other files and folders on <disk name>, you can skip transferring those. If you're using Time Machine for backups, and want old backups to be treated as if they were made from the new or erased Mac, be sure to transfer Computer Settings as well (they're transferred by default).
h.Log off of the temporary Admin account; log on to the transferred account(s) and make sure everything's in the right places, and all permissions are ok.
i.You can delete the temporary Admin account, or keep it in case there's ever a problem with your usual Admin account.
Starting over on Snow Leopard or Leopard
The simplest, easiest way is to erase your internal HD, reinstall OSX, and use Setup Assistant when your Mac restarts to transfer your apps, users, data, etc.:
1.Erase your internal HD, per the yellow box in Format, Erase, or Reformat a Drive.
2.Quit Disk Utility, and install OSX.
3.When your Mac starts up again, use Setup Assistant to transfer your stuff, per Using Setup Assistant on Snow Leopard or Leopard. If you're on Snow Leopard and are using Time Machine for backups, and want old backups to be treated as if they were made from the new or erased Mac, be sure to transfer Computer Settings as well (they're transferred by default).
4.When your Mac restarts, you'll probably need to install the "combo" OSX update to get back to the version of OSX you were running. See Installing the ''combo'' update and/or Reinstalling OSX.
Fixing a UID mismatch without starting over
As explained in the pink box above, transferring via Migration Assistant changed the UID of your user account. To reset the wrong UID (502) to the proper UID (501), you need to "free up" the existing one. As noted in the green box above, this procedure will usually do that if you only had 1 or 2 accounts on the old Mac. If you had more, or had deleted and recreated some accounts, you'll need to re-transfer your stuff, via one of the workarounds (probably #4) above.
To avoid starting over, you'll need to make yet another, temporary, Admin account, use it to delete the account that transferred as 502 (but keep it's home folder); and delete the 501 account you created via Setup Assistant. Then you'll create a new 501 account and assign it to the transferred home folder.
Note: if you put any new data in either account, this procedure will delete it.
In the instructions and samples below:
•Created Account is the one you created at startup (UID 501).
•Transferred Account is the one you transferred from your backups (changed to 502) and has your data but does not have permission to the prior backups with UID 501. If you transferred two, do the original, Admin account, first.
1.Log on to the Created account and make
a new, temporary Admin account, via
System Preferences > Users & Groups.
Call it whatever you like; in the samples,
we used Temp Admin (it will be 503).
a.Unlock the padlock and enter your
current Admin password.
b.Click the plus sign at the bottom, change
the type from Standard to Administrator,
and enter a new name, password, etc.
2.Log off the Created Account and on to the
new Temp Admin account. Note: skip
entering an Apple ID when prompted.
3.Go to System Preferences > Users &
Groups, unlock the padlock, and enter the
password for the Temp Admin account.
4.Select the Transferred Account in the
sidebar and click the minus sign at the
bottom.
5.Select the Don't change the home folder
button, then Delete User.
6.Select the Created Account in the sidebar,
click the minus sign, but this time select
Delete the home folder.
7.Restart your Mac. Log on to the Temp Admin account again.
8.Via the Finder, go to the top level Users
folder on your Mac. If you don't know
how to do that, either select your
computer in the sidebar or press Shift
+Cmd+C. Your internal HD, usually
named "Macintosh HD", will be shown
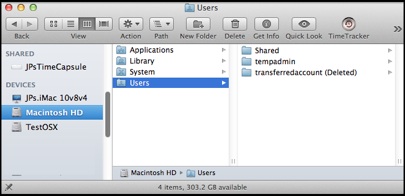
in the center portion with a gray disk icon.
Select it. Inside it is a Users folder, and
inside that are your home folders, something
like this with the Finder in Column View:
9.Note that the transferredaccount has "(Deleted)" appended to its name. Remove that, so it's just the original name. You'll have to enter the Temp Admin password.
10.Go to System Preferences > Users & Groups again.
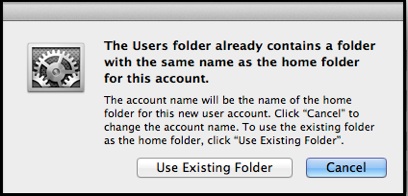
11.Create a new account exactly like the
transferred one you just deleted -- with the
identical name and password.
You'll get a prompt about there
already being a home folder with the same
name:
That's what you want. Click the Use
Existing Folder button.
12.When the new account is created, log on
to it. When asked, be sure to use the same
AppleID as on the original.
13.Make sure everything is there, just as it was, and that you have the proper permissions to your files, including backups.
14.Delete the Temp Admin account (or leave it in case you need it again).
(If you transferred two accounts, repeat steps 4, 5, and 7 through 13 for the second one.)