OSX Tips: Setting-up a new Mac from an old one, its backups, or a PC
Using Migration Assistant on Mountain Lion or Lion
OSX Tips: Setting-up a new Mac from an old one, its backups, or a PC
Using Migration Assistant on Mountain Lion or Lion
Migrating User Accounts

For each user you select, you can click the disclosure triangle and select or omit the contents of that user’s top-level folders (Desktop, Documents, Downloads, etc.).
Otherwise, you can’t "pick and choose" within any of those folders.
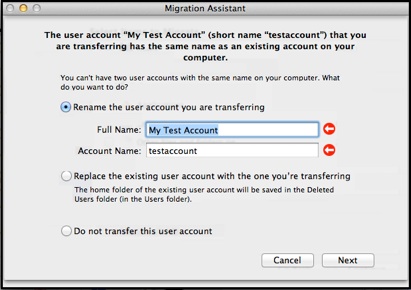
If you try to transfer an existing user account, you’ll get the message shown here.
You can rename the account you’re transferring; replace the existing account (unless you’re logged-in with it); or skip the account entirely.
Note that accounts transferred with Migration Assistant may not be recognized as the same ones as on your backups, or other drives. Thus even though you migrated an account, that same account may not have permission to restore other items from the backups of that account.
For each account selected, the default folders created by OSX (Desktop, Documents, etc.) are all transferred automatically, whether you select them or not. Only the folders that are checked will have their contents transferred.
The exception is the user’s Library folder, which isn’t listed. It, and all of its contents, will be transferred along with the user account automatically.
Select Items to Migrate:
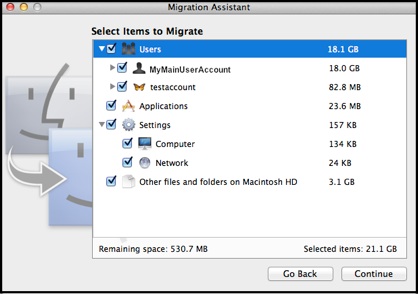
Next is the selection for what you want to transfer. You'll see four checkboxes, some with "disclosure triangles" (they may not all appear until the "Calculating..." is done) you can click to expand them:
•Users
•Applications
•Settings
•Other Files and Folders
(The Continue button may not be enabled until it completes "Calculating" all the sizes.)
These are mostly "all or nothing" selections.
In most cases, just leave everything selected, and click the Transfer button (as soon as it completes calculating all the sizes). Migration Assistant will then transfer everything selected.
Migrating Applications
This option will transfer applications only from the top-level Applications folder; not an Applications folder(s) in user home folder(s), or elsewhere. It will also transfer various support files in the top-level Library folder.
You must transfer either all apps or none; you can't select or omit them individually (see Transferring Applications for an explanation).
But Migration Assistant will only transfer apps that don't already exist in the top-level Applications folder on the destination Mac; thus the new Apple apps that came with your new Mac will not be replaced by old ones (and the size shown may be very small). But if the names are different, or they're in different places on the destination (such as sub-folders within Applications or elsewhere), you'll end up with both.
In some cases, there may be a few exceptions:
•Some 3rd-party apps may not work properly, or at all, if transferred from an older version of OSX. Check with the maker about compatibility.
•PPC apps transferred from a PPC or Snow Leopard Mac will not work on Lion. They'll be shown with a prohibited overlay (a white circle with a line through it).
•You may have to re-enter serial numbers/purchase codes for some 3rd-party applications.
•Some complex 3rd-party apps that were installed with special installers may need to be reinstalled from the original disc(s) to work properly. Adobe apps are often subject to this.
Migrating "Other files and folders on <disk name>"
This will transfer pretty much anything not covered above:
•Non-system files/folders at the top level of the disk, such as the (empty) Unix Desktop folder, the User Guides and Information alias, the Developer folder (if installed), etc.
•The Shared user folder
There is special handling for duplicates in this category: if the item already exists, the new one will have "(from old Mac)" appended to its name.

The migration will take a while, of course, depending on how much data is being transferred, and how. Network transfers will be slower than FireWire, etc.
While it's running, you'll see this window (don't put too much stock in the Time Remaining estimate).
Some of the messages will repeat alternately.
If you migrated from a different Mac, and want to use Time Machine to back up the new Mac to the old Mac's backups, when the first one starts you should get a prompt about using a different Mac's backups. See: Would you like to inherit the backup . . .? for details.
Migration Assistant is used primarily to transfer user account(s) and perhaps other things, from one Mac, its backups, or a PC, adding them to a Mac that's already set up.
Setup Assistant, however, is designed to transfer all or selected things from one Mac, its backups, or a PC, to set up a new Mac just like the old one.
If there's any doubt about which you need, see: Setting up a new Mac from an old one, its backups, or a PC.
If the old Mac has any user home folders on a separate disk or partition, and/or you want to set the new one up that way, see: Transferring Home Folders not on a Startup volume.
If the Mac you’re setting up is running 10.5.x or 10.6.x, see Using Migration Assistant with Snow Leopard or Leopard. It's a bit different from the Mountain Lion and Lion version covered here. (If you're not sure what version of OSX you're running, click here).
If the old Mac is on Tiger (10.4.x), you can transfer to Lion, but not via network; only via FireWire or a "clone" backup. You cannot transfer from Tiger to Mountain Lion at all.
If you have any user accounts on the new Mac with the same name as any you want from the old ones, there's a conflict: they can't both be on the same Mac.
If you don't need any of the new account's data, create a temporary Admin user account, with a name different from any on your backups, log on with it and delete the conflicting account. Then use Migration Assistant to transfer what you want and delete the temporary account. If you do need some data from the new account, copy it elsewhere temporarily, then delete the new account via System Preferences > Accounts.
Alternatively, you can migrate the account, but rename it via Migration Assistant, then copy things from the other account.
Note that you cannot "merge" or combine user accounts with Migration Assistant, but you may be able to do it manually. See Transferring Files from one User Account to another.
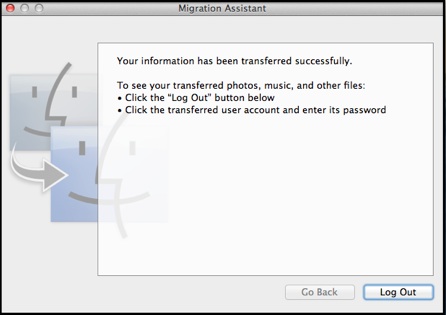
•On Mountain Lion, you'll see this window:
•On Lion, you won't see this window, so Log Out of the user account you used to do the transfer, and log on to the new one.
Migrating Settings
If you're already connected to a network, you won't have the Network option.
If the Computer settings are transferred, that includes system-wide settings, such as Time Zone, System Keychain, EnergySaver, Time Machine, and Sharing. Sharing includes the Computer Name. That's easily changed after your new Mac restarts, via System Preferences > Sharing.
If you're using Time Machine for backups, and want old backups to be treated as if they were made from the new or erased Mac, be sure to transfer Settings. When you do the first backup of the new or erased Mac to the old backups, you'll be asked if you want to "inherit" the old backups. See item #B5 for details.
Don't be alarmed by the length of this page: It includes many details that only a few users will need, in a few situations. The usual procedure is actually simple:
•Start the Migration Assistant app.
•Specify if you want to transfer directly from your old Mac, its backups, or a PC; and connect to it (see the blue box for details).
•Specify what you want to transfer (Apps, User Accounts, Settings, etc.).
•Wait while your Mac does all the work (copying your stuff).
•When it's done, you're in business!
See below for step by step instructions, including some unusual circumstances.
There's also some instructions in the Help Center on your Mac.
Before Starting:
•If you anticipate an issue with iTunes authorizations, see About iTunes Store authorization and deauthorization.
•If you use Time Machine, turn it OFF. Everything you migrate to your Mac is considered as changed, so Time Machine will back it all up. And if there's a problem with the transfer, you may have to delete some or all of the transferred items and run Migration Assistant again.
•Decide how you're going to transfer (that may not be as simple as it seems):
Three ways to transfer from a Mac or its backups:
Which is best for you depends on your hardware and circumstances.
•If both Macs have Firewire or Thunderbolt ports: connect directly via cable; disconnect from the Internet and WIFI.
This is usually fastest and most reliable.
FireWire: if one is FireWire 400 and the other is FireWire 800, you can get an inexpensive adapter, or a cable with a F/W 400 plug at one end and a F/W 800 plug at the other.
•If you have Time Machine or "clone" backups:
•on an external HD: connect it to the new Mac; disconnect from the Internet and WIFI.
It's usually simpler and faster to transfer from them, rather than directly from the old Mac (and, to transfer directly, you may have to install/upgrade software on the old Mac).
•Time Machine backups on a Time Capsule: use another option if possible. If not, connect to the TC via Ethernet cable if at all possible; disconnect from the Internet.
It's usually faster to transfer directly from the old Mac via FireWire or Thunderbolt as above, if possible.
•To transfer via network (Ethernet or wireless)
Ethernet is 2-3 times faster and much more reliable than WIFI.
They can each be connected to your network via Ethernet or WIFI (not recommended), or use a single Ethernet cable to connect them directly to each other. A direct connection is probably best, since you can't use either one for anything else.
Make sure OSX on the old Mac is the most recent version (via Software Update or the App Store), and that it has a Computer name in System Preferences > Sharing. Disable system sleep via System Preferences > Energy Saver on both Macs.
If it's Snow Leopard, be sure it has the Migration Assistant for Mac OS X Snow Leopard update.
If it's Leopard, be sure it has the Migration Assistant for Mac OS X Leopard update.
If it's Tiger or earlier, you cannot use your Network. Either use Firewire (above), or make a "clone" backup on an external HD and use From Another disk.
•To transfer from a Windows PC you must connect them via your network.
Download and install the Windows Migration Assistant on the PC.
On the Introduction window, select From a Mac, PC, or disk.
The following samples are from Mountain Lion; if you're migrating to Lion, the windows look a bit different, but work the same way.
Almost always, folks are transferring from an "old" Mac to a "new" one, so that's how they're referred to below.
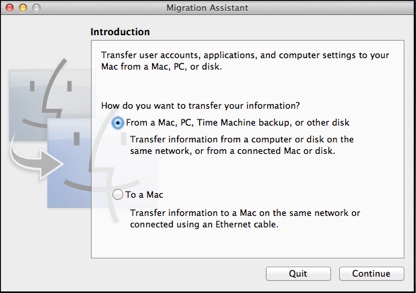
Go to your Applications/Utilities folder and start the Migration Assistant app.
When it starts, you'll see this introduction and options to specify whether this is the Mac you're transferring from or to.
Select From a Mac, PC, Time Machine Backup or other disk. You'll be prompted for your Admin password.
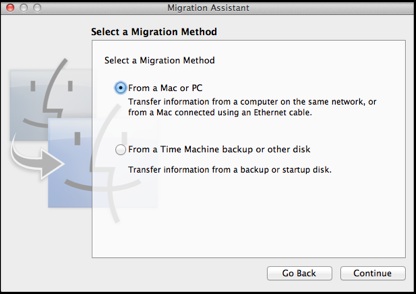
If you select From a Mac or PC, you'll see the Select Your System window below:
If you select From a Time Machine backup or other disk, you'll see the Select Your System window in the tan box below:
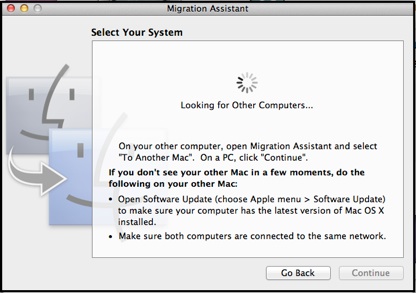
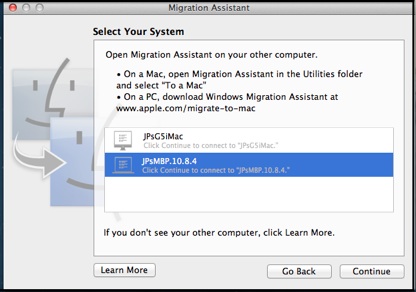
Depending on what's seen on your network, you'll see one of these similar windows:
Follow the instructions to start Migration Assistant on the old Mac.
They should be self-explanatory; a Passcode will appear on each Mac.
They should be fairly clear, but if you want the gory details, see Connecting via your Network.

Select the disk you want here.
(If it's not shown, connect the drive, or click Select Network if it's on your network).
If there are both local and network volumes, what's shown for them may be a bit hard to decipher:
•Internal disks have gray icons.
•External disks have green or yellow icons.
•Network disks have blue icons.
Internal or External Time Machine backups show the name of the volume and computer that was backed-up, not the one they're on.
Network Time Machine backups show the name of the volume and network server they’re on, not the Mac that was backed-up. When you select it, you'll be prompted for the password.
Clones show the name of the volume they're on, and the name of the Mac that was backed-up.
Select the one you want (even if there's only one) then click the Continue button.
Note: if no disks appear after a long time, but the Continue button is enabled, click the button anyway. Check the user names, etc, on the next screen carefully to be sure you got the right one.
If your Time Machine backups are on a network

(Note: if there are multiple network disks/partitions, the number of backup sets may appear under the wrong one. If so select that wrong one.)

Select the one you want (even if there's only one) and click Continue.
Once connected, you'll see the Select Items to Migrate window below.