Time Machine - Troubleshooting
E10. Permissions problems restoring folder contents
Time Machine - Troubleshooting
E10. Permissions problems restoring folder contents
In a dire emergency only, if you've lost the originals and cannot restore from your backups because of permissions problems, there's a "last resort." It will remove some of the protections on your backups that normally prevent you from accidentally changing things in your backups, as that can easily corrupt them. It will also allow anyone with physical access to your backups to restore anything from them. If you take this step, you should start a new set of backups to a different disk or partition, as the existing ones will not be safe and secure.
First, log on to an Admin user account and turn Time Machine OFF.
Second, connect to your backups:
If they were made to an internal or directly-connected external HD, open that disk or partition with the Finder.
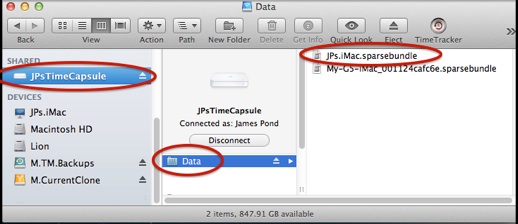
If the server isn't shown, from a Finder menubar, select Preferences > Sidebar and make sure the Connected Servers box is checked.
Double-click the Data folder (it may have another name) to show the sparse bundle(s).
Keep the Finder window open for the next step.
Third, start the Terminal app (in your Applications/Utilities folder.)
Be extremely careful when using Terminal. It is a direct command-line interface into UNIX, the underpinning of OSX. Unlike the Finder, there are few protections against making a mistake, which can cause untold damage.
In Terminal, the prompt looks like this: <ComputerName>:~ <your name>$
(where <your name> is your short user name). It's followed by a non-blinking block cursor. When you first start it, you'll see something like this:

Copy the following into the Terminal window after the prompt:
sudo chmod -RN and leave a space.
Then drag your backups to the Terminal window (the Backups.backupdb folder if they're on an internal or external HD, or the sparsebundle if they were made over a network). That will create the "path" to the backups (and insert a backslash "\" in front of spaces or other punctuation).
The result should look something like this:

Press Return. You'll be prompted for your Admin password. It won't be displayed as you type it. Press Return again.
The cursor will move to the next line, but otherwise there will likely be no response on the Terminal window -- and there's no progress bar or other indication (but it's possible there might be some, or very many, "operation not permitted" error messages).
The only way you'll know it's done is when you get a new prompt, like the first sample above.
This will take a very long time -- the more backups you have, the longer. If they're on network, especially if you're connected via WIFI, even longer. If you have a just a few backups on a fast external HD, it might be done in 20 minutes; a large set, especially on a wireless network could take several hours.
Most of these problems are caused by changes in the permissions in your Home folder on your Mac, so they're different from the backups. This seems to be more common if you've upgraded and/or migrated from a previous version of OSX.
In the Time Machine browser (the "Star Wars" display), select the item in question, then control-click (right-click) it or select the "gear" icon in the Finder window's toolbar. Select the Get Info option.
If that's not what you find, try the procedure in the yellow box below.
Fixing the permissions on your backups
If you have the Fetching... or _unknown problem above, you can't fix it via the Time Machine browser (the "Star Wars" display). You may be able to do so via the Finder:
1.Note the exact date & time of the backup in question, including whether it's am or pm (you may have to convert a pm time to the 24-hour version in the next step).
2.Locate the backup in question via the Finder. See section #A11 if you're not sure how to do that.
3.Navigate in the backup to the file or folder you're trying to restore.
4.Bring up the Get Info window, just as you did above.
5.Click the padlock to unlock it and enter your Admin password.
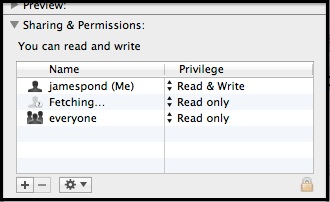
6.Very carefully, select the line with the Fetching... or _unknown entry, then click the minus sign at the bottom to remove it. Do not change anything else!
7.If the item is a folder or "package," click the "gear" icon at the bottom and select Apply to enclosed items. If there are a lot of included files and/or folders, that may take a few moments.
8.Close the Finder window.
9.Go back into Time Machine and try the Restore again.
10.If that works, check the permissions on the original file/folder on your Mac. If it also shows the Fetching... or _unknown problem, fix that as well. That should prevent problems restoring from backups done after making this change (but probably not earlier ones).
11.If the above doesn't work, try the procedure in the yellow box below.
Restoring to a disk image (or disk partition)
This technique restores the item(s) to a disk image or partition that doesn't enforce permissions. The first part shows how to create a disk image for this use.
If you happen to have a partition on an internal or external disk that you can use, that's a bit easier. Make sure it's mounted and appears in your Finder sidebar. Be sure the partition ignores ownership. To check, Get Info on it as above, and see if the Ignore ownership ... box at the very bottom is checked. If it isn't, unlock the window as above and click the box to check it. Then see the green box below, and use the partition instead of the disk image.
If the folder might be over 100 MB, control-click (right-click) it in your backups and select Get Info. All you need to know is how big a disk image you need, not the exact size.
Open the Disk Utility app, in your Applications/Utilities folder. Click the New Image icon in the toolbar, or select File > New > Blank Disk Image from the menubar. You'll see this window:
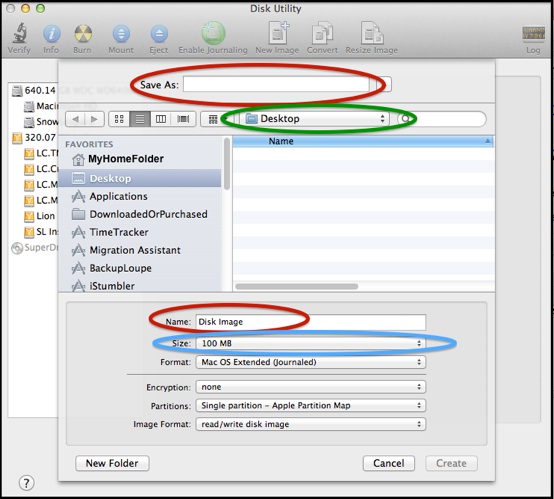
It's probably best to create it on your Desktop; if that's not what's shown (green circle), press Cmd-D.
If you need more than 100 MB, click the Size bar (blue circle). You'll get a small menu with some standard sizes, and Custom at the bottom. Don't make the disk image a great deal larger than you need; the larger it is, the longer it will take to create.
Press Create. There will be a small window with a progress bar; it should only take a few moments, unless the size is in the multi-GB range.
Now, go back to the Time Machine browser (the "Star Wars" display), select the folder you want to restore, control-click (right-click) it, and select the Restore <item name> to .. option.
You'll get a Choose Folder prompt for the destination. Select your disk image, and Time Machine should restore your folder and contents to it.
Double-click the disk image in your Finder Sidebar to open it.
Finally (whew!), you should now be able to drag the restored folder from the disk image to the place you want it. That's a copy, so may take a few moments.
Once you're sure everything is in the right place, eject the disk image by clicking the icon next to it in your Finder sidebar, then delete it from your desktop.
If neither of the above works, and/or you're comfortable with UNIX and Terminal, you might want to try one of these options:
•On Lion or later, use the restore verb of the tmutil command.
•For backups on an internal or directly-connected external HD, disable permissions checking via: sudo vsdbutil -d <path to backup volume>.
When done, re-enable permissions checking by replacing the -d option with -a.