Time Machine - Troubleshooting
A10. Deleting an "inProgress" package
Time Machine - Troubleshooting
A10. Deleting an "inProgress" package
When a Time Machine backup fails or is cancelled, it leaves a partial backup on the Time Machine drive. You won't see it via the Time Machine browser (the "Star Wars" display), or when doing a full system restore or using either Setup Assistant or Migration Assistant.
Ordinarily, on the next backup, Time Machine will use the remains for the new backup, so it doesn't have to copy those files again. So it's usually not a good idea to delete it.
But, on rare occasions, such as after backup failures where Time Machine was trying to back up something very large that shouldn't have been backed-up, it's advisable to delete the "leftover" partial backup from the Time Machine drive.
The partial backup is in a "package" (a folder that's treated as a single file for most purposes).
The procedure is a bit different depending on where your backups are:
•An external HD connected directly to your Mac (or an internal HD).
1.Go to the Time Machine Preferences window and turn Time Machine OFF.
2.Via the Finder, open the HD containing your backups.
3.See the green box below.
•A Time Capsule or 3rd-party NAS ("Network Attached Storage" or Network Drive)
•An external HD connected to a Time Capsule, other Mac, or Airport Extreme
1.Go to the Time Machine Preferences window and turn Time Machine OFF.
2.Eject the drive Via the Finder, and connect it directly to your Mac
3.Via the Finder, open the HD containing your backups.
4.See the green box below:
1.Go to the Time Machine Preferences window and turn Time Machine OFF.
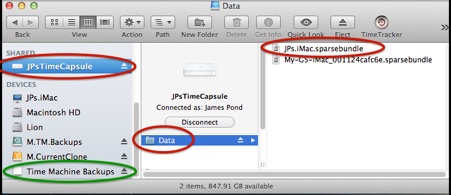
2.Connect to the server by clicking it in a Finder sidebar (the sample has the Finder in Column View).
3.Double-click it to open the disk/partition. That should show the sparse bundle your backups are in. It's named for your Mac, and sometimes doesn't show ".sparsebundle" as part of the name.
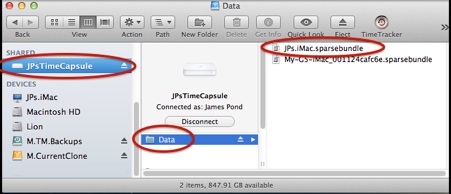
4.Double-click the sparse bundle to mount the disk image inside it (usually named Time Machine Backups, sometimes Backup of <computer name>). After a moment or two, the disk image (circled in green) should appear in the sidebar.
5.Double-click the disk image to open it.
6.See the green box below.
At the top level of the drive (or disk image on backups made over a network) is a single Backups.backupdb folder.
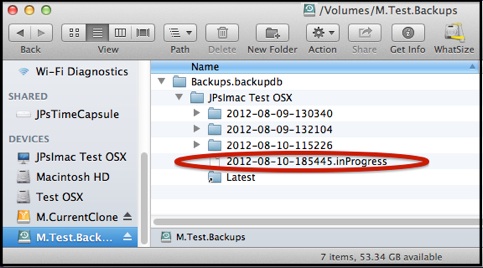
Inside that is a series of date-stamped backup folders, plus a Latest alias, plus an ".inProgress" package (looks like a file, but is actually a special type of folder) containing the remains of one or more cancelled or failed backups.
Move the ".inProgress" package to the trash. Hold the Alt/Option key while emptying it. That may take a very long time. If that fails, use the procedure in item #E6.