How Time Machine Works its Magic
Inclusion and Exclusion handling and the Preferences file
How Time Machine Works its Magic
Inclusion and Exclusion handling and the Preferences file
There are several types of inclusions & exclusions, used for various purposes, handled in various ways. Some are shown on the Preferences Window > Options, some are in the Time Machine preferences file at /Library/Preferences/com.apple.TimeMachine.plist (sample contents below). Note that there are some variations by OSX version, including how specific files are excluded.
Exclusions Shown on the Preferences Window See Time Machine FAQ #10.
•User exclusions are set via the Prefs window > Options; files & folders are in SkipPaths in the plist; internal disks/partitions in ExcludedVolumeUUIDs in the plist.
If a user selects /System, then the Exclude All System Files option in the prompt that triggers, SkipSystemFiles is also set in the plist. That causes the items in /System/Library/CoreServices/backupd.bundle/Contents/Resources/System.plist to be excluded, and System Files and Applications is shown on the Preferences window instead of the System folder.
•Excluded Internal Volumes (shown in black) are internal volumes excluded by the user and shown in the Excluded Volumes section of the plist.
•Excluded External Volumes (shown in black) are placed there automatically unless removed by the user, and do not appear in the plist.
•Automatic Volume Exclusions (shown in gray) are internal or external Time Machine backup drives selected as destinations, and non-HFS drives (which Time Machine cannot back up). They cannot be removed and do not appear in the plist.
Exclusions Not Shown on the Preferences Window
•Standard exclusions apply to all Macs, with some variations by OSX version. They're in /System/Library/CoreServices/backupd.bundle/Contents/Resources/StdExclusions.plist. These are things like system work files, most caches and logs, and trash. The main ones are noted in the tan box of Time Machine FAQ #11. Note that those exclusions are not deducted from the Estimated size of full backup on the Preferences window > Options.
•Fixed Path Exclusions are set by the CSBackupSetItemExcluded API or sudo tmutil with the -p option, whether the item exists or not. They're in the ExcludeByPath section of the plist. These are also kept in a system cache, so if the plist is deleted, the backupd process will restore them as defaults. Also see the Note below.
•Sticky exclusions are set in an item's extended attributes, via the CSBackupSetItemExcluded API, xattr, or tmutil without the -p option. The item must exist to set the exclusion. These follow the item if it's moved or renamed, and are not in the plist, but can be displayed per the yellow box in Time Machine FAQ #11. See the Note below.
•Backed-upVolumes internal and external, may be in the IncludedVolumeIDs in the plist. See Note.
•Required folders at the top level of the OSX drive, are in the IncludeByPath section of the plist, unless specifically excluded by the user. This does not appear unless necessary.
Note: Fixed Path and Sticky exclusions are used by some extra Apple and 3rd-party apps, to exclude things like cache files they create and manage, that may change frequently but shouldn't be backed-up hourly.
In addition, sometimes there's an IncludeByPath section, usually containing the top-level folders (Applications, Library, System, and some hidden system folders). That section may be used only when the ExcludeByPath section also appears.
Sample plists:
The Time Machine plist is a binary file, so can't be deciphered easily with a text editor app; a Plist Editor app such as the paid PrefEdit app will work.
Or, if you're comfortable with Terminal:
•Copy the file to your Desktop
•Convert it to XML via Terminal: plutil -convert xml1 ~/Desktop/com.apple.TimeMachine.plist
•Open it with a text editor that recognizes XML. Some will display the XML, some will use the plist format in the samples below.
Note that there are some variations by OSX version; these are from Mountain Lion.
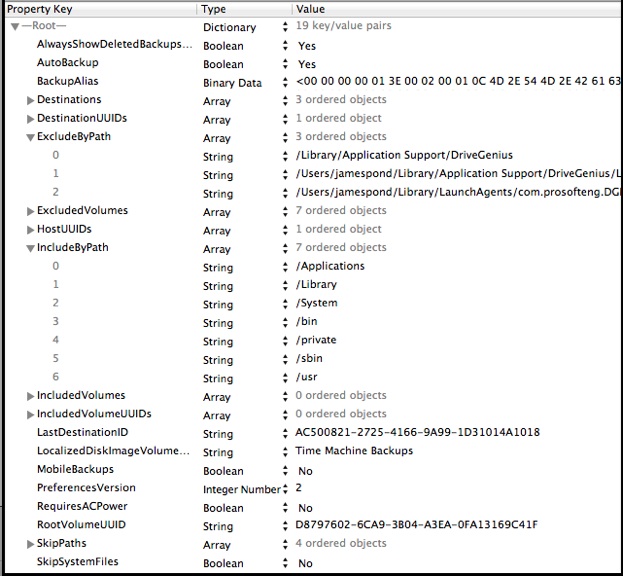
Sample 1: Default plist after setting up Time Machine, but before any backups.
Automatic backups off; two destinations, one local (# 0), one network (# 1); 5 internal HD partitions excluded; one external partition included; 4 items excluded by user via Time Machine Preferences > Options.
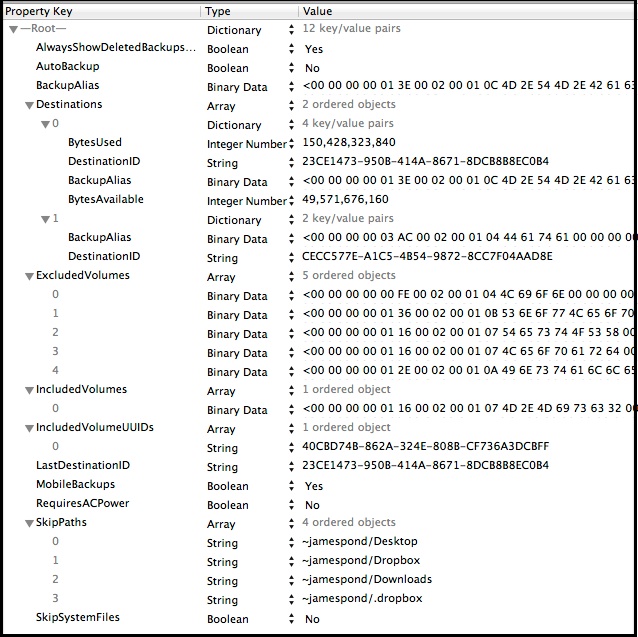
Sample 2: Same plist after backups to both destinations.
Results of completed backups added by backupd process.
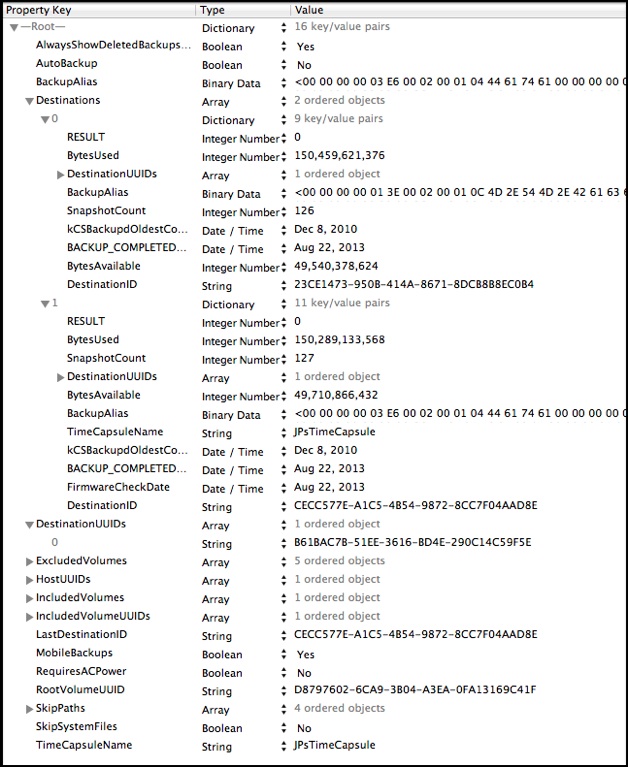
Sample 3: Plist with "Fixed Path" exclusions