OSX Tips: Using Disk Utility
4. Deleting and Resizing Partitions
OSX Tips: Using Disk Utility
4. Deleting and Resizing Partitions
You can usually delete a partition, leaving an empty space, without affecting others.
Effective with Lion (10.7.x), if a disk contains an encrypted partition, no partitions on that disk can be added, resized, or deleted by Disk Utility. If you're familiar with UNIX and Terminal, you may be able to do this with the diskutil command. OSX Versions will show what version you're on.
You cannot resize a partition that isn't journalled. To turn it on, select the partition and click the Enable Journaling icon in the toolbar, or select File > Enable Journaling from the menubar.
If you're running BootCamp, do not use Disk Utility to modify partitions on your startup drive. Use Boot Camp Utility instead.
In some circumstances, you may be able to change the size of a partition. There are some restrictions:
•You can reduce the size of a partition, if there’s no data in the area being eliminated. You may see different values for Used and Available space in different places. Usually, they will be the totals, regardless of where the data is physically located on the partition. But on the Partition tab, Used includes all the empty space in the area where there’s data, so it’s the smallest you can make the partition.
•You can expand a partition, but only by moving the "bottom" of it down in the diagram, into empty space. You cannot move the "top" of a partition.
•You can expand or shrink the partition you're running from, but you can't delete it.
So to expand one partition, you’ll normally have to delete the one below it in the diagram.
Start the Disk Utility app (in your Applications/Utilities folder). Select the line for the drive in question (the top one, with the make and size), and click the Partition tab.
If your disk doesn't appear in the sidebar, see If a disk doesn't appear in the sidebar.

The light blue shading represents the total amount used in each partition (but doesn’t indicate what portions are occupied).
To delete a partition, simply click it in the diagram.
It will be outlined in blue; click the minus sign at the bottom.
Then click Apply.
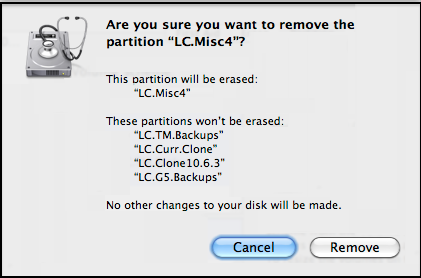
You’ll then see a confirmation prompt. Read it carefully, then click Remove.

The result, showing a "hole:"
And the partition has disappeared from the sidebar.

Or if you don’t want to take up all the space, put it where you want it or enter the desired size in the box at the right.
To reduce a partition, drag the corner upwards or enter a smaller amount in the size box.
Then click Apply.
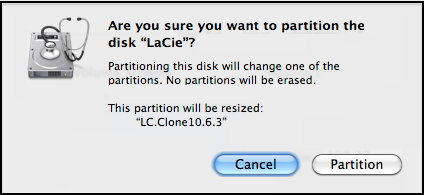
You’ll then see a confirmation prompt. Read it carefully, then click Partition.
The diagram will change, but before the actual resizing starts, Disk Utility will do a Verify Disk on the partition being resized. If you're resizing a partition on your startup disk, your Mac may respond very slowly while that's in progress. If a problem is found, you'll get a message to the effect that the verify failed, and the disk won't be partitioned.
If it fails, run Repair Disk (not permissions) on it, per item #6, then try again.